Introduction
Welcome back to another article about Azure Local, our seventh in the series! (It’s starting to shape up quite nicely, isn’t it? 😊). This time, we’ll dive into a topic I’ve discussed with several colleagues and one that has sparked a fair share of questions: Lifecycle Management. A question that often pops up is whether this process belongs under the umbrella of Day 2 Operations 🤔.
In my opinion (and hey, I could be wrong!), Lifecycle Management deserves its own distinct category within Day 2 Operations. When planning earlier articles, I avoided diving too deep into this area to keep things concise. However, I felt it warranted a dedicated article to give it the attention it truly deserves.
My goal with this post is to walk you through these processes in a clear and straightforward way, helping to demystify some of the perceived complexities around Azure Local Lifecycle Management.
Let’s get started!
Updates
The update process in Azure Local (starting with version 23H2) is straightforward and easy to manage from an administrative perspective. In this section, I’ll walk you through how this process works, its phases, and the key considerations to keep in mind before applying updates.
Spoiler alert: The information I’m sharing is a mix of official documentation (from Microsoft and some OEMs) and my personal experience since the product launched in February 2024. For the sake of brevity, I won’t dive into specific scenarios like SDN or updates for Stretch Clusters, and yes, while Stretch Clusters aren’t available in this version, there’s a Rack-Aware option, which I also won’t cover here.
Azure Local Updates
I recently updated my Azure Local cluster, and I want to share my experience based on the article About updates for Azure Local 23H2. Here’s everything you need to know to keep your system up to date.
Keeping the Cluster Updated
Let’s face it, keeping your system updated is critical, especially with the new Azure Local 23H2 update process. This version introduces the Lifecycle Manager (orchestrator), which simplifies how updates are deployed and managed for the OS, agents, services, and even drivers and firmware.
If you’re still running Azure Stack HCI 22H2, be aware that support ends in May 2025. I recommend making the move to 23H2 sooner rather than later to ensure your system remains secure and supported.
Why the New Update System Is Better
Here’s what stood out to me during the update process:
- Simplified management: The orchestrator consolidates all updates, from the OS to hardware-specific drivers, into a single workflow.
- Peace of mind: Automatic health checks run before and during updates, minimizing downtime and avoiding disruptions.
- Resilience: Any issues during updates are retried and resolved automatically.
- Consistency: Whether you manage updates locally or through the Azure portal, the experience is intuitive and efficient.
The system is designed to make updates easier and save you time. It’s been a significant improvement from previous versions.
What’s Included in the Updates?
When I updated my cluster, these were the main components:
- Azure Stack HCI OS: Security patches and reliability fixes keep the system stable and productive.
- Agents and Services: The orchestrator handles updates for core services, including the Azure Connected Machine Agent and Arc Resource Bridge.
- Drivers and Firmware: If supported by your hardware vendor, these updates are integrated and automatically installed during the same maintenance window.
This all-in-one approach means less manual effort and fewer maintenance windows. However, keep in mind that customer workloads are not part of this update process.
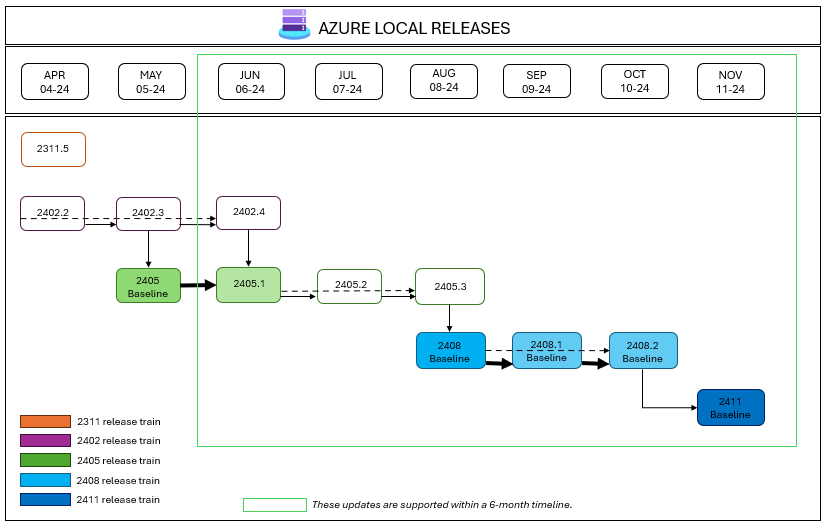
Update Cadence You Should Know
Updates follow a clear schedule:
- Monthly updates: Regular patches for performance and security.
- Baseline updates: Released quarterly, these include new features and improvements.
- Hotfixes: Emergency fixes for critical issues.
- Solution Builder Extensions: Vendor-specific updates like drivers and firmware.
To stay supported, make sure your system is updated within six months of the latest baseline. Falling behind could leave your system out of compliance.
How I Applied the Updates
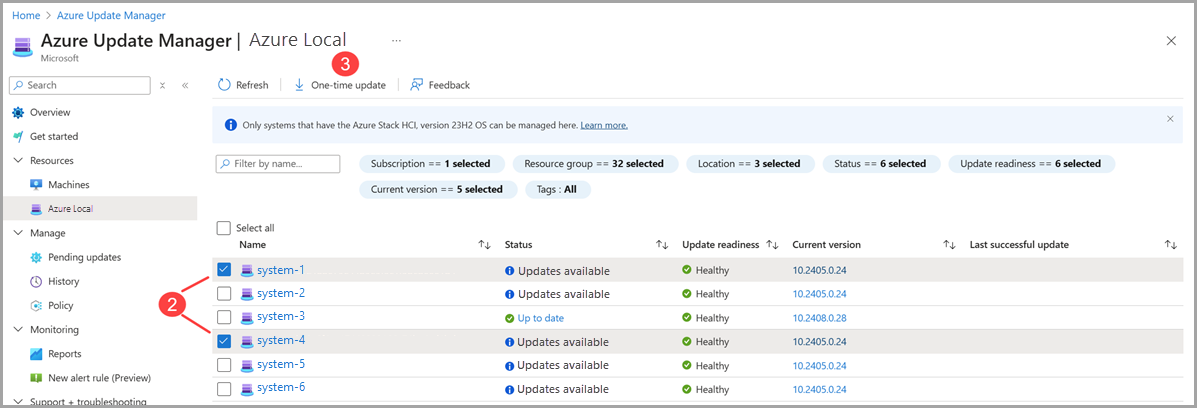
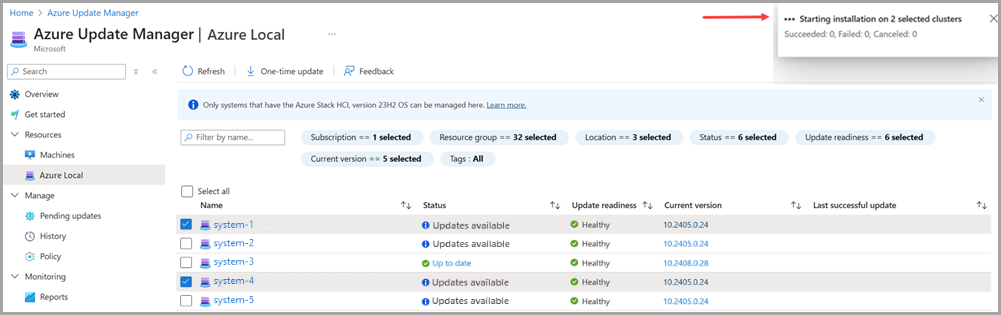
Personally, I used the Azure portal to manage the updates. The Azure Update Manager made the process straightforward, with clear steps and a simple interface.
That said, it’s also possible to apply updates using PowerShell, which works well for both single-node and multi-node systems. If you prefer a command-line approach, PowerShell is an excellent alternative. Just avoid unsupported tools like Windows Admin Center, SConfig, or third-party tools, as they will cause issues and might even impact billing (at least as far as support tickets are concerned 😅).
Update Phases
Updating Azure Local to version 23H2 introduces a phased process designed to ensure smooth updates with minimal disruption. Below, I’ll guide you through the phases of the update process based on Microsoft’s documentation and my own experience.
About Update Phases
The update process in Azure Local focuses on keeping the system available while applying updates to operating systems, agents, services and solution extensions. Updates are automated and designed to handle workloads dynamically to maintain uptime. They fall into two categories:
- Updates not requiring reboots: Applied without restarting the system.
- Updates requiring reboots: Use Cluster-Aware Updating to restart machines one by one, ensuring availability.
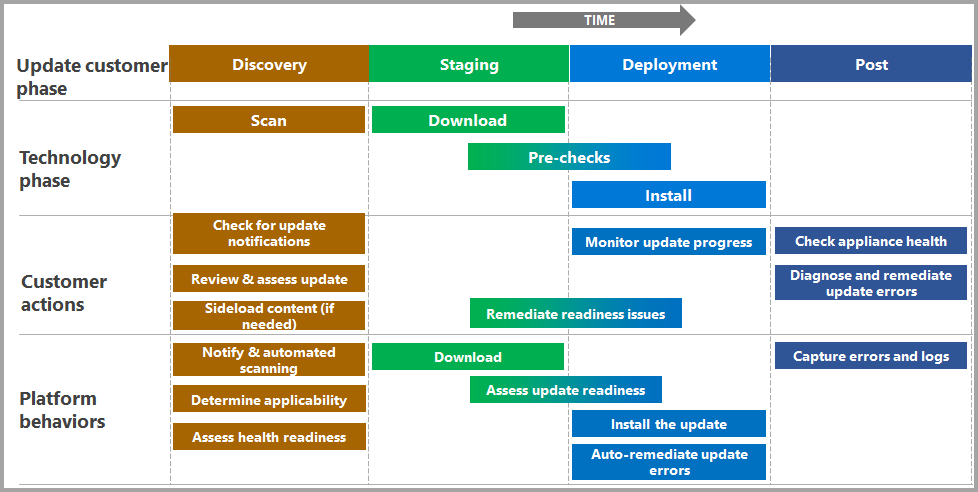
Updates proceed in the following phases: Discovery and acquisition, Readiness checks and staging, and Installation progress and monitoring. Each phase involves specific steps that may or may not require manual input.
Phase 1: Discovery and Acquisition
Before an update is released, Microsoft validates it as a package of components. Once validated, release notes are published detailing:
- Update contents
- Changes introduced
- Known issues
- Links to external downloads (e.g., drivers or firmware)
Your Azure Local update platform will automatically detect new updates, but you’ll need to visit the Updates page in your management interface to view details. Depending on your hardware and the scope of the update bundle, additional content (e.g., OEM-specific drivers) might need to be downloaded (SBE Updates). If extra steps are required, the system will prompt you.
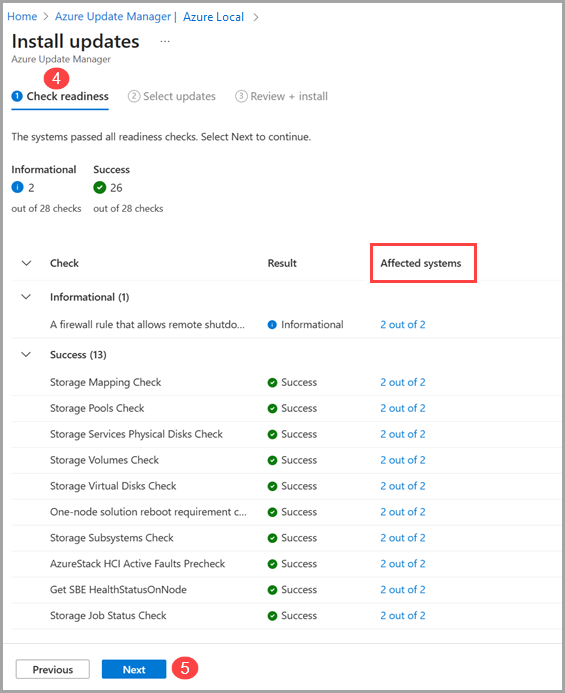
Phase 2: Readiness Checks and Staging
Before installing an update, Azure Local performs a series of prechecks to ensure the system is safe to update. These checks cover:
- Storage systems
- Failover cluster requirements
- Remote management
- Solution extensions
These checks identify potential issues that could block or delay updates:
- Blocking conditions: Must be resolved before proceeding with the update.
- Warnings: Could lead to longer update times or workload impact. You may need to acknowledge these warnings before moving forward.
New checks may be added with each update, so it’s critical to run readiness checks after downloading the update package. Note that in this release, updates cannot be scheduled, they must be installed immediately.
Phase 3: Installation Progress and Monitoring
During installation, you can monitor progress via your chosen interface. The update workflow is displayed hierarchically, showing each step as it occurs. Steps may dynamically adjust depending on the update flow.
The update solution includes retry and remediation logic, automatically addressing issues where possible. However, manual intervention may sometimes be required. If you encounter a blocking issue, you’ll need to fix it and rerun the readiness checks before continuing.
Updates are designed to be as seamless as possible, but the system will prompt you if any critical action is needed to keep the process moving forward.
By following these phases, Azure Local ensures that updates are applied smoothly and reliably, minimizing downtime and keeping your infrastructure up to date.
SBE Updates
The Solution Builder Extension (SBE) is a critical part of managing and maintaining Azure Local, especially when it comes to ensuring your hardware is up to date. Based on Microsoft’s documentation and insights shared by Jaromir in his Lifecycle Manager Deep Dive, let’s explore what SBE updates bring to the table and how they improve the lifecycle management process.
What Are SBE Updates?
The SBE, referred to as Solution Builder Extension in Azure CLI, allows you to apply updates from your hardware vendor to your Azure Local system. These updates are an integral part of Azure Local 23H2, where SBE updates are packaged into a unified solution update. They include:
- Drivers and firmware updates: Released by hardware vendors to enhance hardware compatibility and performance.
- Hardware monitoring enhancements: Tools and diagnostics to maintain hardware health.
- Advanced pre-update checks: Custom validation logic integrated into Azure Local’s health checks.
With these features, SBE enables streamlined updates and introduces vendor-specific enhancements to your Azure Local system.
How SBE Updates Work
Starting with Azure Local 23H2, SBE updates are integrated directly into the Lifecycle Manager. They can be applied as part of a combined solution update or as standalone updates. When an SBE update matching your system’s hardware is available, it appears in the Azure portal or can be retrieved using PowerShell.
SBE updates also include advanced capabilities, such as:
- Health service integration: Extending pre-update health checks to evaluate hardware issues (e.g., power supply failures, SSD wear, or software issues).
- Download management: Allowing Azure Local to download and apply future updates automatically, reducing manual effort.
- Customized updates: Vendor-specific steps before and after the solution update process, ensuring hardware compatibility.
Key Considerations for SBE Updates
- Integration with Lifecycle Manager: Azure Local’s orchestrator ensures that SBE updates are part of the same workflow as OS and service updates.
- Manual intervention for older systems: For hardware not supporting the SBE update experience, updates may need to be applied separately using tools like Windows Admin Center.
- Health checks before updates: SBE integrates into Azure Local’s readiness checks, ensuring any hardware-related issues are addressed before updates proceed.
- Supported hardware: Newer integrated systems and Premier Solution hardware fully support SBE updates. For older hardware, updates might require manual handling.
Additional Insights from Jaromir’s Deep Dive
Jaromir’s Lifecycle Manager Deep Dive provides an excellent breakdown of the SBE update process. While the implementation details are not included here, the guide discusses:
- The structure and packaging of SBE updates.
- How to manage sideloading for environments with restricted connectivity.
- Troubleshooting issues like failed updates or health check prerequisites.
For further guidance, I highly recommend checking out Jaromir’s work if you need more in-depth insights into handling SBE updates effectively.
Upgrade
The Upgrade process in Azure Local encompasses several tasks that go beyond standard updates. While some actions, like upgrading extensions might feel routine, others, such as scaling up nodes or transitioning from Azure Stack HCI 22H2 to Azure Local 23H2, require more deliberate effort and planning.
Many of these processes aren’t strictly classified as updates but play a critical role in maintaining, scaling, and enhancing the functionality of your Azure Local infrastructure. In this section, I’ll introduce each upgrade process and set the stage for a deeper dive into the specifics in subsequent sections.
Here’s what we’ll cover:
- Extensions: Upgrades for both automatically installed extensions during cluster deployment and manually added ones.
- Add a Node: Expanding cluster capacity by adding new nodes to increase CPU and RAM resources.
- Add Storage: Scaling storage capacity by adding disks to nodes and expanding the storage pool.
- Repair a Node & Extensions: Replacing defective nodes and restoring critical extensions for Azure Local management.
- Secret Rotation: Updating administrative passwords and the secret for Azure Arc Resource Bridge to maintain security.
- Upgrade from Azure Stack HCI 22H2: A detailed and challenging process involving the transition to Azure Local 23H2 with careful dependency and compatibility analysis.
Each of these upgrade steps serves a unique purpose in optimizing and evolving your Azure Local environment. In the following sections, we’ll explore them one by one, providing detailed instructions and insights for each process.
Extensions
Managing extensions in Azure Local is a crucial part of keeping your cluster up to date and ensuring it runs optimally. Azure Local supports both Azure-managed extensions and customer-managed extensions, and upgrading them is a seamless process thanks to Azure Arc integration. Below, I’ll break down how the update process works based on Azure’s documentation.
How Extensions Are Upgraded
Extensions in Azure Local can be updated automatically or manually, depending on the type of extension and its configuration. By default, automatic upgrades are enabled for most extensions, provided the extension publisher supports it. Let’s explore the two main types of extensions and their upgrade methods:
- Azure-Managed Extensions:
- These are installed automatically when your Azure Local cluster is registered with Azure. They are essential for the platform’s functionality and include extensions like telemetry, diagnostics, and the Remote Support Arc extension.
- Upgrade Process:
- Azure-managed extensions are typically updated as part of the solution update process.
- If these extensions were missing when the cluster was registered, Azure will display a banner on the Extensions page guiding you to install them.
- Customer-Managed Extensions:
- These extensions, such as Azure Monitoring Agent, Azure Site Recovery, and Windows Admin Center, can be manually installed and managed.
- Upgrade Process:
- Automatic upgrades are enabled by default if supported by the extension publisher.
- Manual upgrades are performed via the Azure portal, allowing you to select the desired version and apply it across the cluster.
Automatic Extension Upgrades
Automatic extension upgrades simplify maintenance by ensuring extensions are updated without manual intervention. Here’s how the process works:
- When a new version of an extension is published, Azure deploys the update in batches across regions and subscriptions.
- If the extension fails to upgrade, Azure retries the process or rolls back to the previous version automatically.
- Extensions with multiple upgrades can be processed in batches, but each upgrade is applied individually to ensure consistency.
Manual Extension Upgrades
In scenarios where automatic upgrades are disabled or a specific version needs to be installed, you can perform a manual upgrade:
- Navigate to the Extensions page in the Azure portal.
- Select the extension you want to upgrade and choose Settings.
- Choose the desired version and click Save.
This approach is useful for:
- Addressing version mismatches across nodes.
- Testing new extension versions before enabling them across the cluster.
Key Considerations
- Cluster-Wide Operations: Upgrading an extension is a cluster-aware operation. Once updated, the extension is automatically applied to all nodes, including new nodes added to the system.
- Rollback and Retry: Azure’s platform ensures failed upgrades are retried or rolled back to avoid disruptions.
- Manual Intervention: If extensions repeatedly fail to upgrade, you can disable automatic upgrades to troubleshoot the issue before re-enabling them.
Extensions are an integral part of Azure Local’s functionality, and their upgrade process, whether automatic or manual, ensures your cluster remains aligned with the latest features and updates.
Add a Node
Adding a node to your Azure Local cluster is one of the most straightforward ways to scale up resources like compute and storage. While I don’t currently have the infrastructure to reproduce this process step by step, I’ve successfully carried it out in the past, transitioning from a single-node to a two-node system without any issues. Based on my experience and this article from Microsoft, let me guide you through the process.
Overview
Azure Local supports scaling from 1 to 16 nodes, allowing you to increase compute and storage dynamically. Adding a node involves preparing the new hardware, validating its compatibility, and integrating it into the existing system. The orchestrator, also known as the Lifecycle Manager, ensures that everything from network configurations to storage resiliency adjusts seamlessly during the process.
Here are some important highlights:
- Node Requirements: The new node must closely match the existing cluster in terms of CPU type, memory, number of drives, and drive specifications.
- Scaling Limitations: In this release, nodes must be added one at a time. Multiple nodes can be added sequentially, but storage rebalancing is triggered only once at the end.
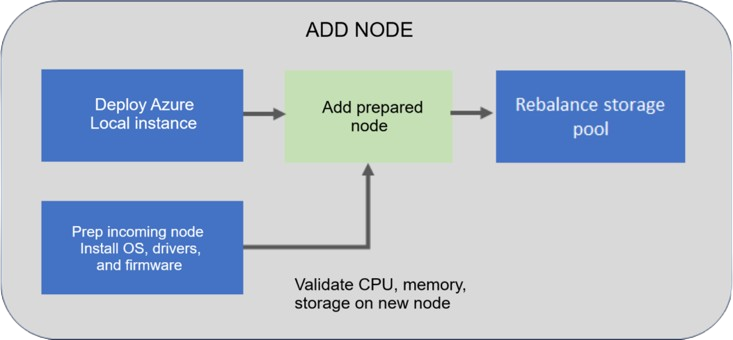
Key Steps to Add a Node
- Prepare the Node:
- Install the operating system and required drivers on the new node. Follow the guidance for Installing the Azure Local Operating System, version 23H2.
- Register the new node with Azure Arc. Ensure the same parameters (e.g., Resource Group, Region, Subscription, Tenant) as the existing nodes are used.
- Assign the following permissions:
- Azure Local Device Management Role
- Key Vault Secrets User
- Add the Node Using PowerShell:
-
Sign in to the existing node with
AzureStackLCMUsercredentials (or another user with equivalent permissions). - (Optional) Update the authentication token for the orchestrator:
Update-AuthenticationToken - For systems running a version prior to 2405.3, clean up conflicting files on the new node:
Get-ChildItem -Path "$env:SystemDrive\NugetStore" -Exclude Microsoft.AzureStack.Solution.LCMControllerWinService*,Microsoft.AzureStack.Role.Deployment.Service* | Remove-Item -Recurse -Force - Run the following command to add the node to the cluster. Replace
<IPv4>with the new node’s IP address and<Name>with the node’s hostname:$HostIpv4 = "<IPv4 for the new node>" $Cred = Get-Credential Add-Server -Name "<Name of the new node>" -HostIpv4 $HostIpv4 -LocalAdminCredential $Cred - Make a note of the operation ID provided as output. This ID will be used to monitor the progress of the operation.
-
- Validate the System:
- Use the operation ID to track the status of the process:
$ID = "<Operation ID>" Start-MonitoringActionplanInstanceToComplete -actionPlanInstanceID $ID - Once the node has been added, the orchestrator begins rebalancing the storage pool. You can monitor the progress of this process using:
Get-VirtualDisk | Get-StorageJob - If the rebalancing is complete, the above command will return no output.
- Use the operation ID to track the status of the process:
- Sync the Node with Azure:
- The new node will appear in the Azure portal within a few hours. To expedite this, you can manually sync:
Sync-AzureStackHCI
- The new node will appear in the Azure portal within a few hours. To expedite this, you can manually sync:
Supported Scenarios
Azure Local supports adding nodes across various scenarios:
- Single-node to two-node: Transitioning from a single-node to a two-node system requires configuring a witness for resiliency.
- Two-node to three-node: In this scenario, storage resiliency shifts from a two-way mirror to a three-way mirror.
- Three-node to N-node: Supports scaling up to 16 nodes while maintaining a three-way mirror resiliency.
Important Considerations
- Manual Adjustments: If custom storage IPs are used, these must be assigned manually to the new node’s network adapters after it’s added.
- Recovery Scenarios: If the operation partially succeeds or fails, you can use the orchestrator to rerun the operation or repair the node if needed.
- Hardware Validation: The system will block the operation if the new node doesn’t meet storage requirements, but CPU and memory discrepancies will only generate warnings.
Add Storage
Expanding your storage capacity in Azure Local is an essential step to accommodate growing workloads. This process, often called scaling up, involves adding drives to your nodes to increase storage capacity and, in some cases, improve performance. Azure Local relies on Storage Spaces Direct (S2D) for storage management, which simplifies the process by automatically detecting and integrating new drives. Based on Microsoft’s documentation, here’s how to add storage drives to your Azure Local cluster.
Overview of Adding Drives
Adding drives enables you to scale your Azure Local instance without adding new servers. Here’s what to keep in mind:
- Uniformity: It’s highly recommended that all nodes have identical storage configurations to ensure consistency and performance.
- Dynamic Integration: Once new drives are connected and discovered by Windows, they are automatically pooled by S2D and the data is rebalanced across the storage pool.
Key Steps to Add Storage
- Physically Install Drives:
- Insert the new drives into the available slots in each server.
- Ensure that the drives are securely connected and meet the system’s hardware requirements.
- Verify Drive Detection:
- Use the following PowerShell command to ensure that the new drives are detected and available for pooling:
Get-PhysicalDisk | Select SerialNumber, CanPool, CannotPoolReason - Look for drives where
CanPool = True. IfCanPool = False, check theCannotPoolReasonproperty to identify the issue.
- Use the following PowerShell command to ensure that the new drives are detected and available for pooling:
- Automatic Pooling:
- If your system has only one storage pool, S2D will automatically claim eligible drives, add them to the storage pool, and begin redistributing volumes across the drives.
- If the drives are not automatically claimed, ensure that the system has detected them by manually scanning for hardware changes in Device Manager or using the following PowerShell command:
Get-Disk | Where-Object IsOffline -eq $true | Set-Disk -IsOffline $false
- Reset Drives with Old Metadata:
- If the new drives contain old data or metadata, reset them using the
Reset-PhysicalDiskcmdlet:Reset-PhysicalDisk -FriendlyName "<DriveFriendlyName>"
- If the new drives contain old data or metadata, reset them using the
- Manual Pooling for Multiple Pools:
- If you’ve configured multiple pools, manually add the drives to the desired pool using the
Add-PhysicalDiskcmdlet:Get-PhysicalDisk | Where-Object CanPool -eq $true | Add-PhysicalDisk -StoragePoolFriendlyName "<PoolName>"
- If you’ve configured multiple pools, manually add the drives to the desired pool using the
Drive Optimization
After adding drives, data redistribution may become uneven across the pool. S2D automatically optimizes drive usage 15 minutes after new drives are added, using background operations to rebalance the data. This ensures even distribution and prevents certain drives from filling up while others remain underutilized.
- Monitor Optimization Progress: Use the following command to monitor the progress of optimization jobs:
Get-StorageJob - Manually Trigger Optimization: If needed, you can manually optimize the storage pool using:
Get-StoragePool "<PoolName>" | Optimize-StoragePoolImportant Considerations
- Storage Pool Resiliency: While new drives are integrated seamlessly, ensure the resiliency settings of your existing volumes align with your storage requirements. Adjustments to resiliency settings are outside the scope of this guide.
- Background Operations: Rebalancing is a low-priority task that can take hours or even days to complete, depending on the size and number of drives in your cluster.
Repair a Node & Extensions
In any Azure Local deployment, hardware failures or inconsistent extension states are inevitable over time. To avoid such scenarios, I will provide you with a detailed guide based on Microsoft’s documentation and my personal experience.
Repair a Node
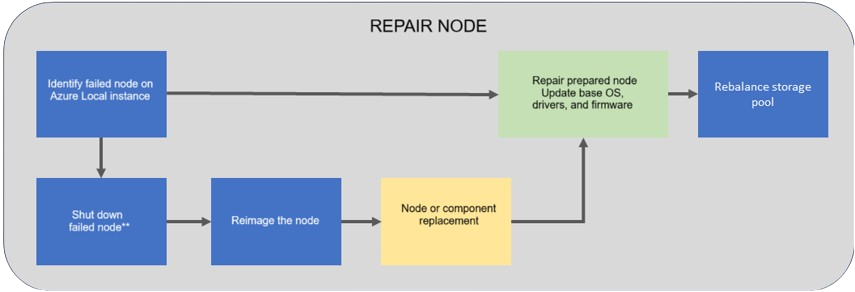
Repairing a node involves bringing a faulty or damaged node back into the system with its original configuration and functionality. This can include hardware replacement, reimaging, or re-registering the node with Azure Arc.
Key Steps to Repair a Node
- Prepare the Node for Repair:
- If possible, shut down the faulty node gracefully. Depending on the node’s state, this may not always be feasible.
- Reimage the node with the Azure Local Operating System (version 23H2) and ensure all required drivers are installed.
- If custom storage IPs were used during deployment, manually assign the appropriate IPs to the storage network adapters after reimaging.
- Register the Node with Azure Arc:
- Use the same parameters (e.g., Resource Group name, Region, Subscription, Tenant) as the existing nodes.
- Assign the following permissions to the repaired node:
- Azure Local Device Management Role
- Key Vault Secrets User
- Run the Repair-Server Command:
- On an existing cluster node, sign in with domain credentials (e.g.,
AzureStackLCMUser) and execute the following PowerShell commands:- (For versions prior to 2405.3) Clean up conflicting files:
Get-ChildItem -Path "$env:SystemDrive\NugetStore" -Exclude Microsoft.AzureStack.Solution.LCMControllerWinService*,Microsoft.AzureStack.Role.Deployment.Service* | Remove-Item -Recurse -Force - Run the repair operation:
$Cred = Get-Credential
Repair-Server -Name "<Name of the new node>" -LocalAdminCredential $Cred
Replace
<Name of the new node>with the node’s NetBIOS name.
- (For versions prior to 2405.3) Clean up conflicting files:
- Make a note of the Operation ID provided in the output for monitoring purposes.
- On an existing cluster node, sign in with domain credentials (e.g.,
- Monitor the Repair Progress:
- Use the following command to monitor the operation’s progress:
$ID = "<Operation ID>" Start-MonitoringActionplanInstanceToComplete -actionPlanInstanceID $ID - Once the repair is complete, storage rebalancing will occur automatically in the background. Monitor this using:
Get-VirtualDisk | Get-StorageJob - If no output is returned, the rebalancing process is complete.
- Use the following command to monitor the operation’s progress:
- Recovery Scenarios:
- If the repair operation fails, you can retry it using:
Repair-Server -Rerun - If the operation succeeds partially but a fresh operating system install is required, the orchestrator will handle the reconfiguration.
- If the repair operation fails, you can retry it using:
Repair Extensions
In addition to repairing nodes, maintaining the health of extensions is equally critical.
To simplify the detection and repair of extensions, I created a PowerShell script that automates the process. This script:
- Detects whether the necessary extensions for Azure Local are installed and functional.
- Repairs or reinstalls extensions that are in an inconsistent state.
You can find the script on my GitHub repository: Troubleshooting Extensions Script.
Secret Rotation
Although secret rotation isn’t strictly part of an upgrade process, it is deeply tied to Lifecycle Management. Since we’ve already covered topics like node and extension repairs in this section, I’ve taken the liberty of including secret rotation as well. Ensuring that administrative credentials and service principal secrets are periodically updated is a critical security measure for any Azure Local deployment. Based on Microsoft’s documentation, here’s how to manage secret rotation.
Rotating the Deployment User Password
The deployment user, commonly referred to as AzureStackLCMUser, is responsible for managing your Azure Local environment. Rotating this password can be done with the Set-AzureStackLCMUserPassword cmdlet.
Steps to Change the Deployment User Password:
- Open a PowerShell session and set the old and new passwords:
$old_pass = ConvertTo-SecureString "<Old password>" -AsPlainText -Force $new_pass = ConvertTo-SecureString "<New password>" -AsPlainText -Force - Run the
Set-AzureStackLCMUserPasswordcmdlet to update the password:Set-AzureStackLCMUserPassword -Identity mgmt -OldPassword $old_pass -NewPassword $new_pass -UpdateAD - After executing the command, you’ll see the following warning:
“The current session will be unresponsive once this command completes. You will have to log in again with updated credentials.”
Close the session and log in again with the updated password.
Updating the Deployment Service Principal (if you upgrade from 2306)
If you upgraded from Azure Local 2306 to 23H2, you may need to rotate the deployment service principal used during the initial deployment.
Steps to Update the Service Principal:
- Log into Microsoft Entra ID (Azure AD) and locate the service principal used for the deployment.
- Create a new client secret for the service principal and make a note of:
- The App ID for the existing service principal.
- The new client secret.
- On one of your Azure Local machines, sign in to Azure using PowerShell:
Connect-AzAccount Set-AzContext -Subscription <Subscription ID> - Update the service principal name:
cd "C:\Program Files\WindowsPowerShell\Modules\Microsoft.AS.ArcIntegration"
Import-Module Microsoft.AS.ArcIntegration.psm1 -Force
$secretText = ConvertTo-SecureString -String "<client secret>" -AsPlainText -Force
Update-ServicePrincipalName -AppId <AppID> -SecureSecretText $secretText
Changing the Azure Resource Bridge (ARB) Service Principal Secret
The Azure Resource Bridge (ARB) uses a service principal to interact with Azure. Rotating its secret ensures secure connectivity between your on-premises infrastructure and Azure.
Steps to Change the ARB Service Principal Secret:
- Log into Microsoft Entra ID and locate the ARB service principal. The name typically follows this format:
ClusterNameXX.arb. - Create a new client secret for the service principal and make a note of:
- The App ID.
- The new client secret.
- On one of your Azure Local machines, run the following PowerShell command:
$SubscriptionId = "<Subscription ID>"
$TenantId = "<Tenant ID>"
$AppId = "<Application ID>"
$secretText = "<Client secret>"
$NewPassword = ConvertTo-SecureString -String $secretText -AsPlainText -Force
Set-AzureStackRPSpCredential -SubscriptionID $SubscriptionId -TenantID $TenantId -AppId $AppId -NewPassword $NewPassword
Upgrade from Azure Stack HCI 22H2
The transition from Azure Stack HCI 22H2 to Azure Local 23H2 is a significant upgrade that ensures your system remains secure, supported, and up to date with the latest features. Although I haven’t personally performed this upgrade yet (for better or worse), I’ve followed multiple discussions about this topic in the Azure Local Slack channel. Based on these threads and Microsoft’s documentation, here’s a guide to the process.
It’s important to note that support for 22H2 ends in May 2025, so I highly recommend upgrading your system sooner rather than later.
Supported Workloads and Configurations
Before beginning the upgrade, keep the following points in mind:
- Consult your hardware OEM before you upgrade Azure Local. Validate that your OEM supports the version and the upgrade.
- Upgrading your Azure Local from version 22H2 is only supported for regions where Azure Local, version 23H2 is available. For more information, see Azure Local region availability.
- Use of 3rd party tools to install upgrades is not supported.
Azure Local upgrade supports the following services and workloads:
| Workload/Configuration | Currently Supported? | Notes |
|---|---|---|
| Azure Kubernetes Service (AKS) | See notes | Kubernetes versions are incompatible between Azure Local, version 22H2, and version 23H2. Remove AKS and all Azure Arc-enabled settings before applying the solution upgrade. |
| Arc VMs | See notes | Preview versions of Arc VMs cannot be upgraded. |
| Stretched Clusters | Yes | You must upgrade to Azure Stack HCI OS 23H2 to maintain support for stretched clusters. The solution upgrade is not applicable for stretched clusters. |
| SCVMM (System Center) | Yes | Supported for Azure Local instances managed by SCVMM 2025. |
| Azure Local 22H2SP | No | Upgrades from 22H2 Supplemental Package clusters are not supported. |
High-Level Workflow for the OS Upgrade
The upgrade process follows these major steps:
- Complete prerequisites.
- Connect to Azure Local 22H2.
- Install the new OS using PowerShell.
- Check the status of updates.
- Perform post-OS upgrade steps.
- Validate readiness for the solution upgrade.
- Install the solution upgrade.
Step 1: Complete Prerequisites
Before starting the upgrade:
- Ensure your Azure Local instance is running version 22H2.
- Verify that the system is registered in Azure and all machines are healthy and online.
- Obtain the Azure Local 23H2 OS update. This is available via:
- Windows Update, or
- A downloadable ISO from the Azure portal (required if the system lacks internet connectivity).
- Confirm that the client used for the upgrade has PowerShell 5.0 or later installed.
Step 2: Connect to Azure Local
- Open a PowerShell session on your client machine as Administrator.
- Establish a remote session to one of the machines in your Azure Local instance:
$cred = Get-Credential
Enter-PSSession -ComputerName "<Computer IP>" -Credential $cred
Example output:
PS C:\Users\Administrator> $cred = Get-Credential
cmdlet Get-Credential at command pipeline position 1
Supply values for the following parameters:
Credential
PS C:\Users\Administrator> Enter-PSSession -ComputerName "100.100.100.10" -Credential $cred
[100.100.100.10]: PS C:\Users\Administrator\Documents>
Step 3: Install the New OS Using PowerShell
To perform the upgrade, follow these steps:
- Prepare the system:
- Enable PowerShell remoting:
Set-WSManQuickConfig Enable-PSRemoting - Verify that the Cluster-Aware Updating (CAU) role is installed:
Test-CauSetup -ClusterName <SystemName> - Validate cluster health:
Test-Cluster
- Enable PowerShell remoting:
- Check for available updates:
Invoke-CauScan -ClusterName <SystemName> -CauPluginName "Microsoft.RollingUpgradePlugin" -CauPluginArguments @{'WuConnected'='true';} -Verbose | fl *Ensure that all machines in the system are offered the same feature update.
- Install updates:
- Run the upgrade using Cluster-Aware Updating:
Invoke-CauRun -ClusterName <SystemName> -CauPluginName "Microsoft.RollingUpgradePlugin" -CauPluginArguments @{'WuConnected'='true';} -Verbose -EnableFirewallRules -Force - If using local media (ISO):
Invoke-CauRun -ClusterName <SystemName> -CauPluginName "Microsoft.RollingUpgradePlugin" -CauPluginArguments @{ 'WuConnected'='false'; 'PathToSetupMedia'='\\some\path\'; 'UpdateClusterFunctionalLevel'='true'; } -Force
- Run the upgrade using Cluster-Aware Updating:
Step 4: Check the Status of the Update
You can monitor the progress of the update using:
Get-CauRun -ClusterName <SystemName>
Example output:
RunId                   : <Run ID>
RunStartTime            : 10/13/2024 1:35:39 PM
CurrentOrchestrator     : NODE1
NodeStatusNotifications : {
Node      : NODE1
Status    : Waiting
Timestamp : 10/13/2024 1:35:49 PM
}
NodeResults             : {
Node                     : NODE2
Status                   : Succeeded
ErrorRecordData          :
NumberOfSucceededUpdates : 0
NumberOfFailedUpdates    : 0
InstallResults           : Microsoft.ClusterAwareUpdating.UpdateInstallResult[]
}
Post-OS Upgrade Steps
Once the OS upgrade to version 23H2 is complete, you need to perform critical post-upgrade tasks to stabilize the system and enable new features.
- Upgrade Cluster Functional Level:
Upgrade the cluster functional level to enable new capabilities. Note that this step is irreversible:
Update-ClusterFunctionalLevel - Upgrade Storage Pool:
Identify the storage pool and upgrade it:
Get-StoragePool Update-StoragePool -FriendlyName "S2D on hci-cluster1" - Upgrade VM Configuration Levels (optional):
Stop each VM and update its configuration:
Update-VMVersion -Name "<VMName>" - Validate the System:
Validate the cluster and check roles, VMs, and live migrations:
Test-Cluster
Install and Enable Network ATC
Network ATC simplifies host networking by automating best practices and ensuring consistency. Follow these steps:
- Install Network ATC:
Install-WindowsFeature -Name NetworkATC - Pause and Prepare a Node:
Suspend the node and remove any conflicting configurations, such as existing VMSwitch or NetQos policies:
Suspend-ClusterNode Get-VMSwitch -Name "<VMSwitchName>" | Remove-VMSwitch -Force - Enable and Configure Intents:
Add intents for management, compute, and storage:
Add-NetIntent -Name MgmtComputeStorage -Management -Compute -Storage -AdapterName pNIC1, pNIC2 - Resume the Node:
After configuring the intents, resume the node:
Resume-ClusterNode
Repeat for all nodes in the system.
Validate Solution Upgrade Readiness
Before proceeding with the solution upgrade, validate readiness using the Environment Checker:
- Install the Environment Checker:
Install-Module -Name AzStackHci.EnvironmentChecker -AllowClobber - Run Validation:
Invoke-AzStackHciUpgradeValidation - Address Issues: Review and address any blocking or warning issues, such as BitLocker suspension, language settings, or storage space.
Install the Solution Upgrade
Once the environment is validated, install the solution upgrade:
-
Initiate the Upgrade: In the Azure portal, select the upgrade option in the Azure Local resource page and provide the necessary details (e.g., key vault, deployment account, IP range).
-
Monitor Progress: Track the upgrade status under Settings > Deployment in the Azure portal.
-
Verify Upgrade Success: Check the resource group for all expected resources, such as Azure Arc machines, Arc Resource Bridge, and Key Vault.
After the solution upgrade:
- Validate the system’s health.
- Update security settings and enable RDP if needed.
- Create workloads and storage paths for each volume.
Conclusion
Lifecycle Management in Azure Local is a multidimensional topic that involves updates, upgrades, repairs, and ongoing maintenance. By following the guidelines in this article, whether you’re adding new nodes, expanding storage, repairing extensions, or rotating secrets, you can ensure that your environment remains secure, stable, and ready for future needs.
Before carrying out any updates or upgrades, it’s crucial to stay informed about the latest release information and known issues for Azure Local 23H2. Microsoft regularly publishes:
- Azure Local 23H2 release information which highlights new features, improvements, and security updates in each release train.
- Known issues for Azure Local 23H2 which provides a running list of critical issues, workarounds, and advisories to be aware of for each version.
Spending a little time reviewing these resources prior to an update can save you a lot of hassle, minimize downtime, and ensure your system remains in a fully supported state. With solid preparation and the processes outlined here, you’ll be well-equipped to navigate the complexities of Azure Local Lifecycle Management.
Happy upgrading!
Additional Resources and References
Below is a table of all the links referenced in this article, along with a brief description for each:
| Link | Description |
|---|---|
| Azure Stack HCI Day 2 Operations | My earlier discussion on Day 2 Operations and how Lifecycle Management fits into that broader framework. |
| About updates for Azure Local 23H2 | Official Microsoft documentation on updating Azure Local 23H2, including key features and update workflow. |
| Update Azure Local via PowerShell | Step-by-step guide to applying updates with PowerShell, suitable for both single-node and multi-node setups. |
| Phases of Azure Local Updates | Detailed breakdown of the Discovery, Readiness, and Installation phases for Azure Local updates. |
| Solution Builder Extension (SBE) | Explanation of SBE updates, including drivers, firmware, and advanced capabilities for Azure Local hardware. |
| Lifecycle Manager Deep Dive by Jaromir | In-depth look at Lifecycle Manager internals, sideloading SBE packages, and troubleshooting tips. |
| Azure Arc Extension Management | How to install, upgrade, and manage Arc extensions on Azure Local, including automatic and manual upgrades. |
| Add a Node to Azure Local | Guidance on scaling your cluster by adding additional servers (nodes) to Azure Local. |
| Adding Drives (Windows Server Storage) | Official documentation on expanding storage capacity in a cluster using Storage Spaces Direct (S2D). |
| Repair a Node in Azure Local | Instructions on repairing a faulty node, from reimaging to re-registering with Azure Arc. |
| Troubleshooting Extensions Script | My custom PowerShell script for detecting and repairing inconsistent or broken Azure Local extensions. |
| Manage Secrets Rotation | Steps to rotate credentials and service principal secrets for Azure Local, maintaining system security. |
| Upgrade from Azure Stack HCI 22H2 | Overview of the 22H2 to 23H2 upgrade process, including prerequisites, supported scenarios, and workflows. |
| Azure Local region availability | Regions where Azure Local 23H2 is fully supported for deployments and upgrades. |
| Azure Local 23H2 Release Information | Microsoft’s official release notes and update trains for Azure Local 23H2, including features and baselines. |
| Known Issues for Azure Local 23H2 | Continuously updated list of known issues, workarounds, and advisories for the current Azure Local release. |
Comments