Introduction
I decided to write this article outside of my usual Chronicloud series, though it does follow on from the Azure Stack HCI: Azure Virtual Desktop post. The reason? Image management for AVD and deploying those images in Azure Local can be a real pain point. Currently, the entire process is quite manual, involves tons of steps, and doesn’t offer much flexibility. So, I thought sharing how to use Nerdio for this might be helpful.
I was also inspired by attending the Nerdio Micro Hack in Frankfurt last Wednesday (kudos to Bas van Kaam (@LinkedIn) and Bjørn M. Riiber (@LinkedIn) for the excellent masterclass). Most attendees seemed to need a solution for running AVD on-prem. While it is indeed possible to manage these images without any extra tooling, just a handful of PowerShell scripts and some Azure DevOps pipelines, I find that approach clunky. Nerdio, on the other hand, does a great job by also offering more flexible autoscaling plans and simple scripted tasks that are far easier to configure.
For those unfamiliar with Nerdio ( getnerdio.com ), it’s a company that specializes in a simple, straightforward way to manage AVD, Windows 365 Cloud PCs, and Intune (no DevOps overhead or IaC expertise needed). Because I want to specifically focus on the Azure Local integration (and there isn’t much up-to-date documentation on this topic), I’m documenting the process here. I won’t be covering the Nerdio installation in your Azure subscription, my friend Michael Frank (@LinkedIn) and Neil McLoughlin (@LinkedIn) have you covered:
- Michael’s blog on how to install Nerdio: Blog Link
- Neil’s YouTube video on setup and basic config:
I also won’t dive deep into FSLogix here. I’ll save that for another article in the Chronicloud series when we talk more about AVD.
The only official documentation I’ve found so far for using Azure Local with Nerdio is:
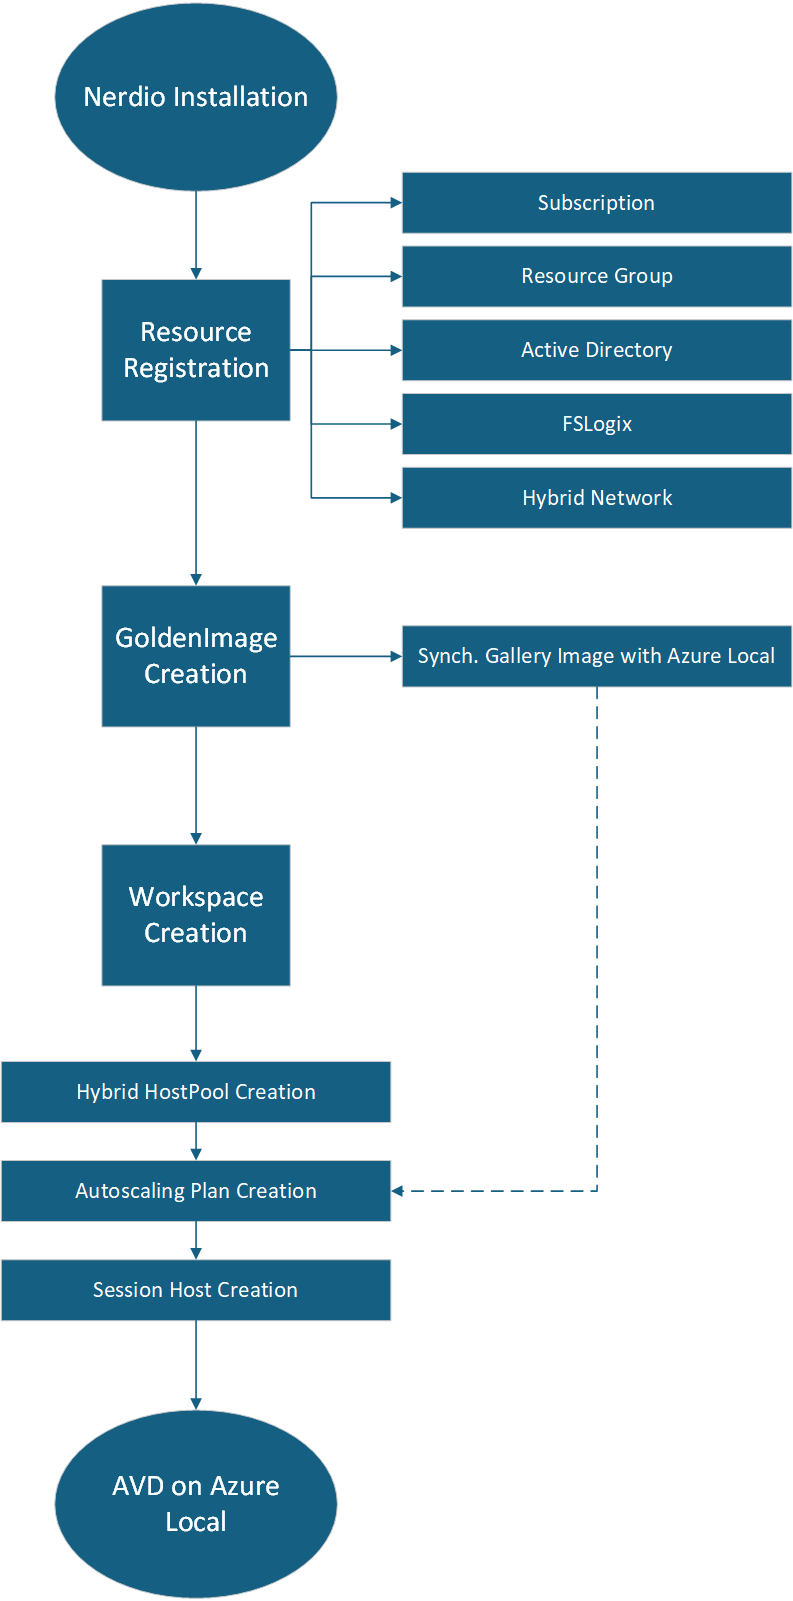
Below is a diagram illustrating the process for registering Nerdio and deploying AVD on Azure Local through Nerdio:
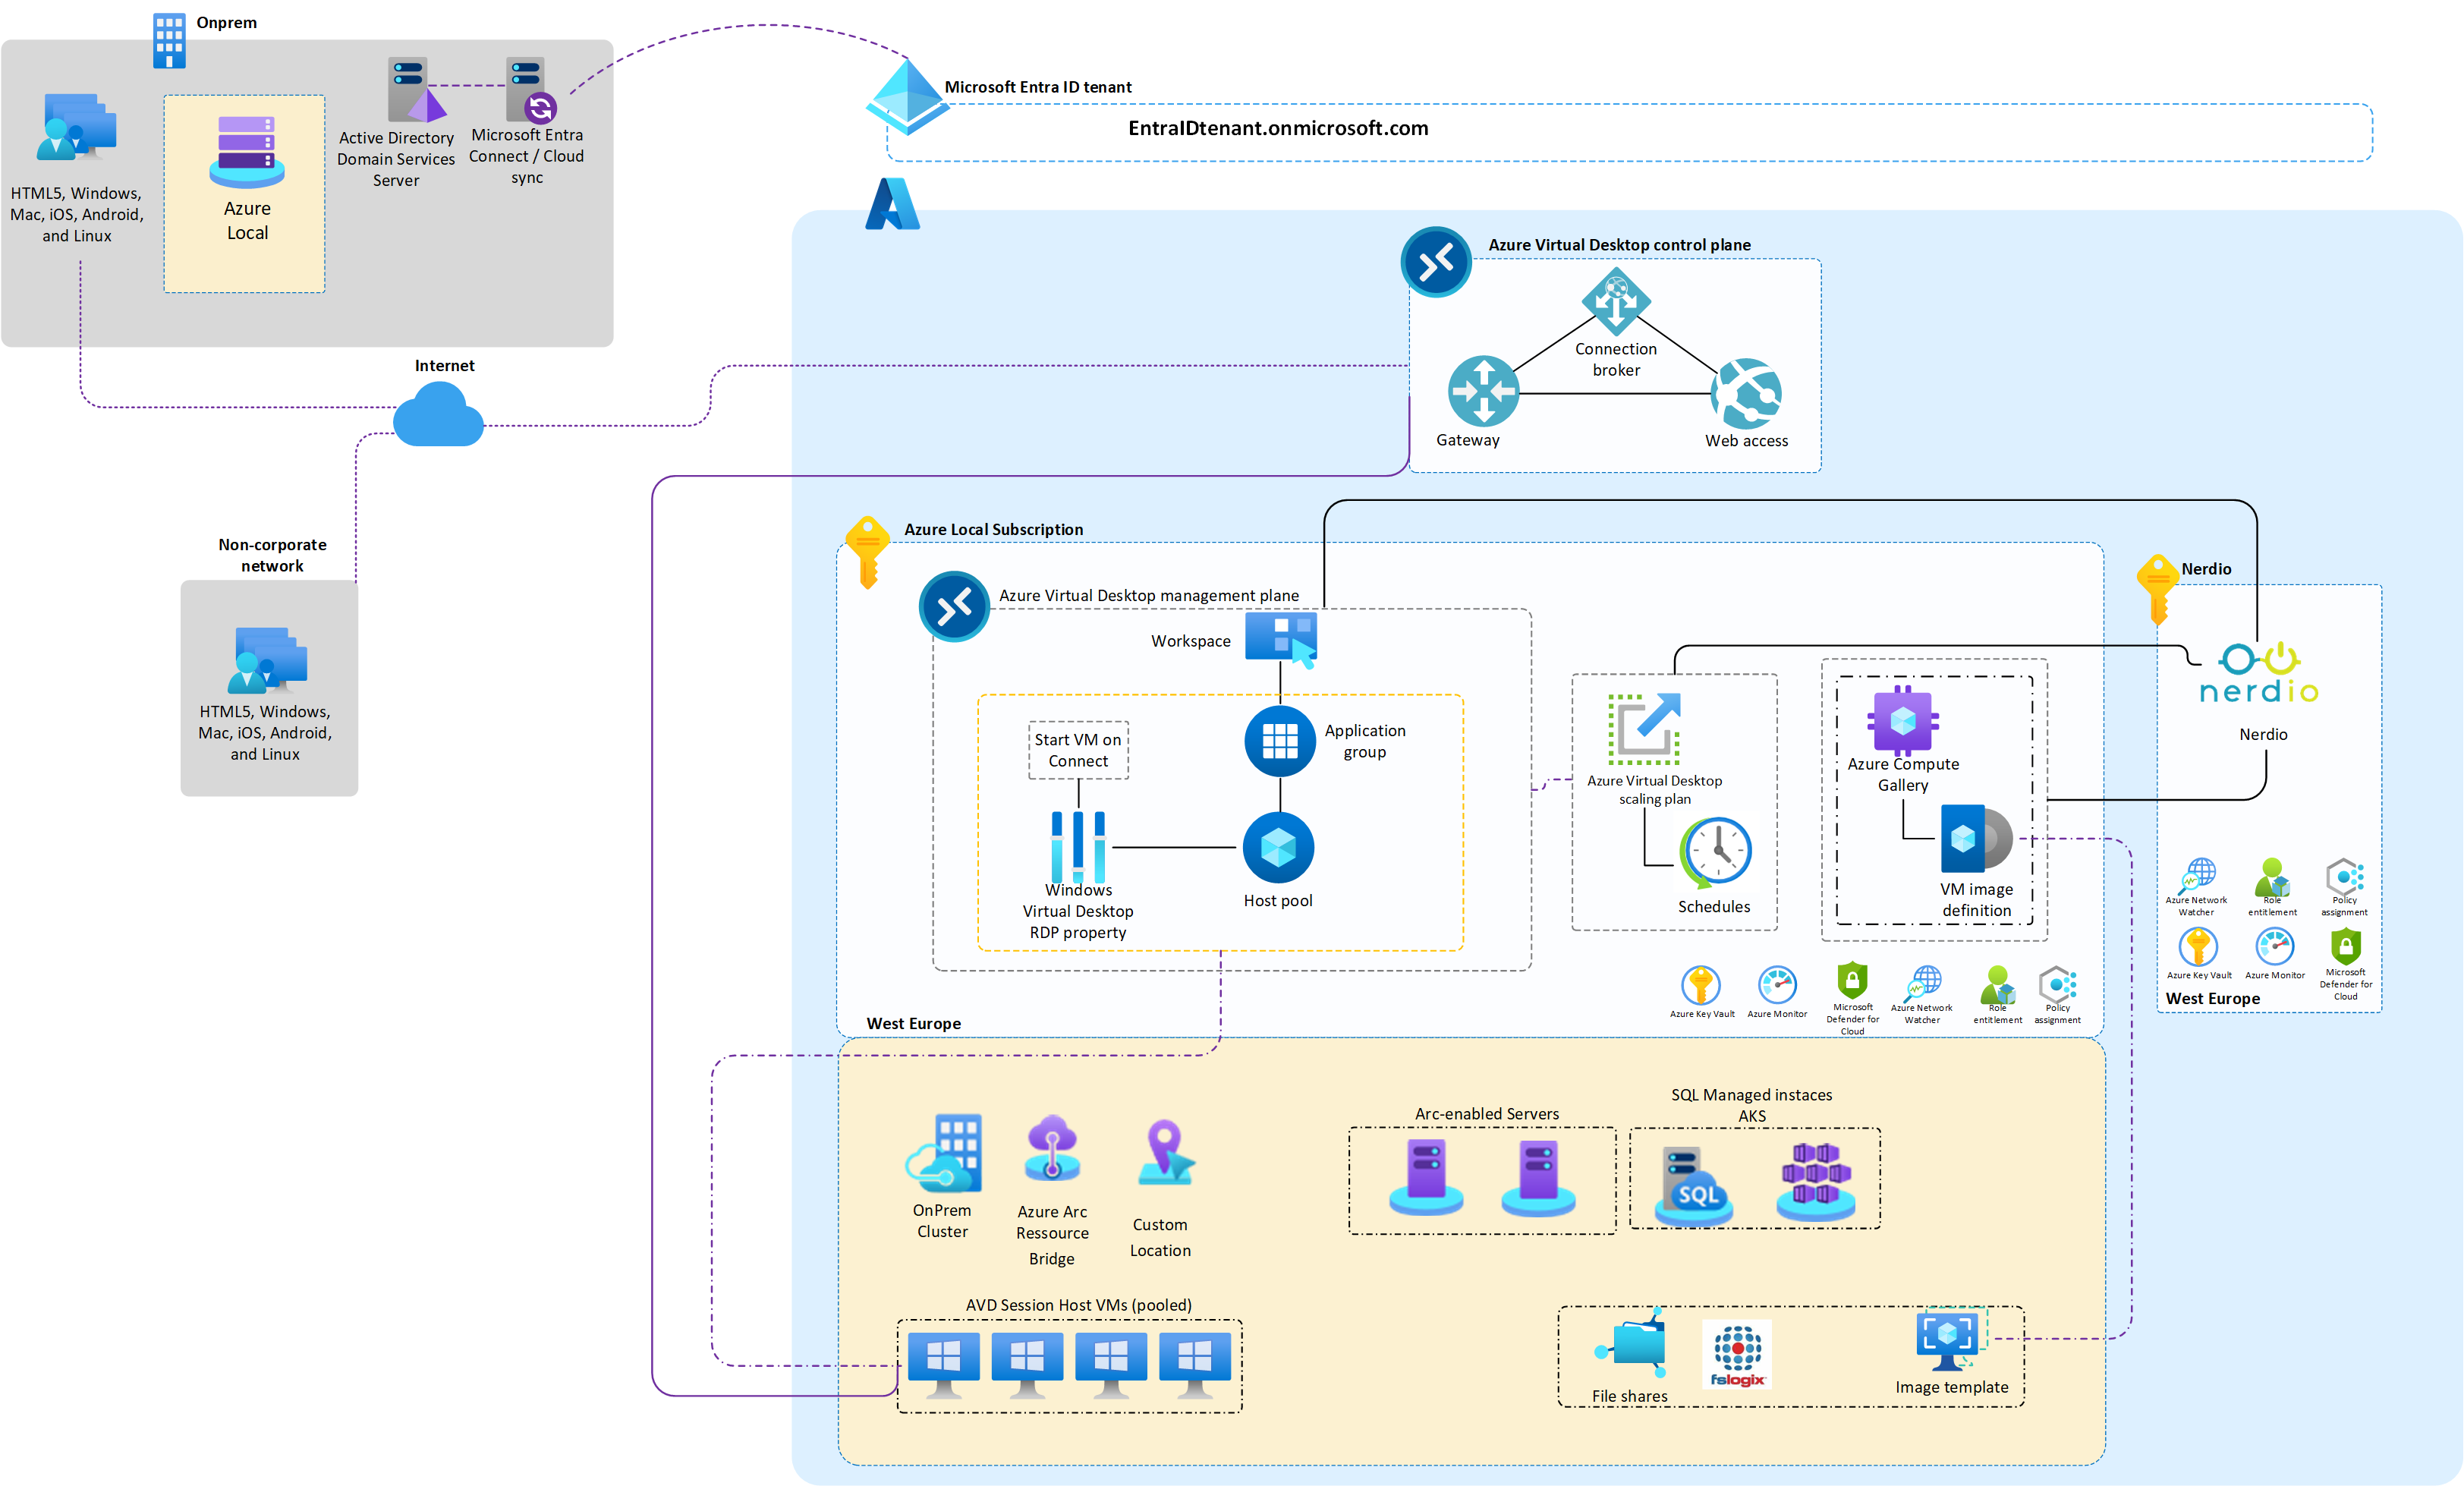
And here’s a reference architecture of the infrastructure which I´m using:
Configuring Nerdio for Azure Local
If you take a look at the earlier documentation, you’ll notice it mentions creating a custom location. This is actually no longer necessary because Azure Local now automatically generates a custom location during its deployment process. I believe the existing documentation hasn’t been fully updated to reflect this (and I don’t blame anyone, Azure Local evolves so quickly that staying on top of changes is a challenge, and I face the same issue with my own blog posts).
Before we dive into the configuration, there are a few prerequisites to meet. Thankfully, most of them were already taken care of in the article “Azure Stack HCI: Azure Virtual Desktop”:
- Install Nerdio Manager: This should be done using the guides mentioned in the introduction.
- An Active Directory for the users who will be using AVD (with identities synced to Microsoft Entra ID).
- A fully functional Azure Local cluster (at least 1 node), registered with an Azure subscription that is connected to Nerdio Manager.
- Azure Arc registration for the Azure Local nodes.
- Resource Bridge already enabled in Azure Local.
- A local shared storage path on the Azure Local cluster for FSLogix profiles.
- The logical network and resource group where your Azure Local cluster is registered must be linked.
Registering Resources in Nerdio
Once Nerdio is installed, you’ll need Owner permissions on the resources you’re about to register, using the same account that performs the registration in Nerdio. The resources you’ll register are:
- Subscription
- Resource Group
- Hybrid Network (a.k.a. your Logical Network)
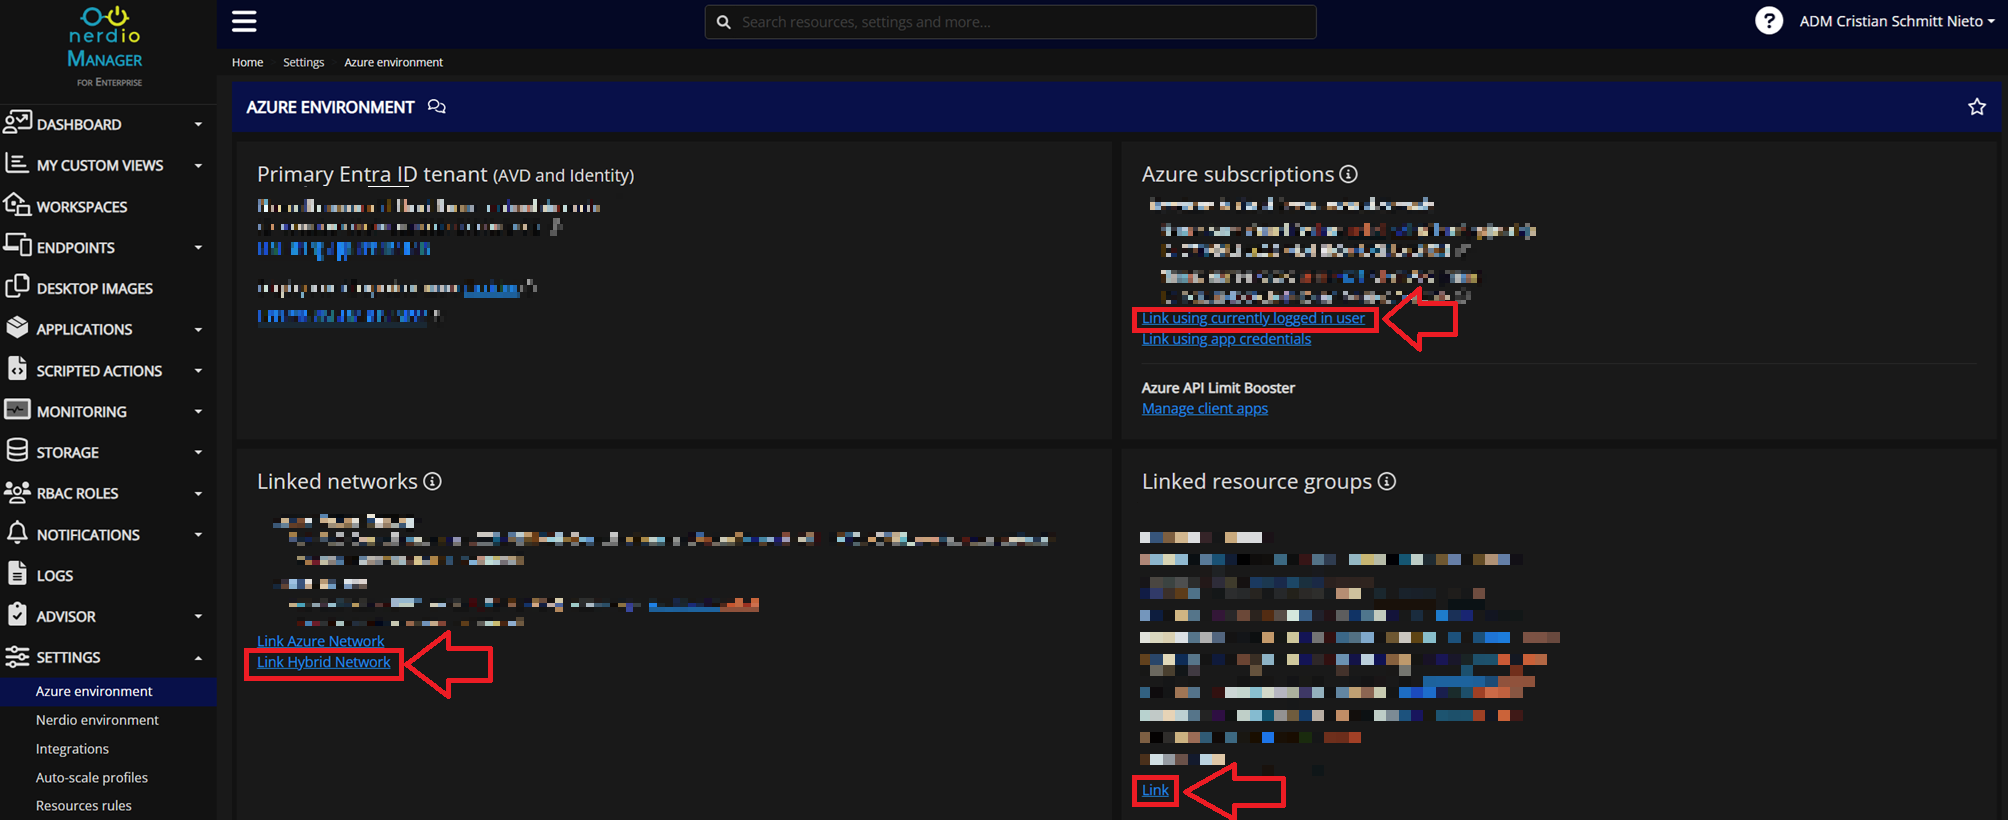
You can register all of them from the same management window under Settings > Azure environment:
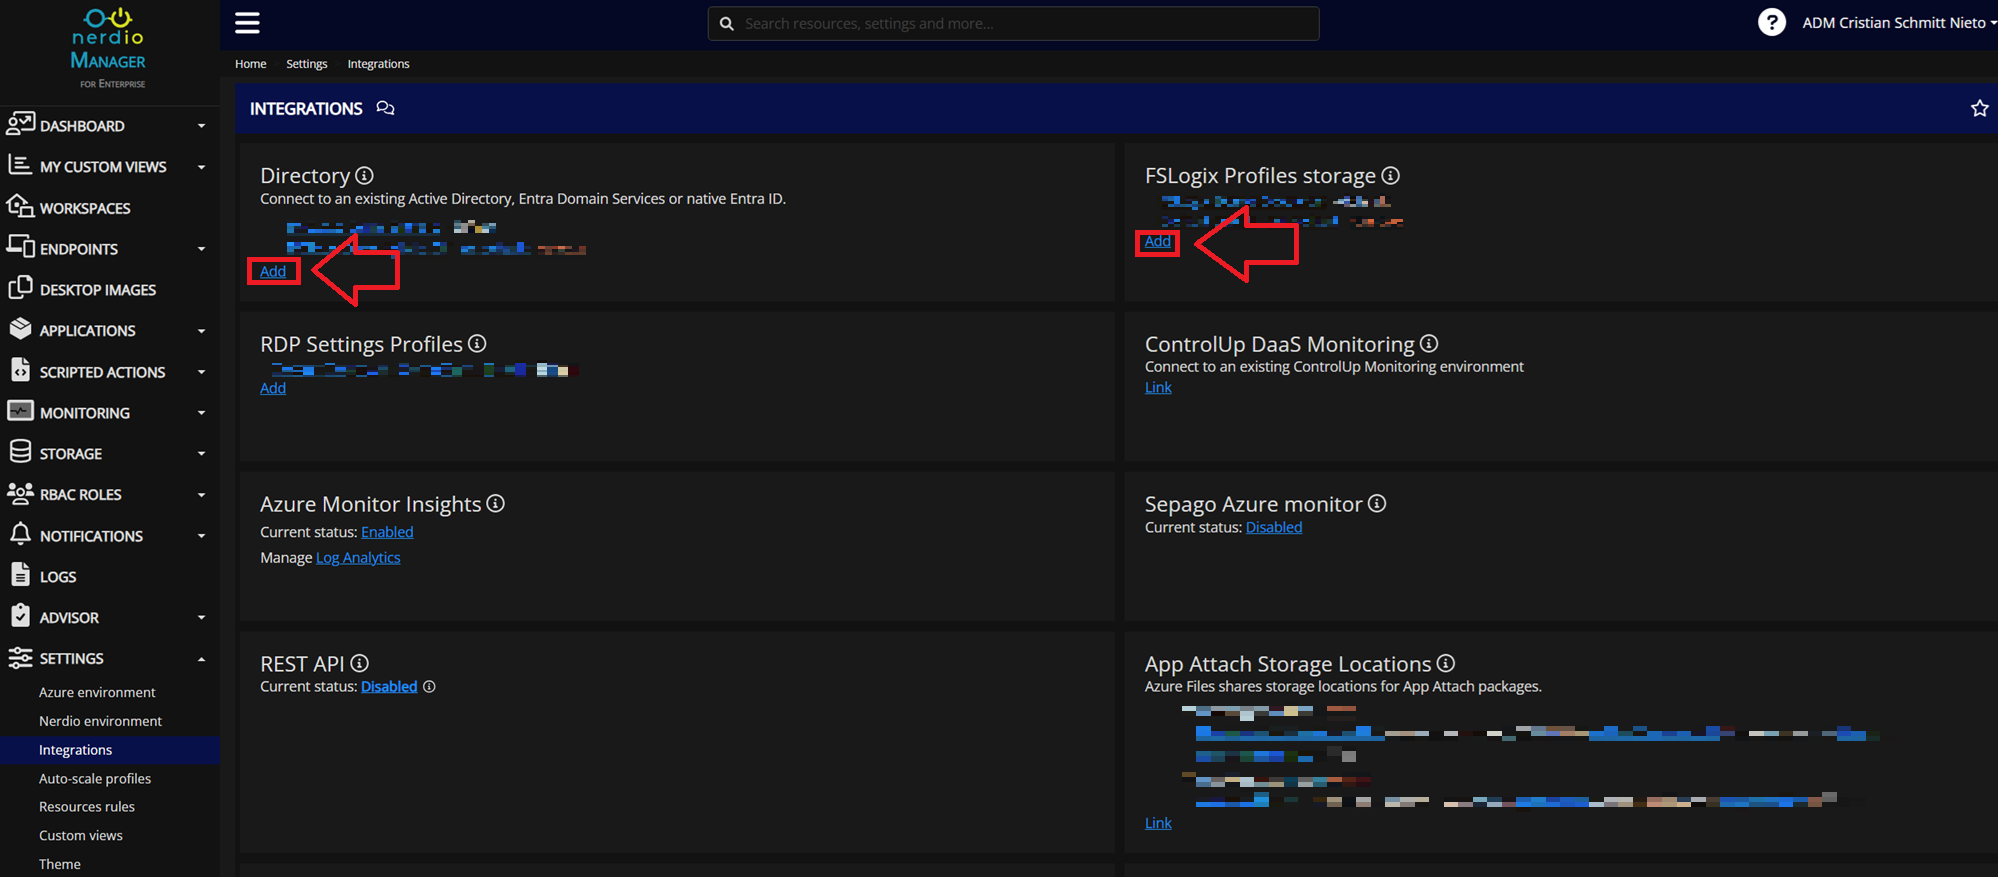
You’ll also need to connect your Active Directory (with a user who has the rights to join machines in the appropriate OU) and specify the file share for FSLogix profiles (in my case, a file share hosted on the domain controller(don´t replicate 😅)). This is done in Settings > Integration:
Golden Image
The process of creating a Golden Image was outlined in the introduction, and if you’ve worked with Nerdio before, you’ll find it’s a fairly straightforward process. Here’s my quick rundown:
-
Set up a virtual network (vNet) in Azure (not your local, logical network). I created a simple vNet in the same Resource Group as my Azure Local cluster, changing only the name. You can do this in the Azure portal.
-
Import the VM image from the Azure gallery by going to Desktop Images > Add from Azure library. Select both the vNet you just created and the Azure image you want to use as your Golden Image. My setup looked like this:
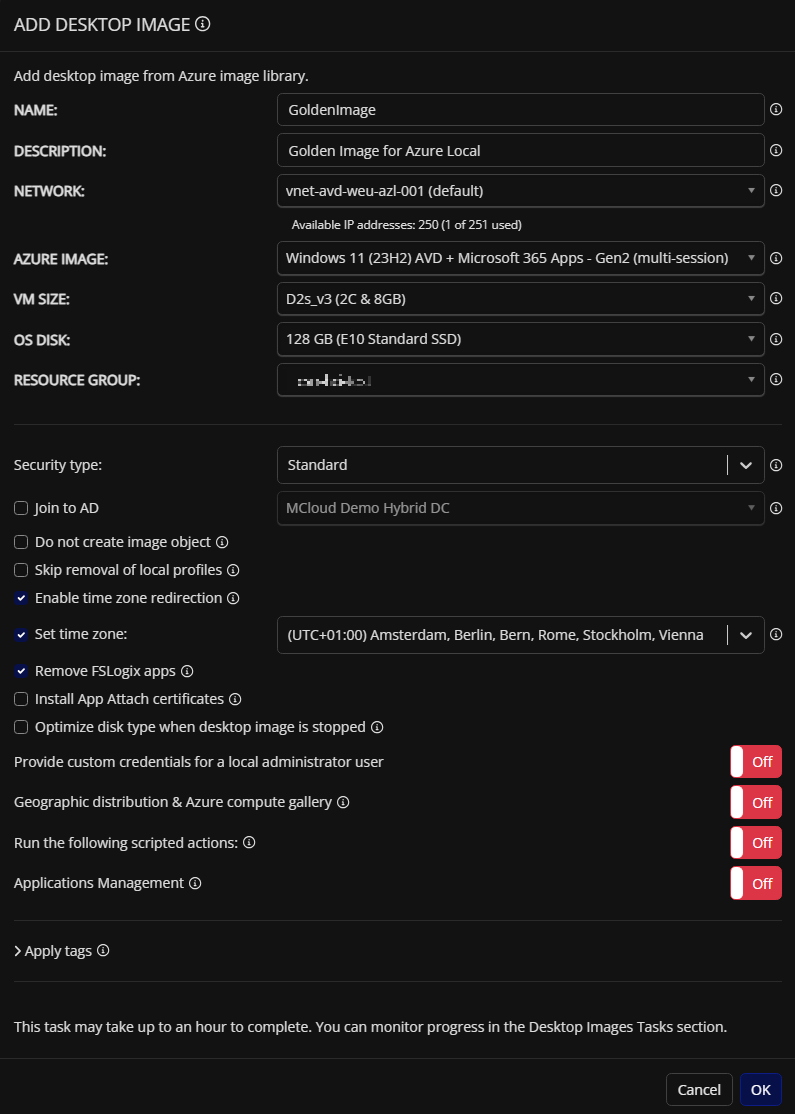
Nerdio will then spend about 30 minutes creating a VM based on the parameters you provided. It places that VM in the specified vNet and Resource Group. By default, this VM won’t be accessible from the internet unless you assign it a public IP and configure RDP access in the Azure portal.
Now, you can modify this VM in two ways:
- Direct Access: Connect to the VM (via VPN or public IP) to configure it manually.
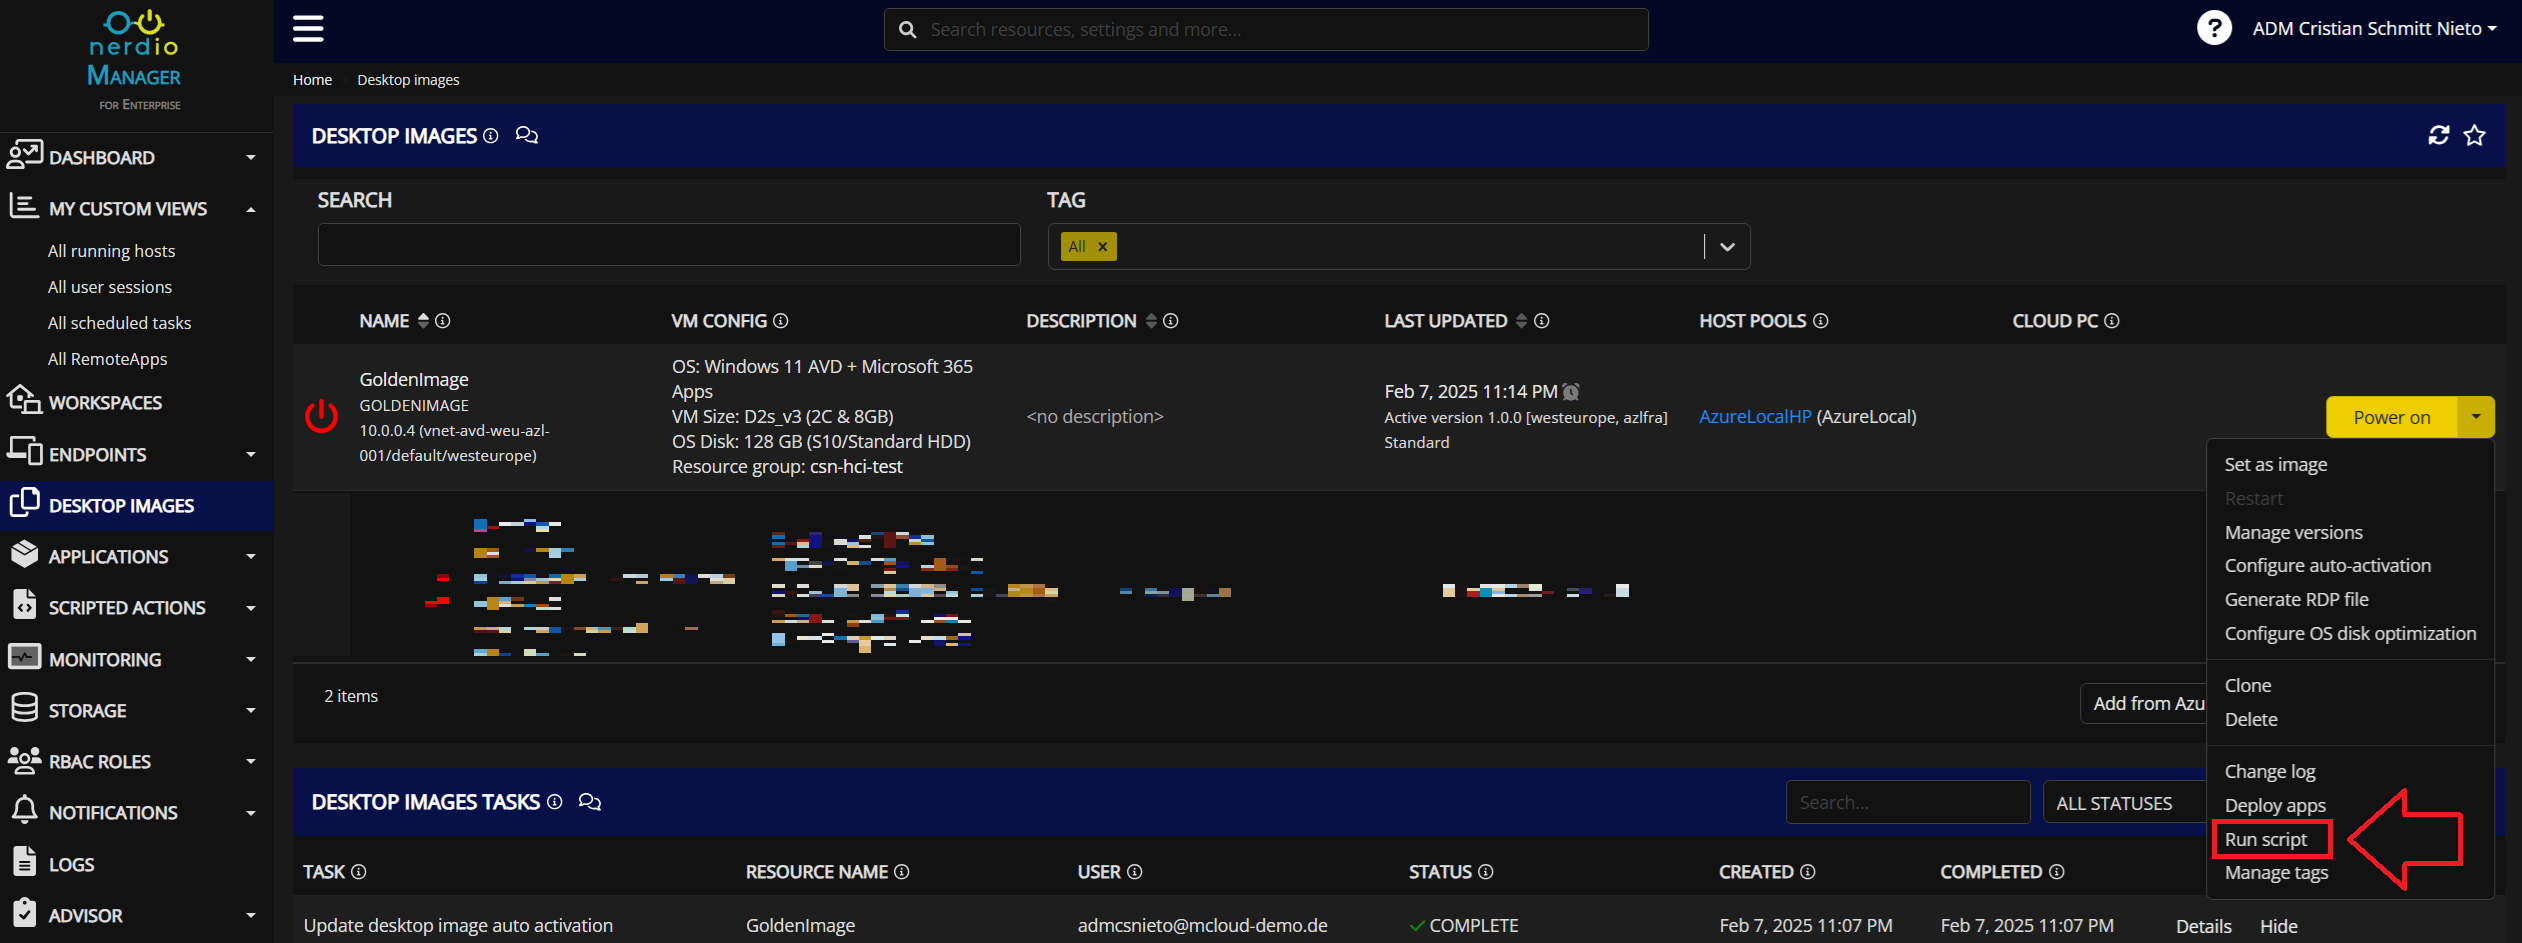
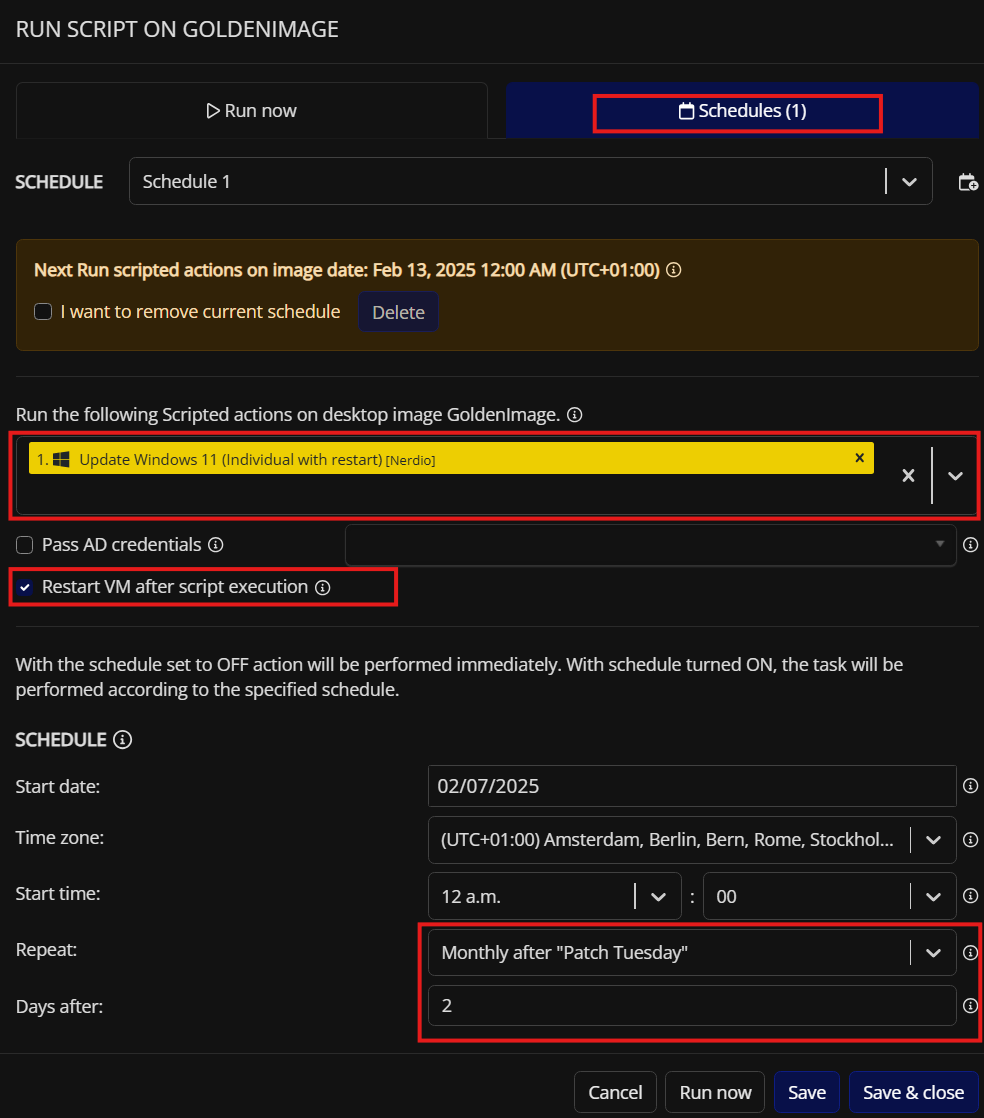
- Run Scripts: One of my favorite features in Nerdio. You can run scripts to install language packs or other software, either on demand or scheduled. (If you’re thinking what I’m thinking, this is perfect for scheduling and automating Windows Updates on your Golden Images!)
That sets up your base VM to serve as your Golden Image. Next comes the more interesting part: deploying the image into a Compute Gallery and syncing (or uploading) it to Azure Local so it can be used on your Session Hosts.
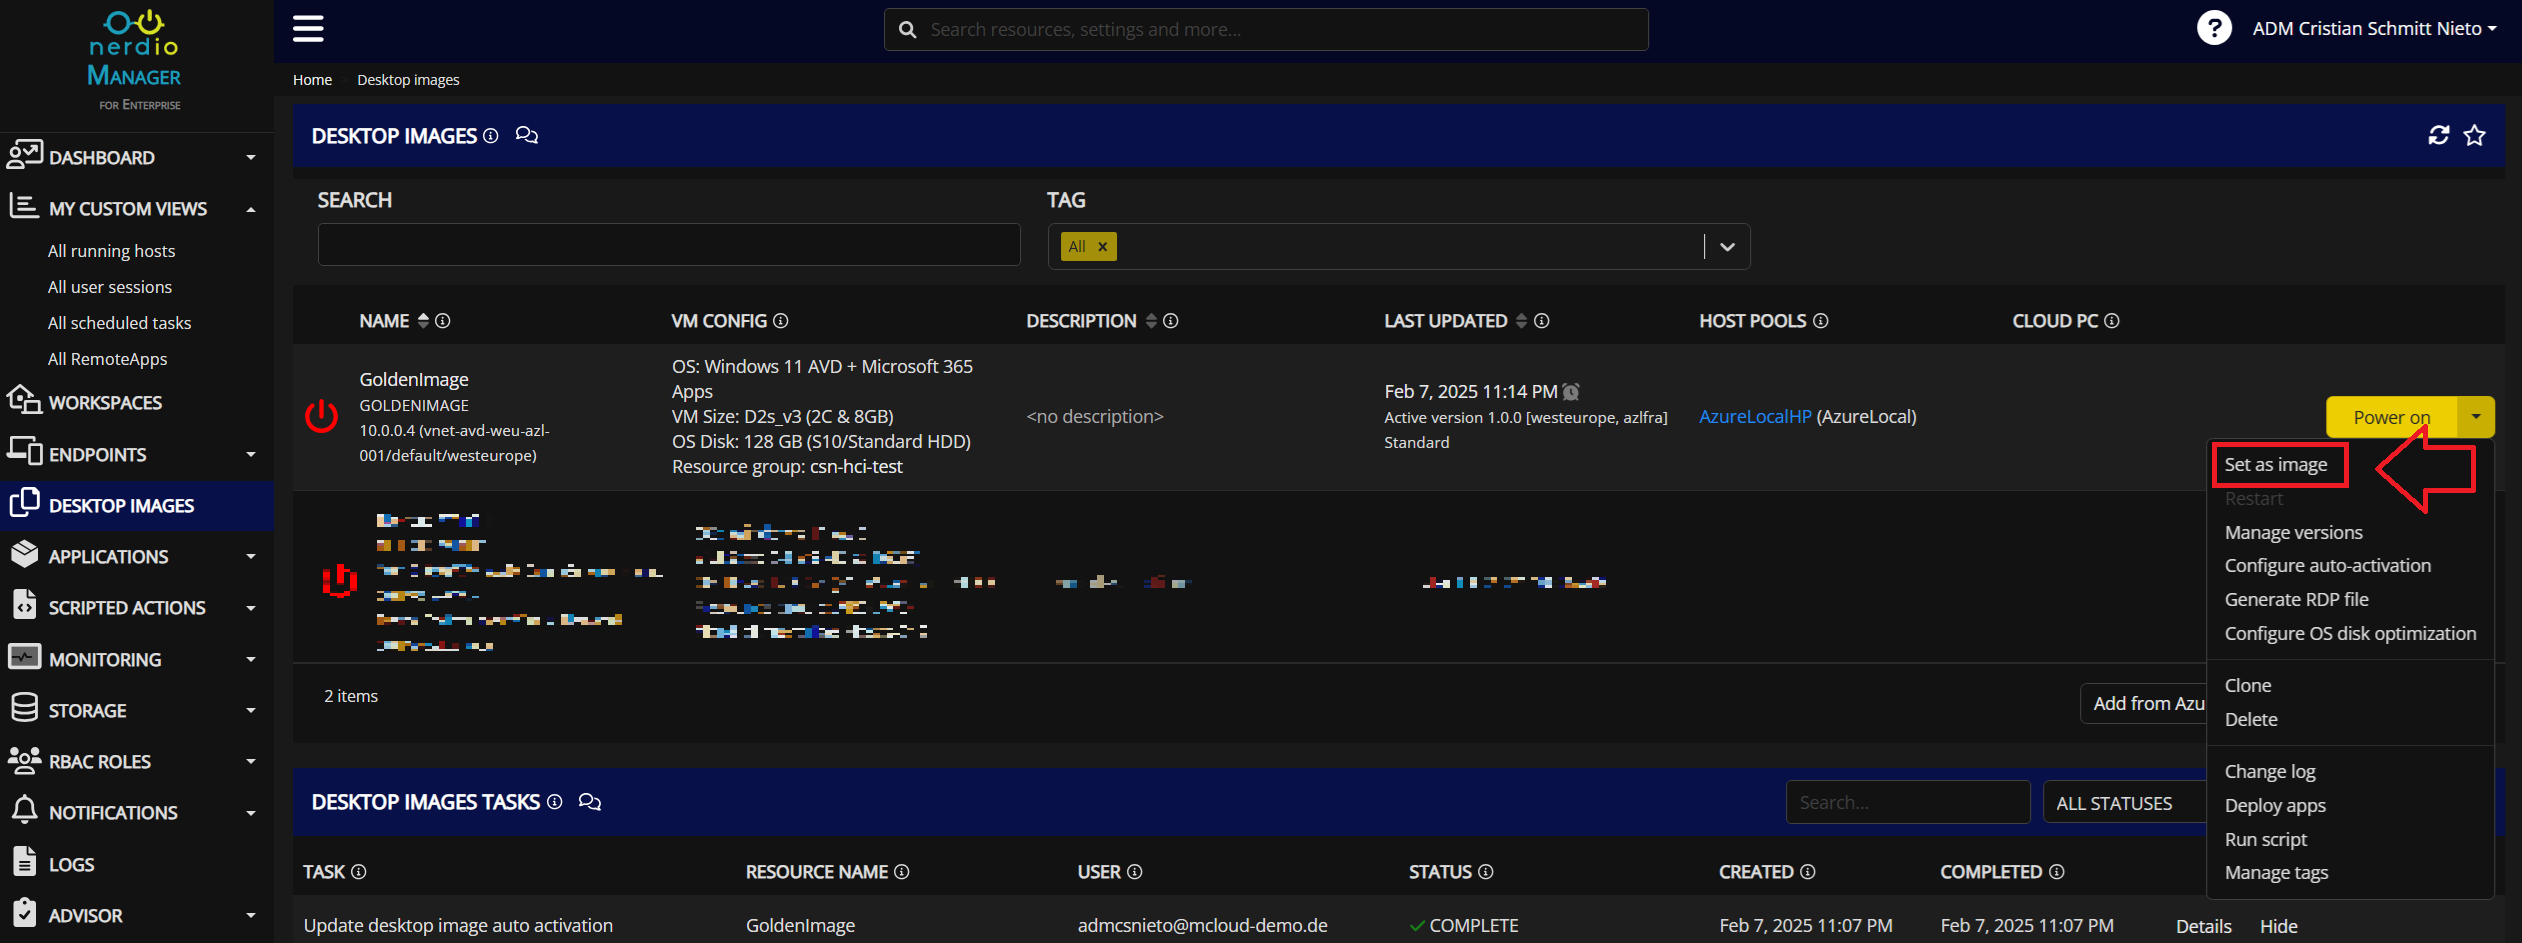
You can accomplish this by converting the VM into an Image and syncing it with Azure Local like so:
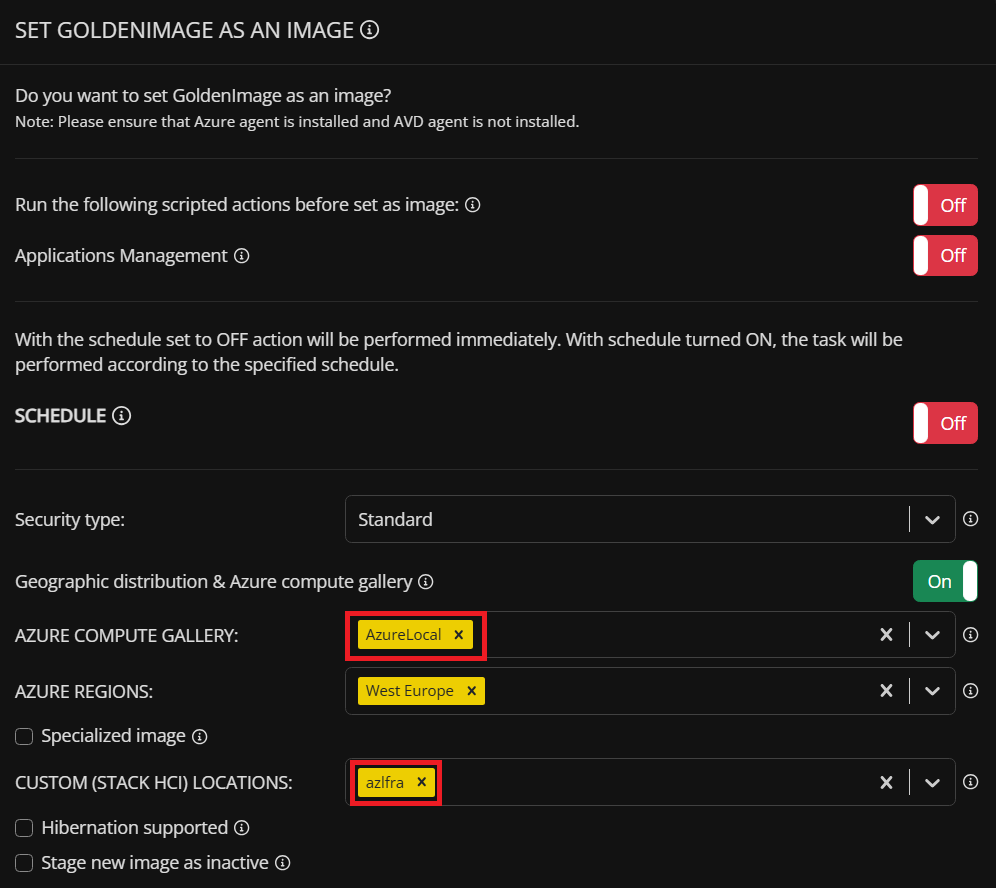
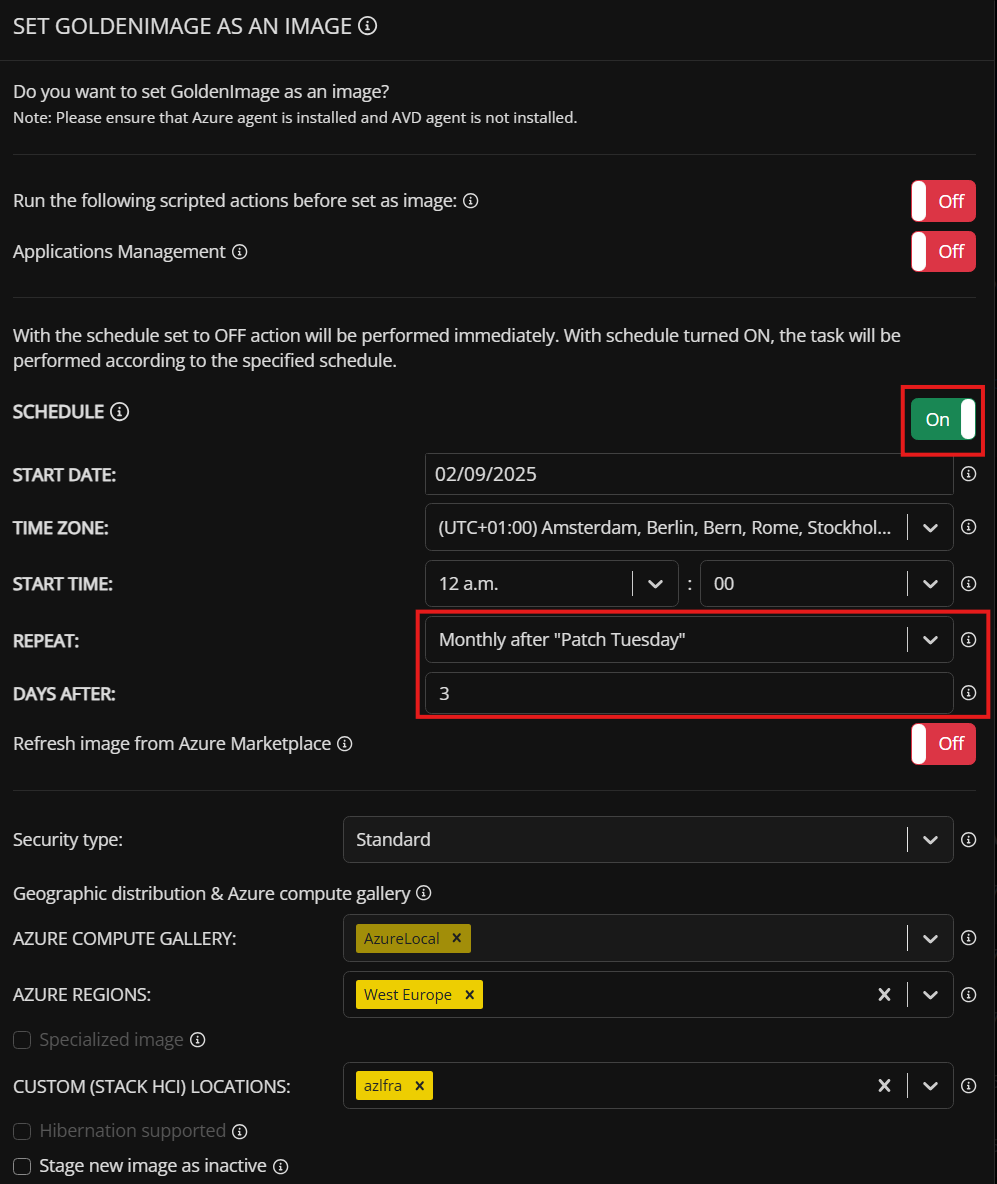
As you can see in the last screenshot, I’ve enabled Geographic distribution & Azure compute gallery because it allows me to pull the image down to Azure Local by selecting my custom location. In my case, I created the Compute Gallery automatically from within Nerdio and selected the custom location azlfra. If you wish, you can also configure a schedule so that this process runs automatically the day after Windows Updates are installed on the Golden Image:
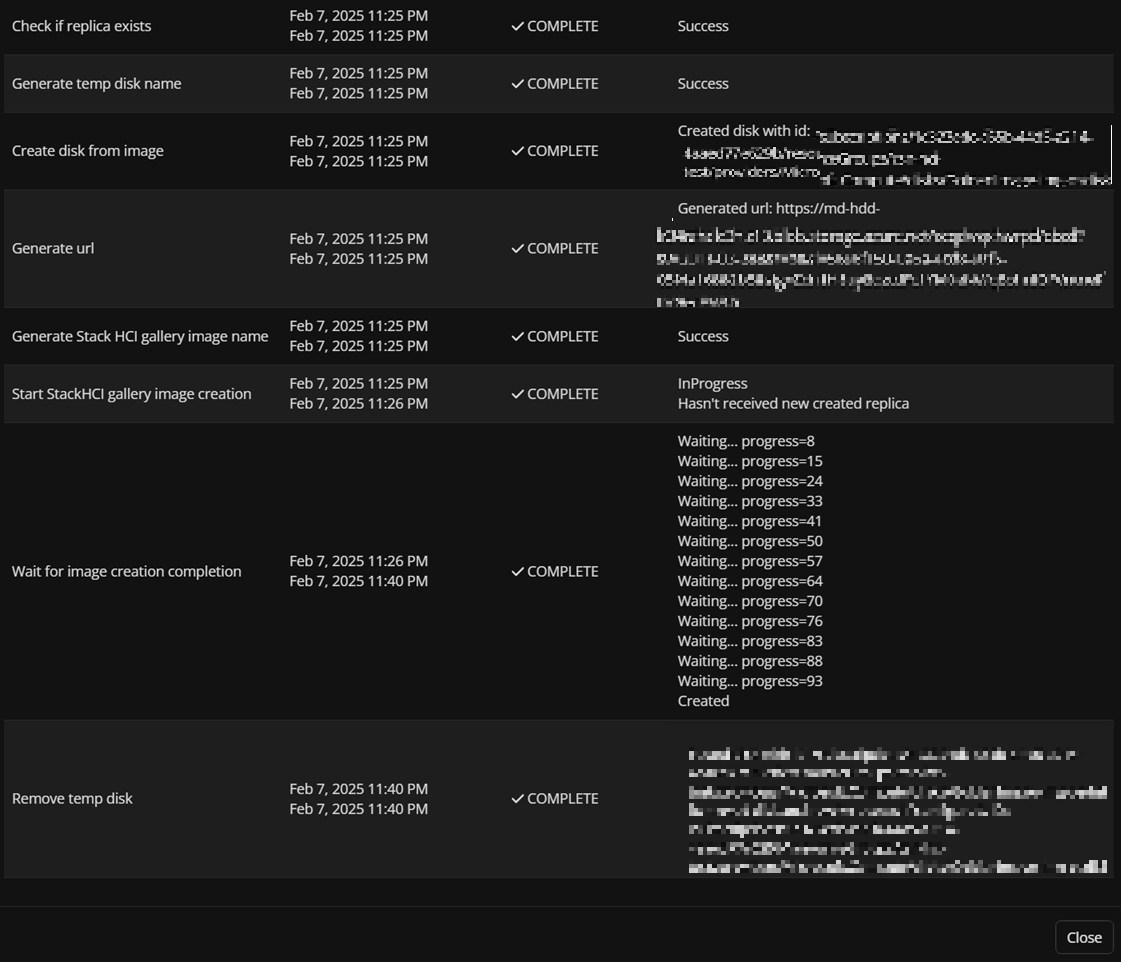
It took about 30 minutes for my image to sync. I really appreciate how Nerdio keeps you updated on the entire progress. Here’s what the result looks like:
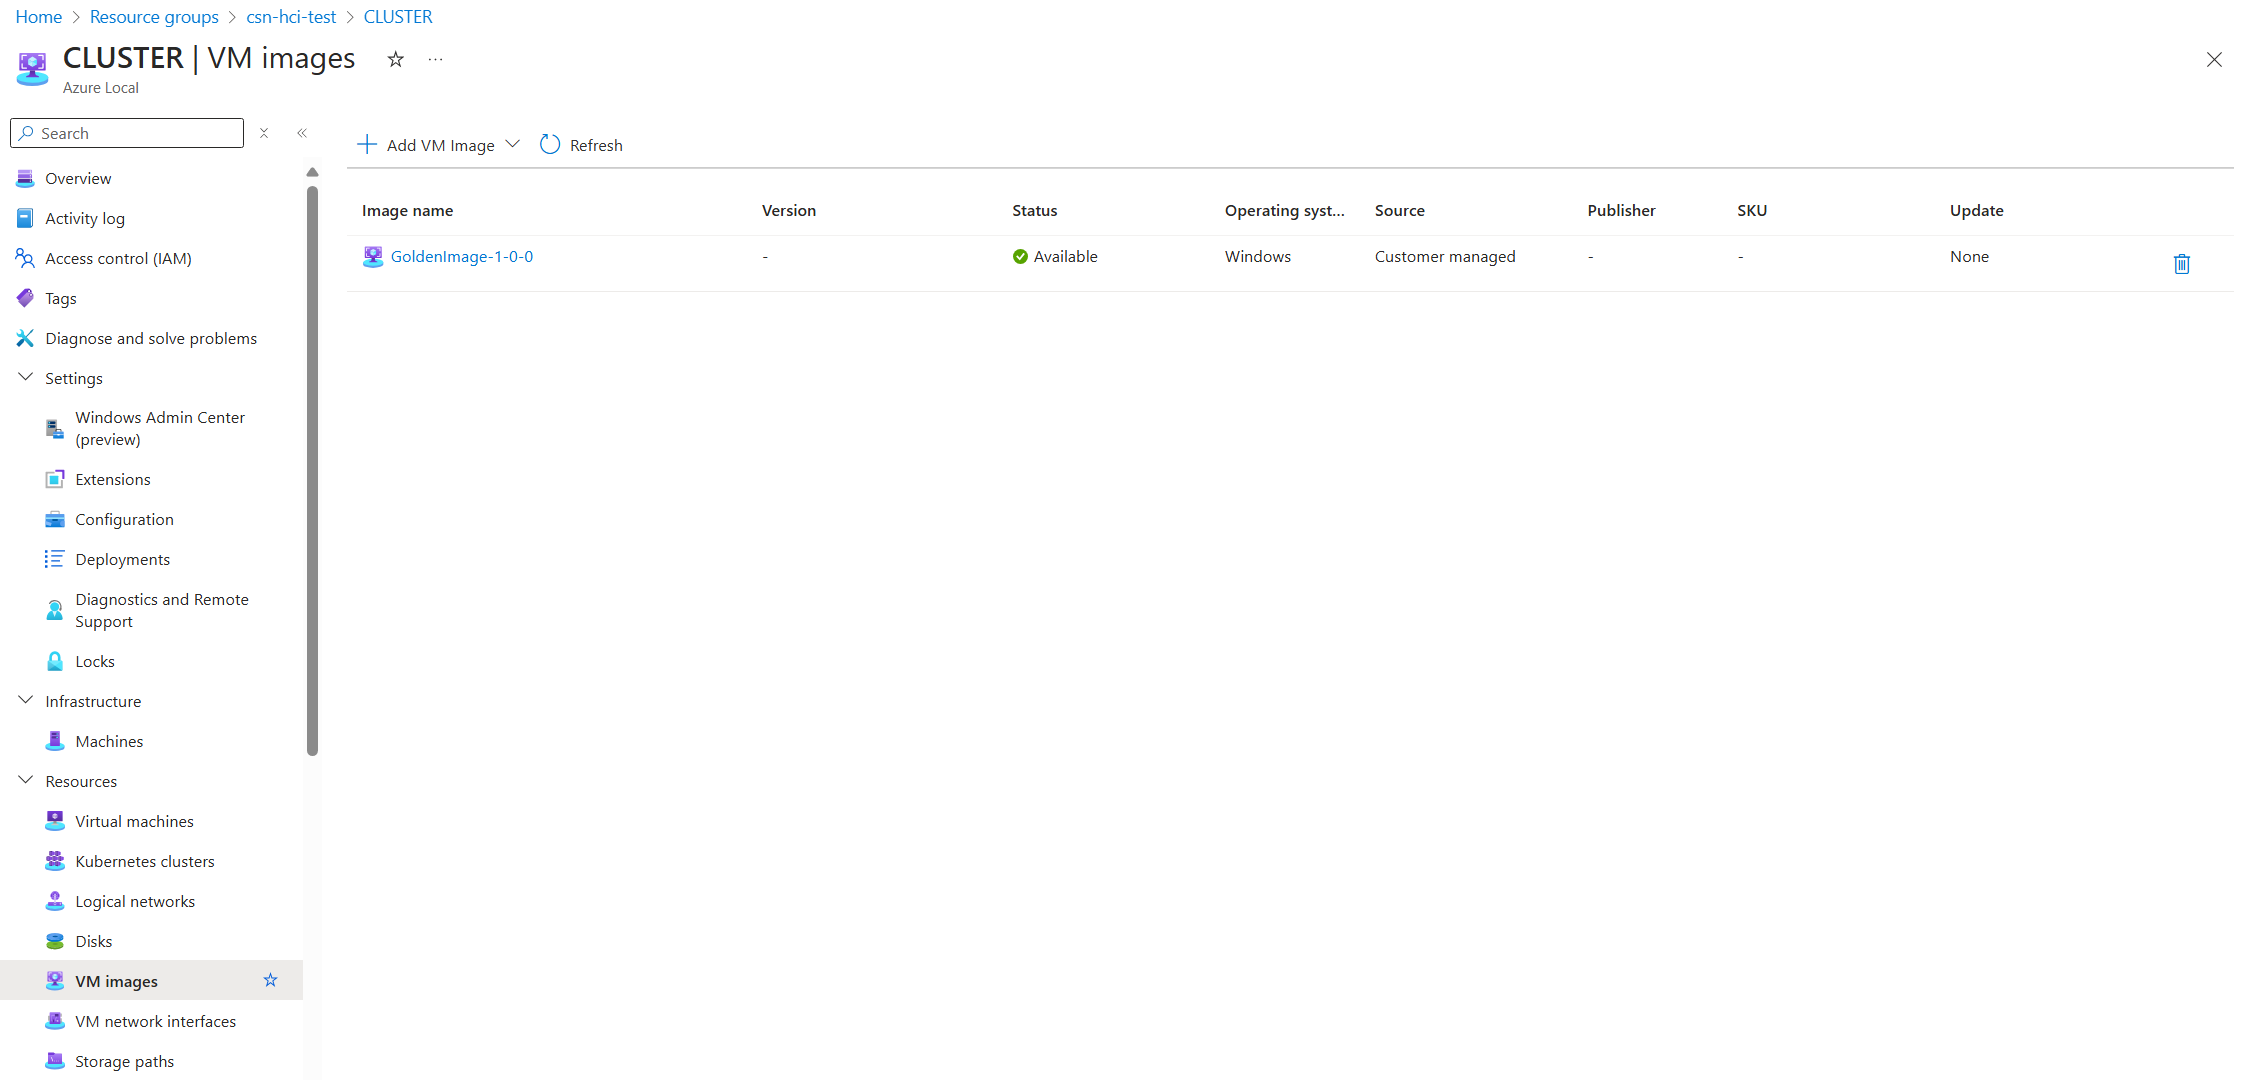
And that’s it! You now have a Golden Image you can generate periodically and automatically update through Nerdio. It saves you a ton of time and makes image management much more efficient and user-friendly.
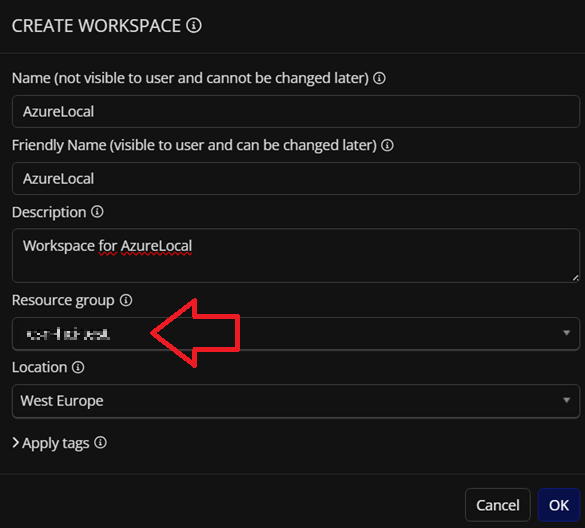
Creating a Workspace
We now have an image in Azure Local that we can use to provision a Session Host. So, what’s next? Since I’m starting from a clean deployment, I’ll create a Workspace dedicated to Azure Local, where I’ll implement a “Hybrid host pool”. I use quotes because, realistically, these host pools shouldn’t be mixed between on-prem and cloud (not supported yet), so they’ll reside solely in Azure Local.
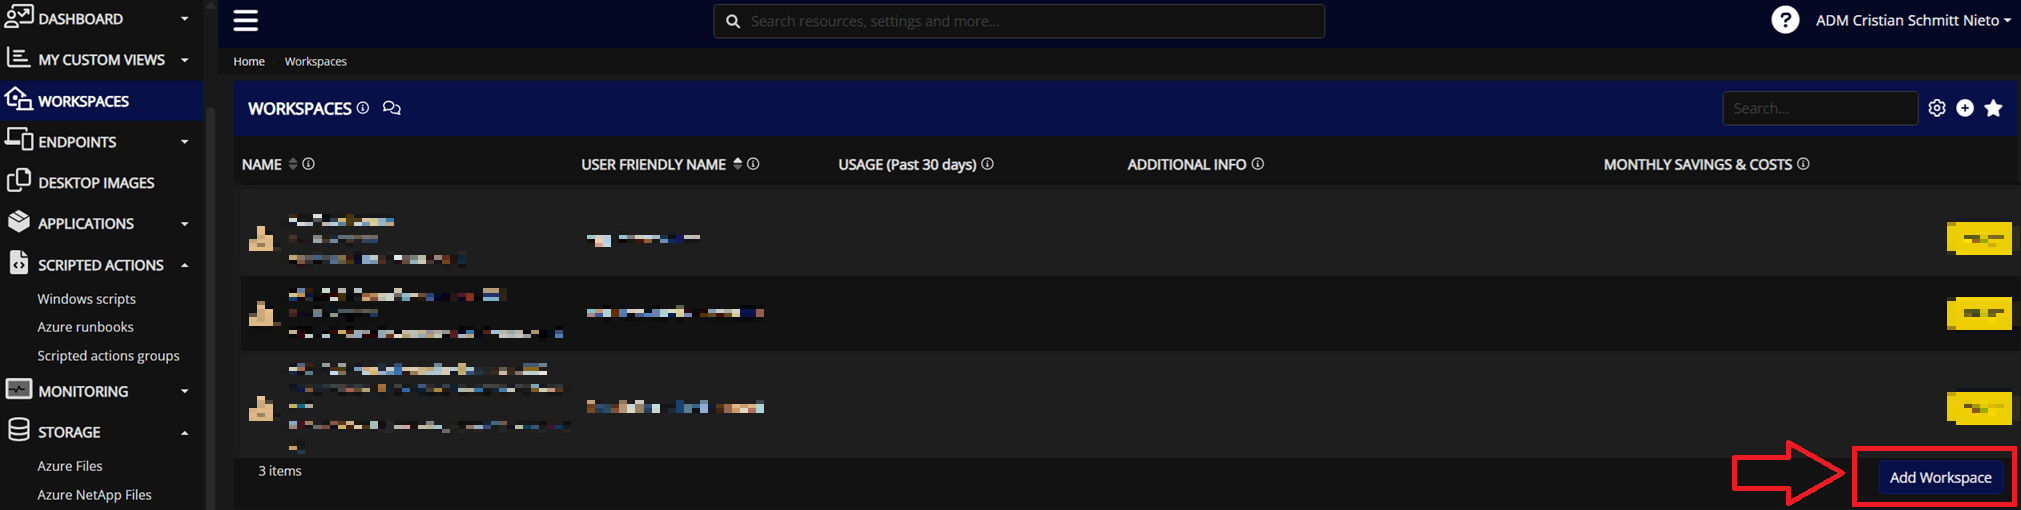

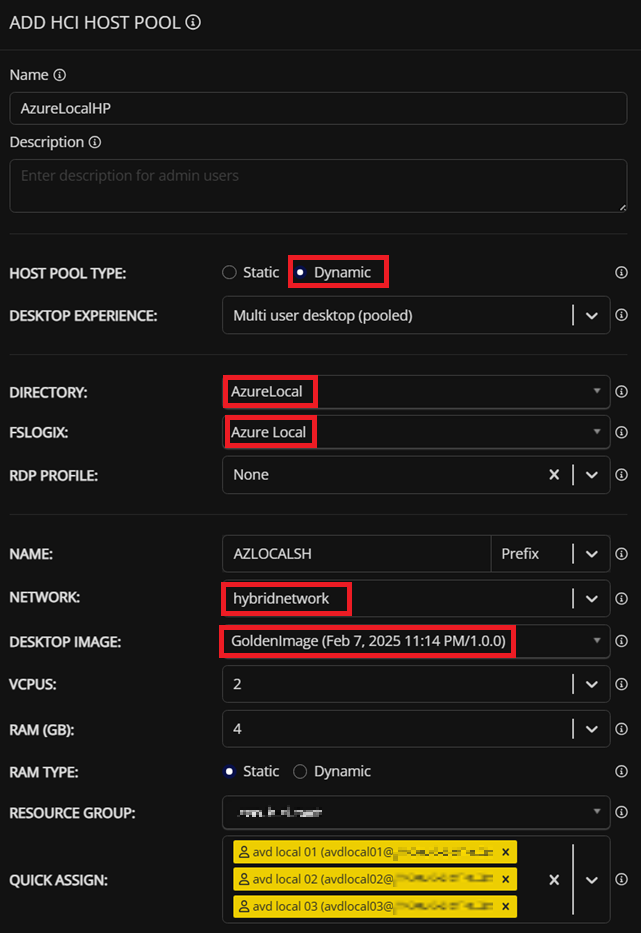
Adding a Hybrid Host Pool
After the Workspace is created, head to Hybrid host pools and add a new one. In my case, I chose Multi user desktop (pooled). You’ll need to select the Active Directory and FSLogix profile you configured under Integrations, pick the hybrid network you set up in the Azure Environment settings, and finally select the Desktop Image we created earlier. I assigned three users manually via Quick Assign, but in a production environment, you’d typically assign users through security groups.

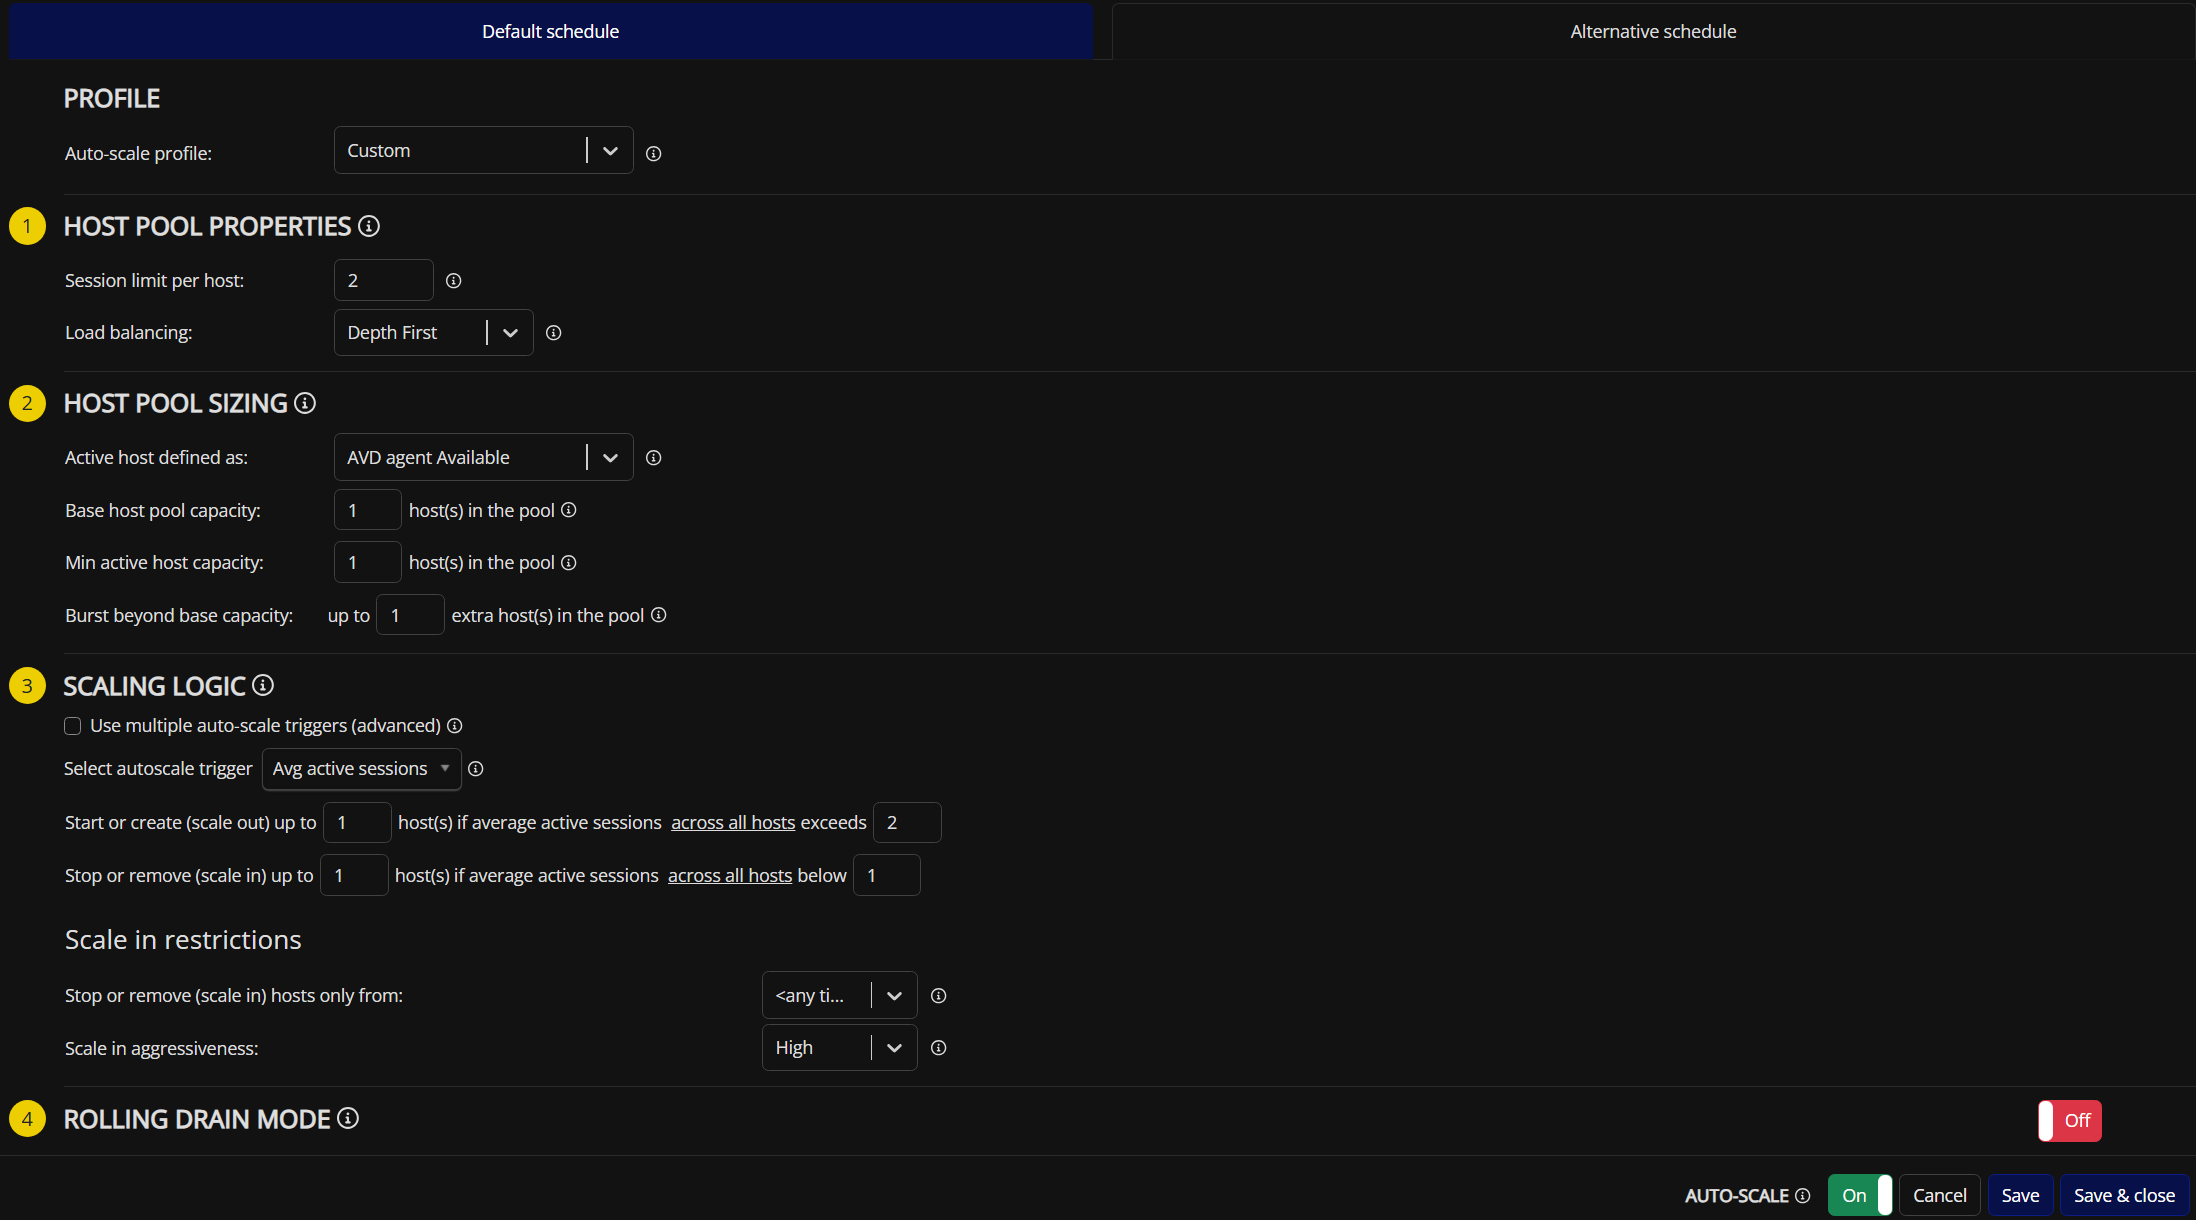
Configuring Autoscaling
Once the host pool is created, you’ll see a prompt to configure Autoscale. This differs from “Scaling Plans” in the Azure portal, which mainly handle power management (the dynamic autoscaling feature is still in preview). Nerdio offers a far more robust approach to autoscaling, with several factors to consider:
-
HOST POOL PROPERTIES
Specifies max sessions per Session Host and how load balancing is handled. -
HOST POOL SIZING
Determines when a Session Host is considered active (based on whether the VM is running or if the AVD agent is available), sets a base capacity for Session Hosts, a minimum capacity, and a “bursting” feature that automatically creates Session Hosts to meet demand. - SCALING LOGIC
Lets you use multiple triggers (in parallel if you wish) to scale in and out Session Hosts. For Azure Local, there are currently only three autoscale triggers:- Avg active sessions: Scales out when the average number of active sessions exceeds a predefined value.
- Available sessions: Maintains a specified number of available hosts by scaling in/out within the limits of Host Pool Sizing and max sessions per host.
- User-driven: Starts hosts when users connect, then automatically deallocates them after a set time of zero user sessions.
-
ROLLING DRAIN MODE
Lets you create multiple “drain windows” and target a percentage of your hosts to place in drain mode. -
PRE-STAGE HOSTS
Powers on or creates Session Hosts before business hours, avoiding massive logon storms. -
MESSAGING
Allows you to notify users of maintenance or shutdown periods. Changing the time automatically updates the in-session notification. - AUTO-HEAL BROKEN HOSTS
A “killer feature” of Nerdio. If a Session Host VM isn’t recognized as Available by the AVD service, Nerdio Manager can try repairing it automatically. It performs this auto-heal after all scale-out tasks are finished and things are stable.

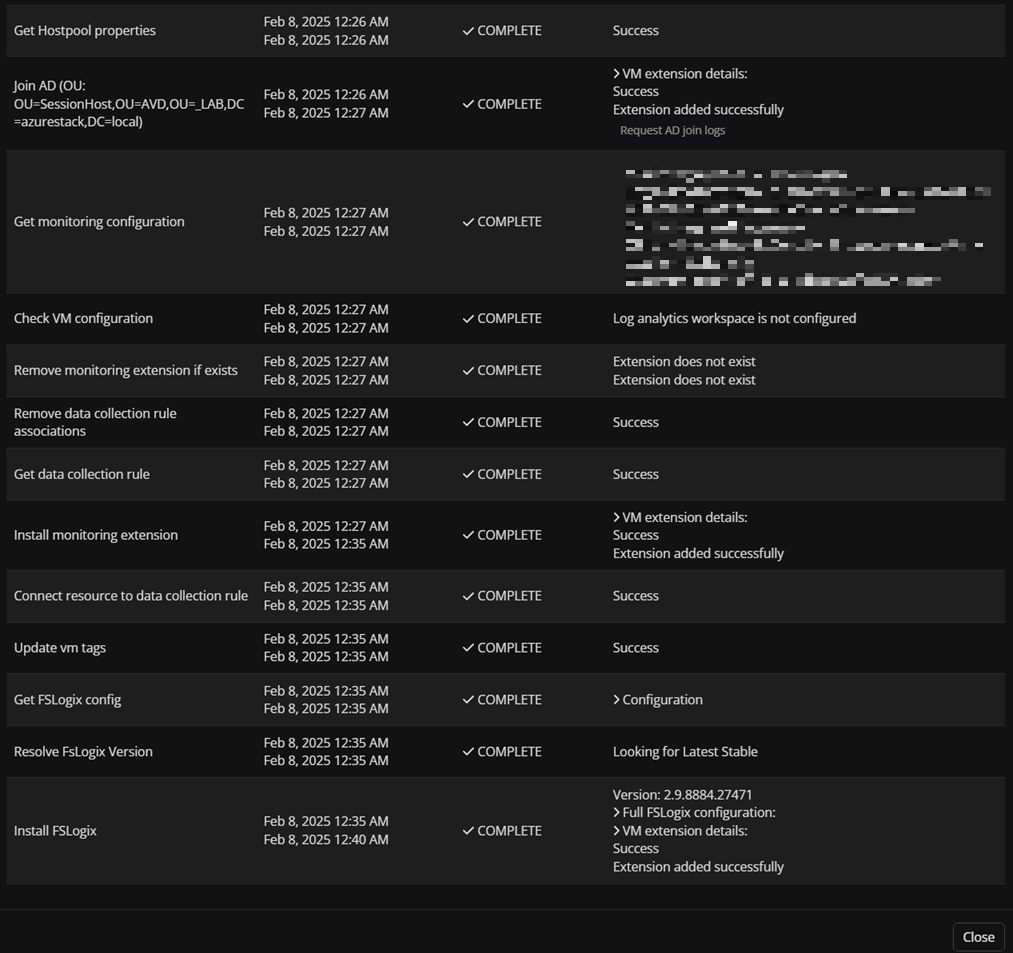
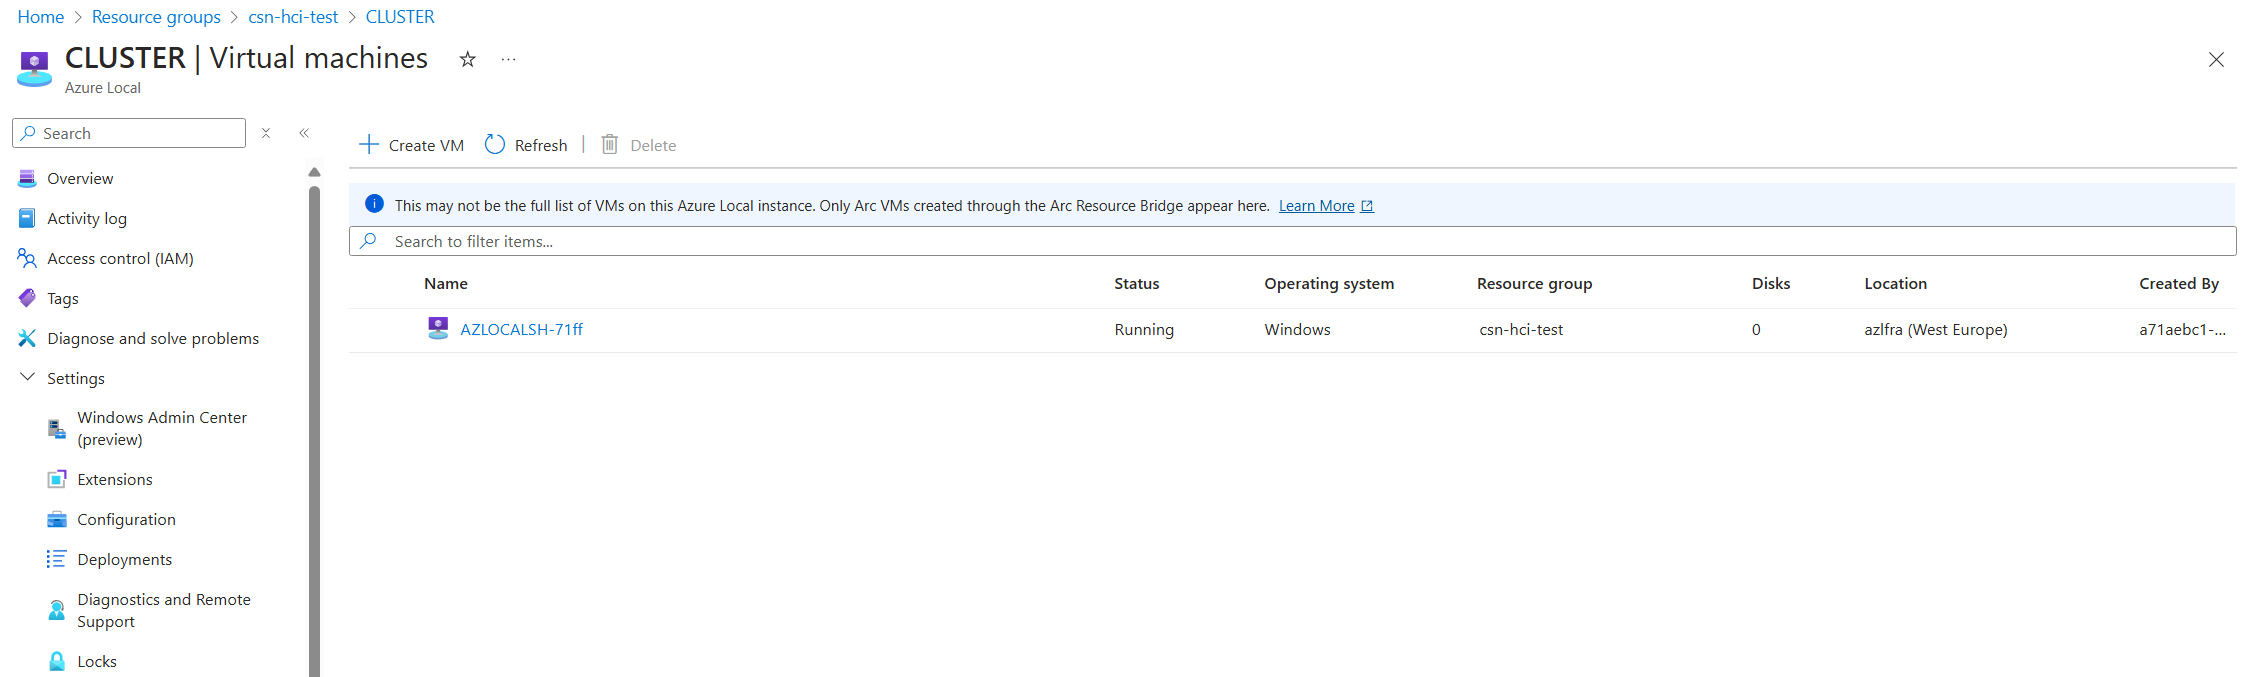
Upon configuring autoscaling, Nerdio provisions a Session Host according to your settings. In my test, the process took roughly 50 minutes and (to my surprise) completed without any errors. Here’s a snapshot of the provisioning and its final result:
Post-Deployment Tweaks
After the deployment, I realized I forgot to install the multimedia redirection extension and enable RDP Shortpath in my Golden Image. Ordinarily, I’d have to update the Golden Image and roll out a new deployment. But with Nerdio, I can use Run Script to fix these settings directly on the Session Host (or multiple Session Hosts simultaneously via bulk operations). Of course, I’ve also integrated these features into my Golden Image as well, but below are two screenshots showing how I added them directly to the Session Host:


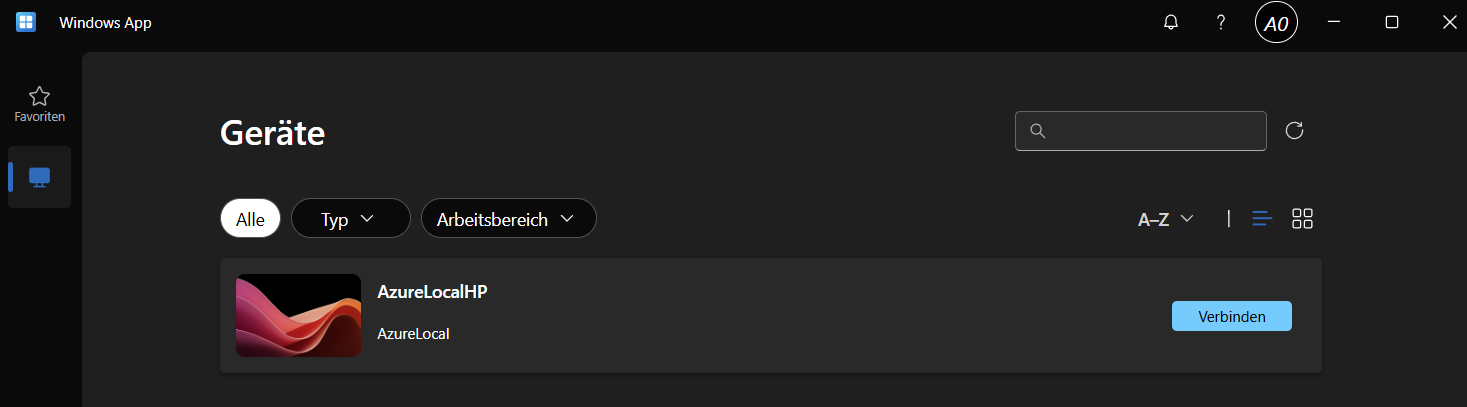
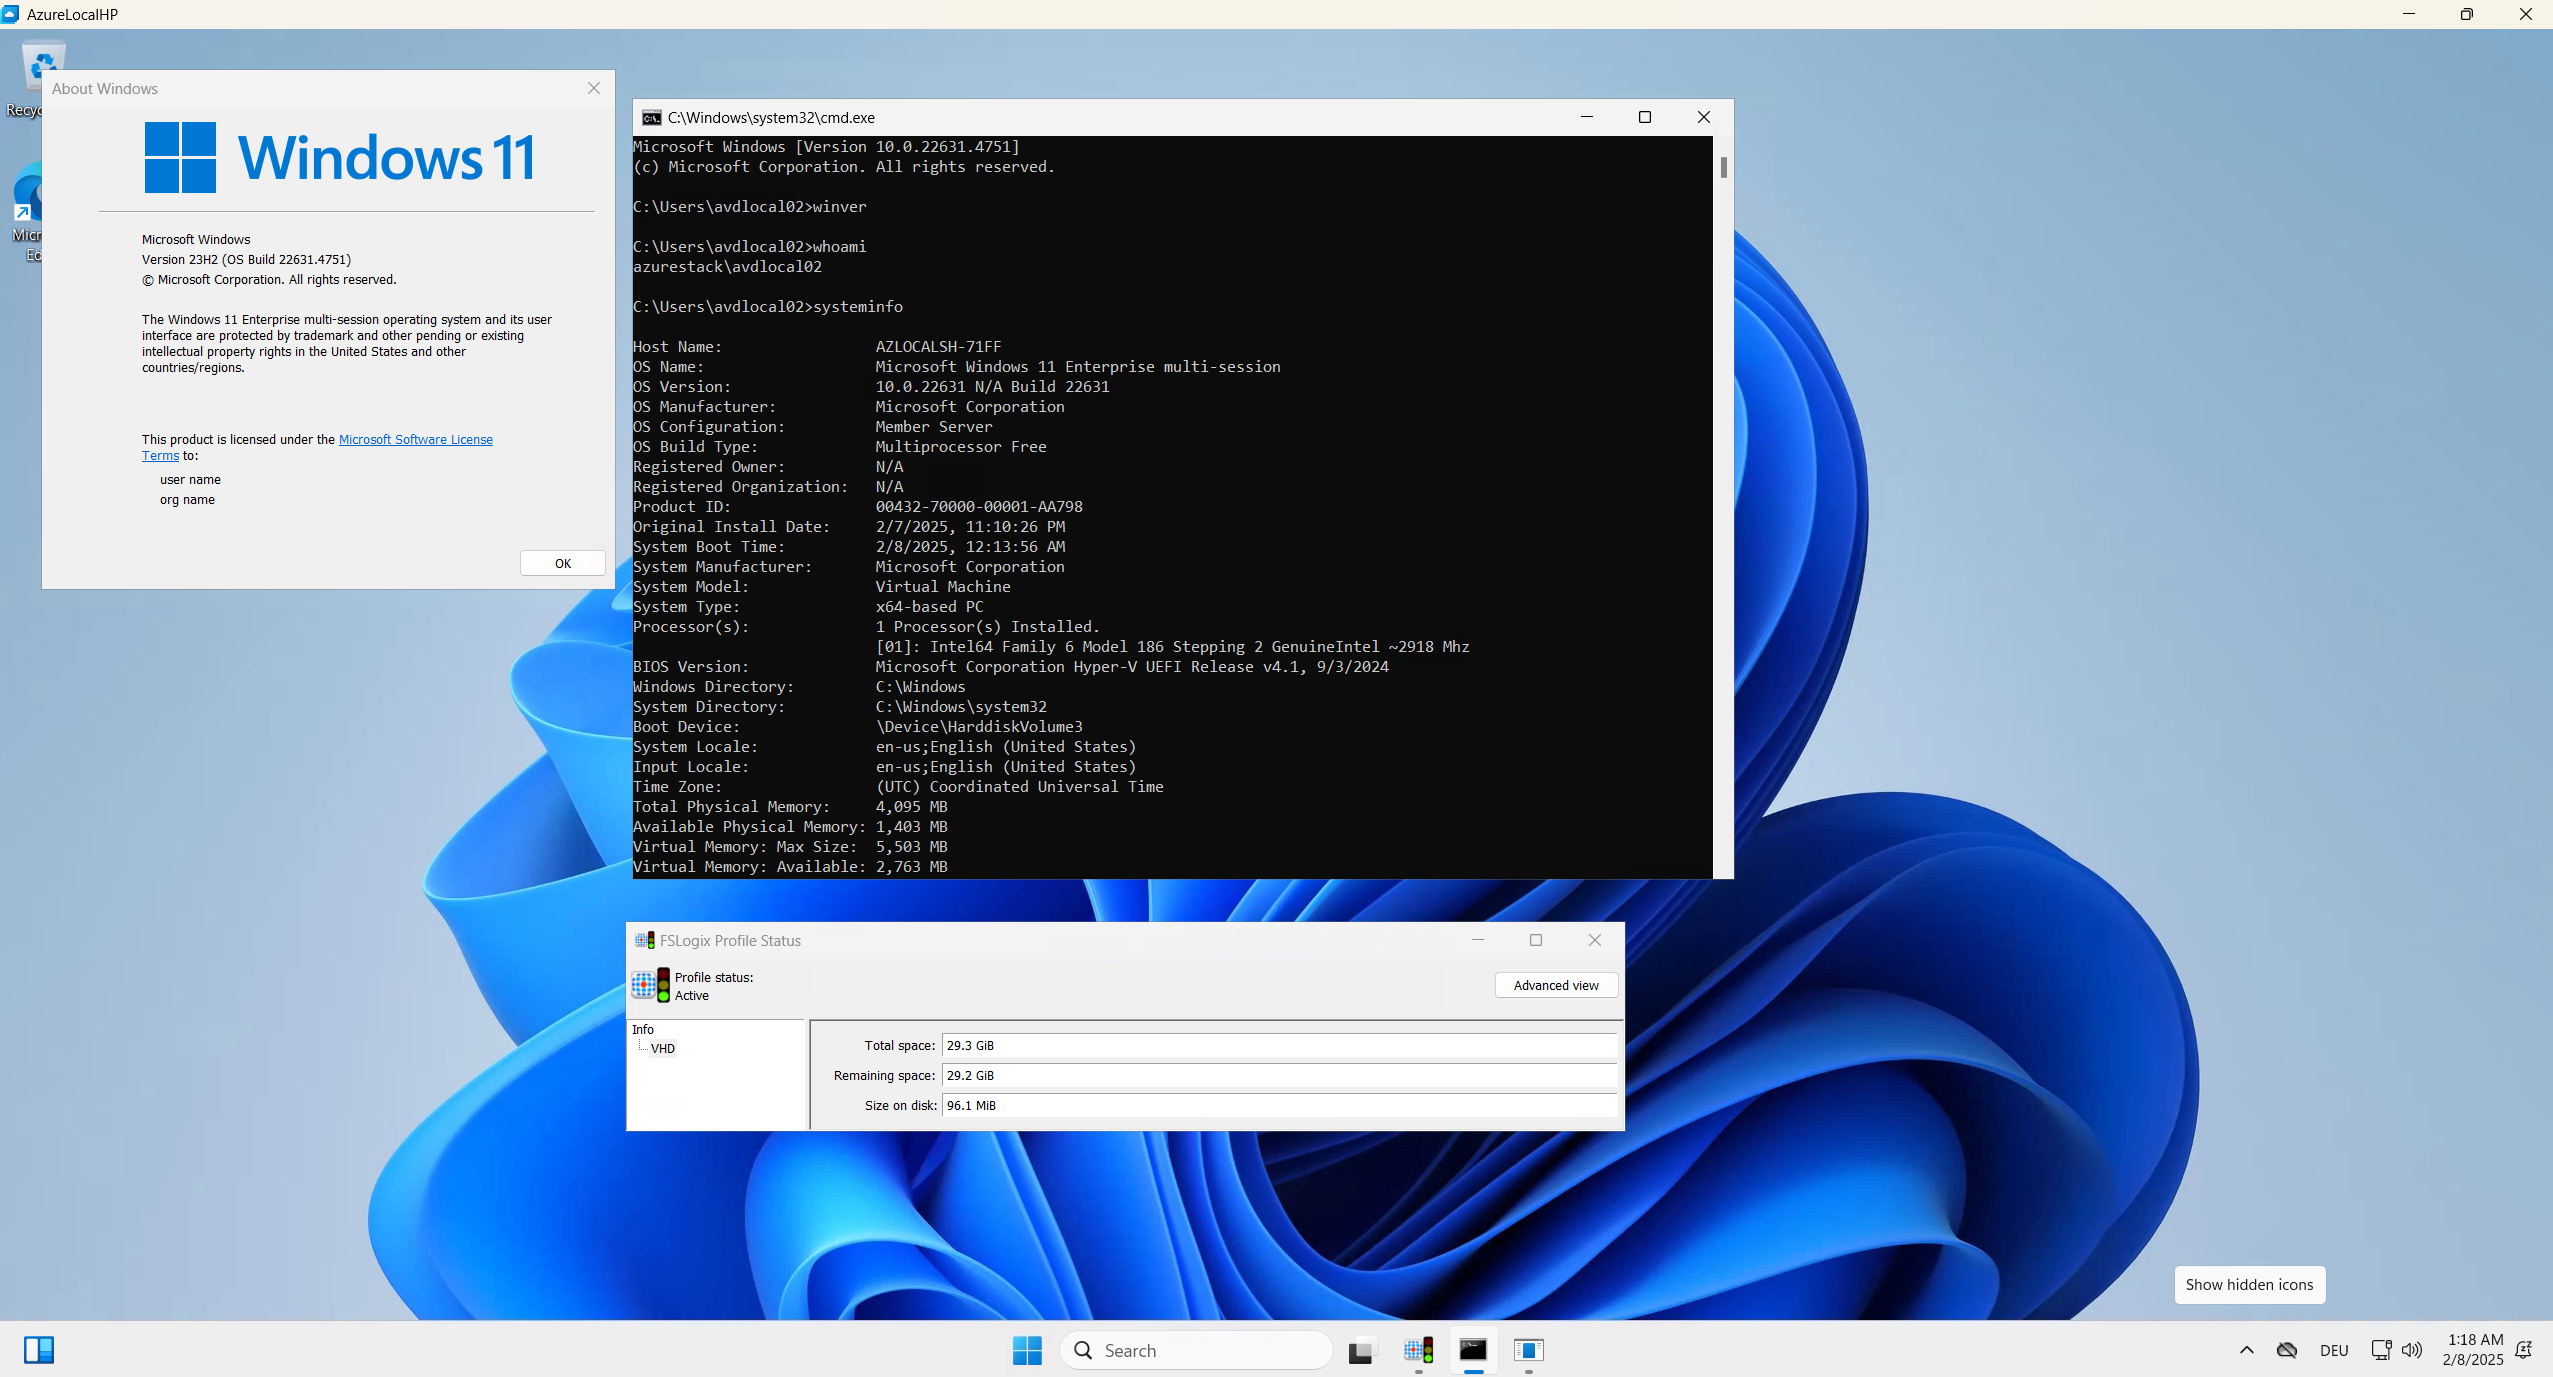
Once everything was in place, I logged into the Virtual Desktop, and sure enough, it performed exactly as expected:
Conclusion
A process that would normally take three to four hours to handle manually can easily be automated with Nerdio in about one or two hours at most. The main advantages come from the ability to automate nearly every step, like managing images, generating them automatically after Windows Updates are applied and running scripts to install applications on the fly.
Being able to implement unconventional autoscaling plans is another standout factor of this solution. Although I do wish we had a few extra scaling triggers on Azure Local (for CPU and RAM metrics), the current setup is already quite impressive compared to the Standard processes.
Bear in mind, Azure Virtual Desktop on Azure Local is a pay-as-you-go model (you pay for the Session Hosts while they’re running), so Nerdio’s autoscaling capabilities can help optimize costs. Granted, the cost savings aren’t as pronounced as on Azure Public, but the flexibility and ease of management still make it well worth considering.
Personally, I’m impressed by how straightforward and effective Nerdio is in conjunction with Azure Local. While I’m no stranger to Nerdio in general, seeing it work with Azure Local reinforces how viable this combination can be, especially for admins who want a comprehensive solution without needing deep technical knowledge in DevOps or infrastructure as code.
Comments