Introduction
Welcome to a new article in the Chronicloud Series. In this post, I’ll be addressing a topic that is always a key consideration when using Azure Local: Backup and Disaster Recovery.
If you’re accustomed to using infrastructure in Azure and haven’t yet experienced Azure Local, this subject might catch you off guard, since the backup and restore process here is completely different. Azure Local is deployed in your chosen location, whether that’s a data center, your company’s basement, or, in my case, my laptop, and it follows backup and recovery procedures that are almost identical to those used in Onpremises environments like Windows Server 2025, VMware, Nutanix, or similar systems.
This means that, for now, you need an on-premises backup infrastructure to secure your workloads. There is one small exception: Azure Site Recovery, which is currently in Preview and will be discussed later in this article.
Throughout this post, I will explore various backup solutions and possibilities, detailing both their dependencies/requirements and their limitations. Although I won’t implement a full technical backup solution (since my testing infrastructure is too limited for such a setup and would take too long to produce a satisfactory result), I will cover Azure Site Recovery in detail as I have a few specific insights to share.
Additionally, I’ll delve into the topic of hydration, a subject I’ve discussed in previous articles, examining its challenges and current possibilities. In my view, this aspect plays a crucial role in the VM recovery process.
The Challenge: Hydration and VM Recovery
For those who aren’t familiar with what I mean by Hydration, I’ll try to explain it simply. Hydration is a process where an Azure Local VM, managed and configured as if it were a Hyper-V VM (e.g. using PowerShell commands, Hyper-V Manager, Cluster Manager, or Windows Admin Center), is transformed into an ARC VM. In other words, it converts a “local” VM into a “hybrid” VM that can be managed from the Azure portal.
Regarding the recovery process and hydration of a VM in Azure Local, here’s what I can say:
- If your goal is solely to cover the backup and recovery of VMs within a single Azure Local Cluster, I can confidently state that this is currently achievable through various solutions. Restoring the VM in the cluster returns it to its original state, meaning no hydration is needed because the VM functions normally.
- Conversely, if your objective is to back up and restore across different Azure Local Clusters, there are a couple of limitations and challenges to consider. The primary challenge is restoring an ARC VM in an Azure Local Cluster different from the original.
- Since there isn’t currently a hydration service in Azure Local that allows registering (or re-registering) the VM in a cluster other than the one it was originally set up on, the only thing that gets restored is the VM as a local resource (with its CPU, RAM, storage configuration, etc.).
- This doesn’t mean the VM can’t be used in the new cluster; it will simply operate as a basic Hyper-V VM and won’t have the capabilities of an ARC VM since it can’t utilize the ARC Resource Bridge it was configured with.
As for when and how a hydration service will be implemented in Azure Local, there’s no current information available about its roadmap or status. Despite the absence of a hydration service, there are a couple of workarounds that can help you implement a local VM as an ARC VM, which I’ll explore in more detail in the next section.
Workarounds for Hydration
Personally, I only know of one “functional” workaround and one “theoretical” workaround. Neither is supported or documented by Microsoft; what I’m about to describe isn’t designed or validated by Microsoft, this is simply based on my experience as a provisional measure until the service becomes available.
Let’s start with the functional workaround. This method uses Azure Migrate (in preview) and requires a server running Hyper-V to migrate the VM to Azure Local. The migration process, which I’ll detail in my next blog post (Azure Local: Planning, Sizing & Migration), is as follows:
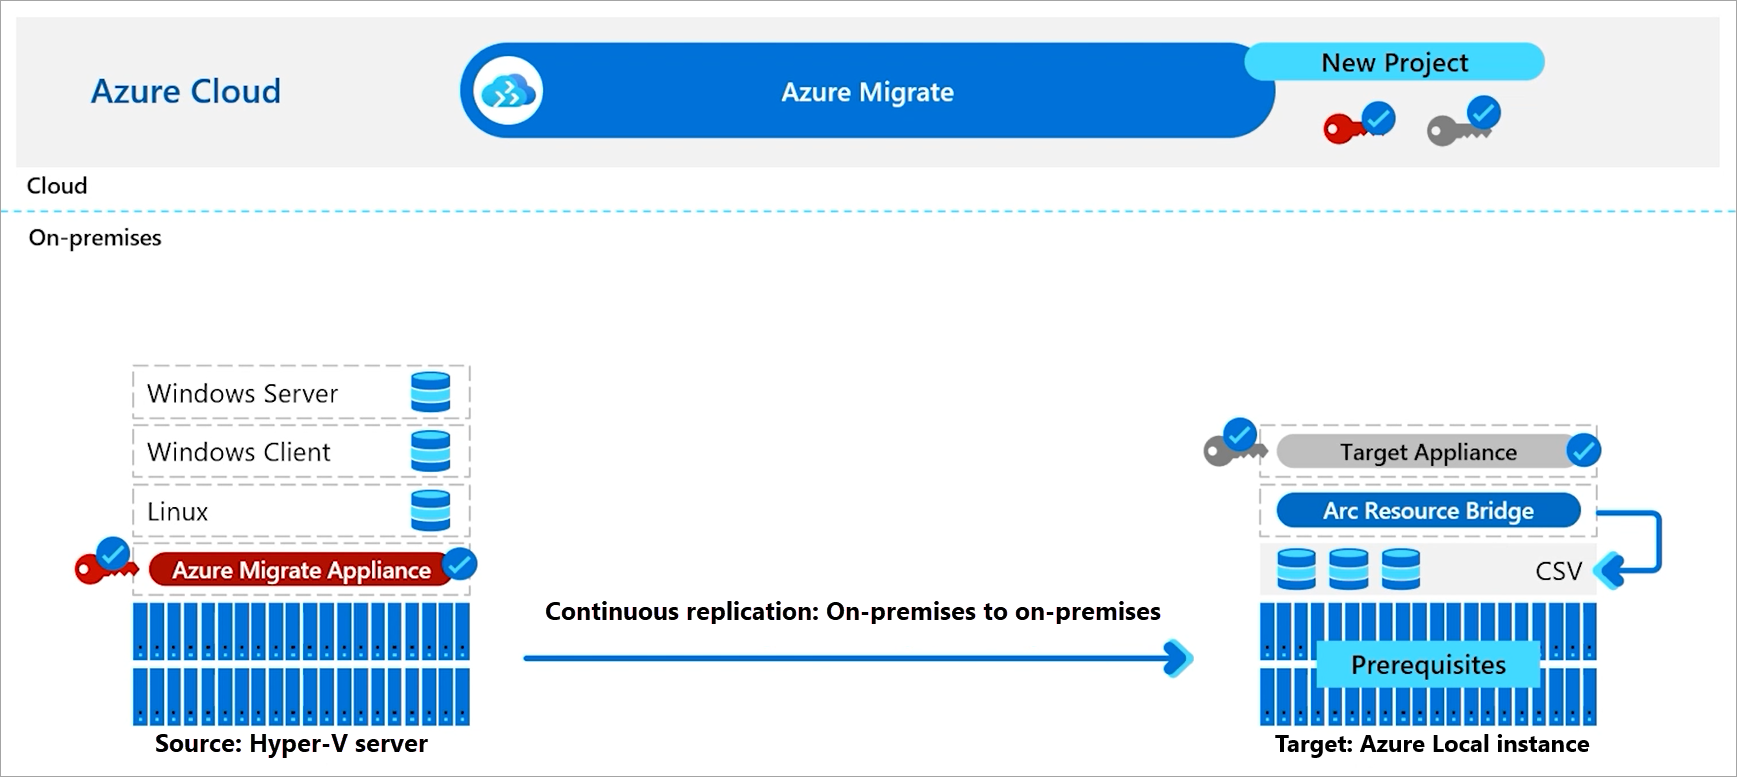
This process allows us to migrate the VM from a Hyper-V environment to Azure Local and have it appear as an ARC VM by registering it with the ARC Resource Bridge. However, if the VM we want to “migrate” is actually a restoration of a VM from another Azure Local cluster, a couple of preparatory steps are necessary to ensure it registers correctly in the new cluster. The most important step noted in the documentation is:
- Verify that none of the VMs you plan to migrate have the Azure Connected Machine Agent installed. For more information, see FAQ.
In other words, you need to uninstall the “Azure Connected Machine Agent” and, to avoid issues, also remove any existing resource in the Azure Portal previously linked to that VM. There are also certain limitations with this process, such as the MAC address of the network interfaces changing (link). This usually isn’t a problem, but it wouldn’t be the first time that an application requires a specific MAC address due to licensing concerns 🥲.
That said, since my goal isn’t to describe in detail how Azure Migrate works (I’ll cover that in my next article), for those eager to understand the process, I recommend a great article by Kenny Lowe which details the migration of a local VM (located on a cluster node) to an ARC VM within the same Azure Local cluster, in other words, performing the hydration process via Azure Migrate: Migrating VMs to Azure Stack HCI 23H2.
Once the functional workaround has been discussed, we move on to the theoretical workaround, which I haven’t yet tested and have serious doubts about. The theoretical workaround is based on some responses from users in the following post, which states:
- You can deploy a new Azure Stack HCI virtual machine in your newly redeployed cluster and then overwrite the existing virtual disk with your backup data.
I personally believe this might work only if the VM wasn’t previously registered with ARC and assuming that the ARC Resource Bridge would initiate a new onboarding process upon detecting that the VM isn’t “configured correctly” (which it doesn’t). However, as mentioned, this is an approach I haven’t been able to verify, and I remain quite skeptical about its viability when restoring an ARC VM from another Azure Local cluster.
I plan to take some time in the coming weeks to validate the theoretical workaround and, if it proves functional, update this article to reflect my experiences. For now, though, we’ve covered enough on hydration in Azure Local, so let’s move on to the next topic, which should be the main focus of this article: Backup.
Backup
This is a topic that always gives us headaches but is fundamental to any infrastructure, whether due to hardware issues, physical incidents (floods, fires…), configuration mistakes (deleted files, corrupt VMs…) or security breaches (ransomware). Without a robust backup, you’re really in trouble…
I won’t delve too deeply into the basic concepts of backup and recovery here, as that would make this article excessively long. Instead, I encourage you to explore these fundamentals through a few links from one of the most popular solutions my clients use (Veeam):
- What is the 3-2-1 backup rule?
- RPO and RTO: What’s the Difference?
- Best Practices: Assess, Design, Build, Operate & Secure
- Backup resource calculator
- Backup servers and repositories should not depend on the infrastructure (e.g. not be part of AD, be on a separate physical server…)
As I mentioned in the introduction, even though Azure Local is part of Azure’s hybrid infrastructure, it does not include the native Azure Backup service. On reflection, this makes sense, as it would be very difficult, costly, and inefficient to maintain the required RPOs and RTOs by continuously backing up workloads solely over the Internet (WAN).
There is an approach that comes close to this, which we’ll cover later, called Azure Site Recovery (ASR). This means that if you design an Azure Local solution, you also need to design or adapt your backup strategy. In the sections that follow, I’ll discuss a couple of solutions for the various workloads that can be implemented in Azure Local, along with their dependencies, advantages, and benefits.
Host
Although, in theory, you could back up the hosts (while, of course, avoiding the Cluster Shared Volume), I do not recommend this practice since it is not one of Microsoft’s recommended best practices. In case one of the nodes suffers hardware damage, there is some excellent documentation that outlines the node repair process:

That said, this guide does not apply to single-node servers. This is the only case where, besides backing up the workloads, I would recommend backing up the node itself (without needing to back up C:\ClusterStorage, as it is redundant). A failure here would constitute a “Disaster Recovery” scenario, and if we want to maintain the ARC VMs and the entire configured infrastructure, it could be a possible method to achieve that.
While I personally wouldn’t back up the entire nodes of a cluster, there are certain folders on each node that I like to keep copies of, and these are:
- C:\ProgramData\AzureConnectedMachineAgent\Log
- C:\MASLogs
- C:\Agents
- C:\CloudContent
- C:\CloudDeployment
- C:\ClusterStorage\Infrastructure_1\ArcHci
The last folder ideally should not be backed up, but since it contains the log of the last time the ARC Resource Bridge was provisioned in the event of Disaster Recovery and a cluster rebuild, it may contain relevant information.
VMs
Since VMs are the primary workload in Azure Local (at least in my experience), there are several options for creating backups. Of the solutions I’ll present below, I want to highlight that they are just two of the seven currently available for Azure Local, in other words, when it comes to backing up VMs, you have plenty of choices.
Before diving into the two solutions I will cover, please note that depending on the workload you intend to run, it makes more or less sense to perform backups (as well as to determine the backup frequency, i.e., how many backups of the VM are performed each day). A couple of examples of this would be:
- AVD Multiuser Session Host: Personally, since I usually manage session hosts using Golden Images, I don’t require a backup of the VMs because the valuable data (user profiles and/or data directories) is already secured via the File Server backup.
- SQL Server: SQL servers, due to the high volume of changes throughout the day, typically have a much more intensive backup configuration compared to other VMs. Common practices in mission-critical servers include backing up transaction logs every 30 minutes, performing incremental backups every hour, and a full backup once a day.
All the solutions we will analyze (and indeed all those available) share the same problem when restoring VMs in an ALR (Alternate Location Recovery), that is, in another cluster: the VMs are restored as Hyper-V VMs rather than as ARC VMs, which is something we discussed in the Hydration section.
Microsoft Azure Backup Server
Before anything, I want to share the official guide on how to configure Azure Local Backup with Azure Backup Server, which also outlines the supported scenarios.
In my experience, MABS is not one of the most widespread solutions in the market (at least not in Germany 🤔), likely due to its limitations and performance compared to other infrastructure platforms (aside from Azure Local and VMware) and, conversely, the services offered by other solutions. However, it can be a more economically efficient option, as it does not incur additional licensing costs for the backup service, although it should be taken into account that for large data volumes (many terabytes), the cost of storing information in Azure Backup Vaults can be higher compared to other alternatives..
Regarding integration with Azure, MABS integrates natively with hybrid services (storing data in an Azure Backup Vault), which, in my view, simplifies and eases its management.
When it comes to backing up VMs, MABS offers the following features:
- Native Hyper-V/Azure Local support: Backs up VMs in an Azure Local cluster with an agent on each node.
- Host-level backup: Protects VMs even when stored on local storage, DAS, or CSV (Cluster Shared Volumes).
- Cluster mobility: Detects live migration; if a VM moves to a different node, MABS continues protecting it on the new host without manual intervention.
- Limitation: It does not support moving a VM to a different cluster (only within the same cluster).
Specific workload limitations/characteristics include:
- Domain Controller: It does not offer granular restoration of individual AD objects from the MABS console (there is no “item level restore” for AD); you would need to recover a System State backup and use AD tools (or the AD Recycle Bin) to restore specific objects.
- SQL Server: SQL backups can be sent to an Azure Recovery Services Vault for long-term retention (up to 99 years), with storage isolated from the local infrastructure. It does not protect databases whose files reside on remote shared resources (SMB), nor certain complex scenarios of Availability Groups with mismatched names.
For the proper operation and backup of the aforementioned specific workloads, Guest Agents are required, which slightly increases the complexity of the solution.
Concurrency and parallel processing: Historically, MABS had restrictions on the number of simultaneous tasks, but in version 4 it supports up to 8 parallel backups/restorations of VMs by default (configurable via settings).
Storage efficiency: MABS can leverage Windows Server deduplication on its backup volumes to reduce consumed space (a strategy inherited from System Center DPM). Additionally, it compresses and encrypts the data sent to the Azure Backup Vault.
Load on the protected systems: MABS, by using agents on each server/VM for certain tasks (for example, agents within VMs for SQL or for the System State of Domain Controllers), can impose CPU/memory usage on the guest systems during the backup window (due to VSS operations, encryption, and data transfer).
File restoration: It allows restoring individual files or folders to their original or an alternate location. MABS v4 introduced the ability to browse recovery points in Azure without fully downloading them, making it easier to restore specific files from the cloud (link).
Data encryption at rest: All content backed up in the Recovery Services Vault (in Azure) is encrypted by default with 256-bit AES (link). In on-premise MABS, data stored locally on the backup server can be encrypted using BitLocker or the operating system’s EFS if needed, but there is no native encryption option in MABS for that local storage beyond what Windows provides.
Backup immutability (protection against deletion/modification): On-premises, MABS does not have an immutability mechanism for its backup disks beyond protecting server access. However, if you use immutability in the Recovery Services Vault and “lock” it, Azure guarantees that no backup can be deleted or altered before its expiration date according to the configured policy (link). This adds a layer of protection against accidental or malicious deletions, even an attacker with access would not be able to delete the current backups.
Given all of this, if you’re starting from a “Green Field approach” and do not have highly specific backup requirements for your workloads, MABS is a solution that maybe fits your scenario. It is a Microsoft solution for a Microsoft product, and despite not having all the features that other backup providers might offer, I believe the features it does provide are more than sufficient to meet your needs.
Veeam
Why Veeam? In many of the infrastructures where I’ve implemented Azure Local or Windows Server, a backup solution was already in place, and in my experience, Veeam was the most widely adopted by my clients. I must say it offers certain benefits over MABS in terms of backup and recovery. Like every backup solution for Azure Local, it also encounters the hydration issue, meaning that its use should be evaluated based on its local infrastructure features rather than its Azure integration.
Without getting too lengthy, I’ll summarize the advantages Veeam brings compared to MABS, as well as the supported scenarios and requirements for integrating Veeam in Azure Local. I’ll start with the integration requirements, which are brief and specific:
- Integration with Windows Defender Application Control (WDAC) in Azure Local: One of the main issues I’ve seen in the past is that Veeam couldn’t be integrated into Azure Local because WDAC blocked its use. Using this article, you can add a supplemental policy to allow Veeam to integrate.
- Requirements and support: The supported scenarios and requirements are detailed in this article. They can be summarized as:
- Minimum version of Veeam Backup & Replication for Azure Local (version 25398.X): The current minimum supported version is 12.1 (build 12.1.0.2131).
- No support for Azure Arc VM management (Hydration): Azure Arc VMs in a “Running” state can be backed up. Upon restore, these VMs become standard Hyper-V workloads. If a VM is restored (and the original is no longer present) within the period that Azure Arc can reconnect (45 days), the Azure Arc connection should persist if restored to the same cluster.
I also want to mention an issue that may occur in Azure Local Clusters running an older 22H2 version that hasn’t been updated regularly. This is the “Hyper-V Resilient Change Tracking Performance Issues”, where general Hyper-V OS performance degradation can occur when using a backup solution to export Hyper-V VM snapshots during backup operations. The fix involves installing the Cumulative Update from February 11 and adding the following registry value:
- Key Location: HKLM\SYSTEM\CurrentControlSet\Policies\Microsoft\FeatureManagement\Overrides
- Value Name: 636159629
- Value Type: DWORD (32-Bit) Value
- Value Data: 1
Now, let’s examine the supported scenarios and the advantages of Veeam over MABS for backing up on-premises infrastructure:
- Support for Hyper-V/Azure Local: Veeam backs up VMs in local clusters without needing to install agents on each machine, leveraging hypervisor-level integration.
- Host-level backup: It protects VMs even on local storage, DAS, or CSV (Cluster Shared Volumes), ensuring continuity in environments with distributed storage.
- Cluster mobility: Veeam automatically detects VM movements (Live Migration) and continues applying backup policies without manual intervention.
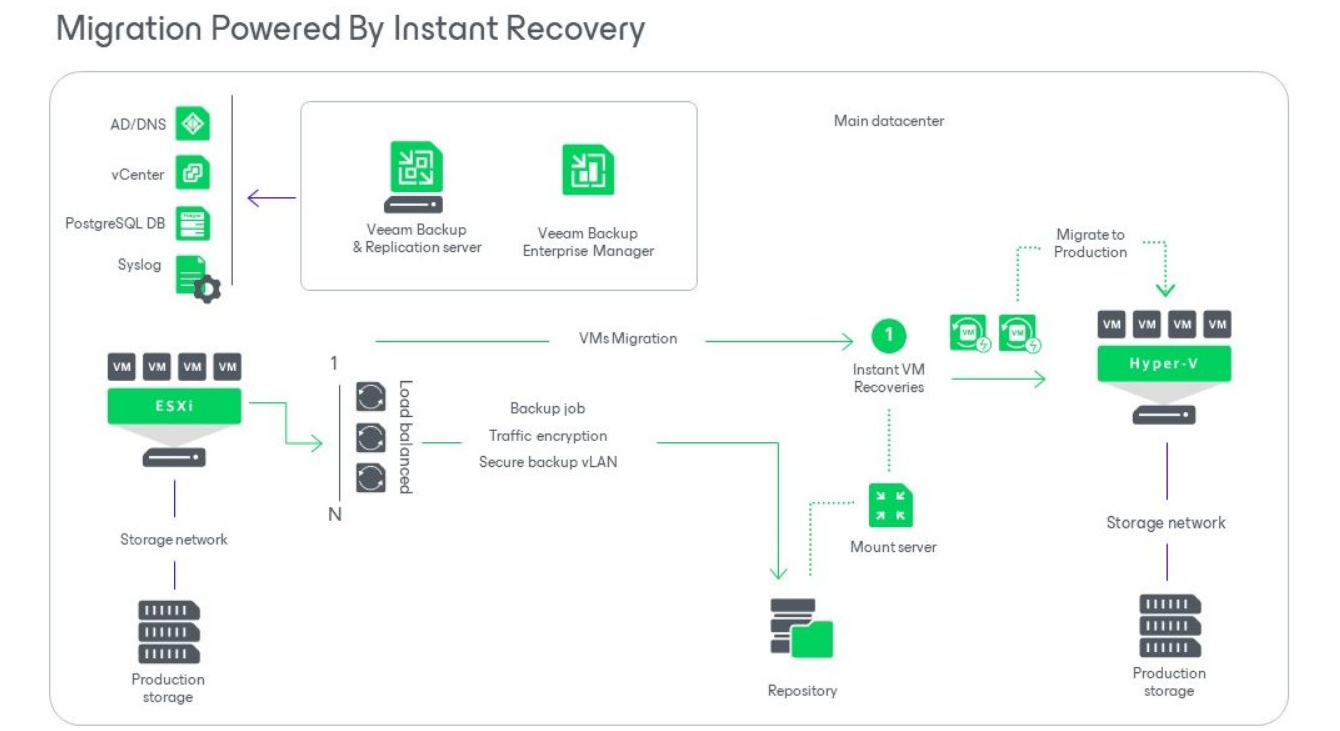
- Additional functionality: It includes Instant VM Recovery, which allows you to boot a virtual machine directly from the backup, significantly reducing restoration times.
- Support for additional platforms: Veeam supports backups for Proxmox, Nutanix, Oracle, and Red Hat in addition to Azure Local and VMware (link).
-
Live Migration: Although VMs won’t be rehydrated in the new cluster, locally (as Hyper-V VMs) it is possible to move VMs between clusters while retaining the backup. In fact, you can even move VMs from other platforms (e.g., VMware) via Instant Recovery. That said, I personally do not recommend this approach if the goal is to migrate to Azure Local, as it would forfeit the possibility of integrating the VM as an Arc VM, a process that can be achieved with Azure Migrate, which I’ll cover in my next blog post. Here’s a schematic of the process:
- Workload-specific features:
- Domain Controller: Veeam protects domain controllers through its integration with VSS, ensuring consistent backups. With Veeam Explorer for Active Directory, you can perform granular restores of individual objects, making it easy to recover specific users or groups without restoring the entire system.
- SQL Server: Veeam natively backs up SQL databases using Application-Aware Processing, ensuring data consistency during backups. It also allows sending backups to cloud repositories (e.g., Azure Blob Storage) for long-term retention. In complex scenarios (like Always On Availability Groups or databases with files on remote shared resources), specific configuration adjustments may be necessary for complete protection.
- Concurrency and parallel processing: Veeam is designed for high-demand environments, enabling multiple backup and restore tasks to run in parallel. Thanks to its distributed architecture, with scalable backup proxies and repositories, it efficiently manages large volumes of data in line with the available infrastructure capacity.
- Storage efficiency: Veeam applies deduplication and compression techniques at the job level, significantly reducing backup storage space. It also offers the option to integrate external deduplication appliances, further optimizing storage usage, especially in environments with high data volumes or frequent changes.
- Data encryption at rest: Veeam natively encrypts backup files using AES 256-bit (link), ensuring that stored information, whether in local repositories or in the cloud, remains protected. This option is set at the job or repository level, providing added security against unauthorized access.
- Backup immutability (protection against deletion/modification): Recent versions of Veeam offer options to configure immutable repositories to protect against unauthorized deletions or modifications. This is achievable both in local repositories (using Linux systems with immutable attributes) and in cloud storage environments, leveraging the immutability features of Azure Blob Storage.
Not everything is an advantage, so here are additional factors to consider when deciding on a backup infrastructure:
- No use of Azure Backup Vaults: Although you can configure Azure Blob Storage as the backup storage, Veeam does not use vaults natively. This means the solution isn’t integrated with Azure out-of-the-box and requires an additional management portal to handle or verify backups. Personally, I’m a fan of the configurations possible with Veeam Backup Monitoring & Replication Alarms, so I don’t see this as a major limitation.
- Know-How: While Veeam is user-friendly, integrating it into a new infrastructure requires specific prior knowledge, a topic that could easily fill 10 blog posts 😅. Veeam backs up infrastructures more effectively and efficiently, but there is an initial learning curve. They even offer a specialized certification program for experts that covers these topics in depth (link).
- Licensing Costs: I won’t commit to a specific number as costs vary per infrastructure, but you can calculate expenses using their pricing calculator. Compared to MABS, depending on the amount of data to back up, Veeam can be a much more expensive option.
- Additional Infrastructure: Although Veeam can be configured with an infrastructure similar to MABS, leveraging its full potential might require designing additional infrastructure, which can incur extra monetary and operational costs.
Taking all these points into account, I conclude that Veeam is a more advanced, focused, and specialized backup solution that offers many more options than MABS, though it does come with additional costs that must be planned for in advance. In my experience, especially in the German market, if a client has on-premises infrastructure and a backup system, it is very likely to be Veeam.
Trusted launch VMs
After covering the VMs workload in the previous section, a new question arises: how are Trusted launch VMs backed up and restored? The main difference compared to standard Azure Local VMs is the following:
Trusted Launch VMs in Azure Local environments differ from standard VMs because they use a dedicated key to secure the state of the VM guest, including the virtual TPM state when it is not active. This key is kept safe in a local key vault located on the same Azure Local system as the VM. Additionally, the guest state of a Trusted Launch VM is saved in two separate files: one file contains the guest state and the other contains the runtime state. As a result, any backup or restoration process for a Trusted Launch VM must include all VM files along with the protection key.
I want to highlight the following message from Microsoft’s documentation regarding Backup and Restore of Trusted launch VMs:
Backup and disaster recovery tooling support: Currently, Trusted launch for Azure Local VMs do not support any third-party or Microsoft-owned backup and disaster recovery tools, including but not limited to, Azure Backup, Azure Site Recovery, Veeam, and Commvault. If there arises a need to move a Trusted launch for Azure Local TVM to an alternate cluster, see the manual process Manual backup and recovery of Trusted launch for Azure Local VMs to manage all the necessary files and VM protection key to ensure that the VM can be successfully restored.
Because of this, before deploying a Trusted Launch VM, you need to consider how to back it up, as the current solution is neither elegant nor integrated into standard backup solutions. My main advice is that if you require Trusted Launch VMs, make sure to set up an automation (for example, a PowerShell script that saves the results of the manual process into a CSV which is then backed up) to ensure they are properly secured. Otherwise, you might end up with backups that cannot be used, and as they say, a backup that cannot be restored is as good as having no backup at all (even worse, since you’re wasting space and resources 😅).
With that in mind, the manual backup and restore process is detailed perfectly in the following summary.
Manual backup and recovery of Trusted launch VMs
Overview
Trusted Launch Arc VMs use a VM Guest State Protection (GSP) key stored in a local key vault to secure the VM guest state (including the vTPM state). The guest state is divided into two files: VM Guest State (VMGS) and VM Runtime State (VMRS). Losing the GSP key prevents the VM from booting, so it’s essential to back up both the VM files and the GSP key regularly.
Manual Backup Process
-
Export the VM Files
UseExport-VMto back up all VM files (VMGS and VMRS). -
Back Up the GSP Key
- On the Azure Local system with the backup key vault:
Create a wrapping key and download its PEM file by running:New-MocKey -name wrappingKey -group AzureStackHostAttestation -keyvaultName AzureStackTvmKeyVault -type RSA -size 2048Get-MocKeyPublicKey -name wrappingKey -group AzureStackHostAttestation -keyvaultName AzureStackTvmKeyVault -outputFile wrappingKey.pem - On the Azure Local system hosting the VM:
Copy the PEM file, verify the VM owner node, and retrieve the VM ID:Get-ClusterGroup <VM name>(Get-VM -Name <VM name>).vmidThen, export the GSP key:
Export-MocKey -name <VM ID> -wrappingKeyName wrappingKey -wrappingPubKeyFile wrappingKey.pem -outFile <VM ID>.json -group AzureStackHostAttestation -keyvaultName AzureStackTvmKeyVault -size 256 - Return to the backup key vault system:
Transfer the<VM ID>and<VM ID>.jsonfiles, and import the GSP key:Import-MocKey -name <VM ID> -importKeyFile <VM ID>.json -group AzureStackHostAttestation -keyvaultName AzureStackTvmKeyVault -type AES -size 256
- On the Azure Local system with the backup key vault:
Manual Restore Process
- Prepare the Target System
On the Azure Local system where you want to restore the VM, create a new wrapping key and download its PEM file:New-MocKey -name wrappingKey -group AzureStackHostAttestation -keyvaultName AzureStackTvmKeyVault -type RSA -size 2048Get-MocKeyPublicKey -name wrappingKey -group AzureStackHostAttestation -keyvaultName AzureStackTvmKeyVault -outputFile wrappingKey.pem - Export the GSP Key from the Backup
On the system with the backup key vault, copy the PEM file to the target system. Then, obtain the VM ID (from the VM’s config file or by executing):(Get-VM -Name <VM name>).vmidExport the GSP key using:
Export-MocKey -name <VM ID> -wrappingKeyName wrappingKey -wrappingPubKeyFile wrappingKey.pem -outFile <VM ID>.json -group AzureStackHostAttestation -keyvaultName AzureStackTvmKeyVault -size 256 - Import the GSP Key on the Target System
On the target system, copy the<VM ID>and<VM ID>.jsonfiles and import the GSP key:Import-MocKey -name <VM ID> -importKeyFile <VM ID>.json -group AzureStackHostAttestation -keyvaultName AzureStackTvmKeyVault -type AES -size 256
Important:
Ensure that the GSP key is restored on the target system before starting the VM. If the VM is started without the restored key, the system will generate a new GSP key, which may cause errors. In such a case, remove the incorrect key with:
Remove-MocKey -name <vm id> -group AzureStackHostAttestation -keyvaultName AzureStackTvmKeyVault
Cluster Storage
At this point, let’s focus on Cluster Shared Volumes (CSV). Normally, additional backups of the storage aren’t required if the workloads have already been backed up. However, as I mentioned in the Host Backup section, in certain scenarios it might be useful to back up specific CSV folders. I primarily focus on the Infrastructure folders (especially their logs), and if we use Golden Images for deploying certain workloads that are stored on the CSV, you might also want to back those up.
Another possibility, although I don’t recommend implementing it directly, is that if your cluster is designed solely for AVD usage, you could use one of the CSVs as the storage directory for FSLogix user profiles. I wouldn’t recommend this approach directly because it implies that the cluster is in the same Active Directory as the AVD users, and in turn, it would expose a shared folder within a CSV where users can store their profiles. I am in favor of using Fabric Domains (as I mentioned in the previous article and will discuss further in the next post) that are separate from the main domain. However, I understand that if the only workload is AVD, this implementation might be considered to minimize costs and leverage the storage space and performance of the cluster.
I don’t want to dwell too much on this type of backup, since all backup solutions can cover this function. As noted throughout this post, such a backup is only necessary if CSVs are used for specific workloads, in which case I assume the designer will inform the person responsible for backups to ensure they are properly secured.
Key Vault
The Key Vault required for installing Azure Local is not a typical workload. However, considering that the Azure Local deployment with local identities without the need for Active Directory (currently in preview) makes full use of the Key Vault for cluster operations, it is important to note that this component should be backed up in the future.
Currently, and likely in your case as well, the Key Vault contains only three secrets: the AzureStackLCMUserCredential, the DefaultARBApplication, and the LocalAdminCredential. These are created during installation and are valid for one year from deployment. As mentioned, these are not critical because, in case of errors (for example, if the BitLocker key is needed), they can be resolved using other methods. However, given the upcoming changes, I personally recommend taking a look at this article: Recover a deleted key vault and resume backup.
The Key Vault backup process is detailed in the following section.
Key Vault Backup Process
Overview
This article outlines how to back up individual secrets, keys, and certificates from your Azure Key Vault. The backup creates an offline, encrypted snapshot of each object to protect against loss of access to your key vault.
Key Considerations
- Backup Scope: Each key vault object must be backed up individually; there isn’t an option to back up the entire vault in one operation.
- Version Limits: Only up to 500 previous versions per object can be backed up. Attempting to back up objects beyond this limit may result in errors.
- Snapshot Nature: The backup is a point-in-time encrypted blob. Because the blob cannot be decrypted outside of Azure, it must be restored within the same Azure subscription and geographic region.
- Operational Challenges: Managing multiple backups, logs, and permissions can be complex, especially as secrets rotate or expire.
Prerequisites
- You need Contributor-level (or higher) permissions on your Azure subscription.
- A primary key vault containing the objects to back up and a secondary key vault where these objects can later be restored are required.
Backup and Restore Using the Azure Portal
- Backup:
- Go to your key vault in the Azure portal.
- Select the desired object (secret, key, or certificate) and click Download Backup.
- Download and securely store the encrypted blob.
- Restore:
- In your key vault, select the object type and click Restore Backup.
- Locate the encrypted blob and confirm to complete the restoration.
Backup and Restore Using Azure PowerShell
- Log in and Set Context:
Connect-AzAccount Set-AzContext -Subscription '{AZURE SUBSCRIPTION ID}' - Backup Commands:
- Back up a certificate:
Backup-AzKeyVaultCertificate -VaultName '{Key Vault Name}' -Name '{Certificate Name}' - Back up a key:
Backup-AzKeyVaultKey -VaultName '{Key Vault Name}' -Name '{Key Name}' - Back up a secret:
Backup-AzKeyVaultSecret -VaultName '{Key Vault Name}' -Name '{Secret Name}'
- Back up a certificate:
- Restore Commands:
- Restore a certificate:
Restore-AzKeyVaultCertificate -VaultName '{Key Vault Name}' -InputFile '{File Path}' - Restore a key:
Restore-AzKeyVaultKey -VaultName '{Key Vault Name}' -InputFile '{File Path}' - Restore a secret:
Restore-AzKeyVaultSecret -VaultName '{Key Vault Name}' -InputFile '{File Path}'
- Restore a certificate:
AKS
We are now nearing the end of the workloads to be backed up, and of course, we cannot forget AKS Hybrid. Many may wonder why one should back up AKS when, in theory, simply backing up the repository from which AKS is provisioned would suffice. Well, yes and no. I consider the repository as a golden image; if AKS is used in a generalized manner without the need for permanent storage and if the workload itself generates the backup (through copies to external servers or by using backed-up services), then you might not require a backup for AKS since the backup of your repository is more than enough. However, if you are using permanent storage and/or services that require a backup (for example, MongoDB) that are not handled at the application level, then a dedicated backup solution is necessary.
To date, it is not possible to perform native backups of AKS Hybrid in Azure Local, unlike in Azure Public where AKS has its integrated backup service. Therefore, external solutions are required to carry out this process. The only solution I have considered so far is Velero, mainly because there is an article in the documentation (Back up, restore workload clusters using Velero) that explains how to do it, although it should be noted that this article applies to AKS on Azure Local 22H2, AKS on Windows Server. Since I have not yet integrated Velero in Azure Local 23H2, I cannot say what limitations it may present in the new version of Azure Loca (related to Arc Resource Bridge). Perhaps in the coming weeks, with a bit more time, I will take a closer look at this matter. That said, if your applications have been configured correctly, you likely won’t need to back them up.
There is an excellent guide written by Alper Can that details the entire backup and restore process in Azure Local using a local backup via Minio Storage installed on an Ubuntu VM. For more information, you can check out the article here.
SQL Managed Instances enabled by Azure Arc
Although this workload should technically fall under AKS, since it involves Arc Dataservices running within AKS, there is currently no native solution for backing up this workload (or at least I haven’t found adequate information on this topic so far). Therefore, I have decided to dedicate a separate section to it.
Because it is nearly impossible to back up AKS, the Data Controller within it (with its custom location), and then the SQL Managed Instance enabled by Azure Arc, an ordeal in terms of recovery, I have concluded that the most effective, efficient, and straightforward method is to perform a backup using SQL Server Management Studio.
Perhaps BCP (Bulk Copy Program) could be used to automate the process, but I personally have no experience with it. From what little I have researched, there are some important considerations:
- This method transfers data only. Schema objects such as stored procedures, triggers, and indexes are not transferred and must be handled separately.
- Ensure that the target tables exist in the destination database before importing.
Once I have a larger lab where I can run SQL Managed Instances, I will try to find a better solution for this issue (and I will also test Velero). For now, however, you will have to settle with SQL Server Management Studio 😅.
Limitations
Based on the only article I have found on this subject in the documentation (Limitations of SQL Managed Instance enabled by Azure Arc), here are the limitations of backup in SQL Managed Instances enabled by Azure Arc. Note that I have not been able to find more information on “Automated Backup,” which is why I still consider that the most efficient way to perform the backup is through SQL Server Management Studio.
Backup and Restore Limitations
- Automated Backups:
- User databases using the SIMPLE recovery model aren’t included in backups.
- The system database model is excluded to avoid interfering with administrative operations like creating or deleting databases, which may lock the database during such tasks.
- Point-in-Time Restore (PITR):
- Restoring a database is confined to the same Arc-enabled SQL Managed Instance where the backup was created; cross-instance restores are not supported.
- Renaming databases during a point-in-time restore isn’t supported.
- There is currently no support for restoring databases that have Transparent Data Encryption (TDE) enabled.
- Once a database is deleted, it cannot be restored.
Other Limitations
- Transactional replication is not available.
- Log shipping is blocked.
- Every user database must operate under a full recovery model because they participate in an always-on availability group.
- The instance name for an Azure Arc-enabled SQL Managed Instance must be 15 characters or fewer, including any suffix for instance indexing.
Roles and Responsibilities
The responsibilities differ significantly between Azure PaaS services and Azure Arc hybrid services:
- Azure PaaS:
- Microsoft handles the infrastructure, operations, and provides an SLA.
- Azure Arc Hybrid Services:
- While Microsoft supplies the software, customers are responsible for the infrastructure and day-to-day operations. Consequently, Microsoft does not offer an SLA for these services since the underlying infrastructure is customer-managed.
Disaster Recovery
This is one of the most dreaded events to face, as it means the Azure Local cluster cannot be recovered and you must restore the workloads either on another cluster or directly in Azure using Azure Site Recovery. On the day you need to perform disaster recovery, your least concern should be that the VMs are not Arc VMs, I’ll spare you repeating that no current system can carry out disaster recovery to Azure or another Azure Local cluster while retaining the VMs as Arc VMs.
Regarding the first option (restoring the workloads in a new Azure Local Cluster), I won’t dwell on it since it simply involves restoring the backed-up components described in previous sections.
The second option involves performing backups and restorations using Azure Site Recovery (currently in Preview). This approach allows you to restore VMs in Azure after an incident or a planned event, and once the incident is resolved, to perform a failback, returning the workload to the Azure Local cluster.
For this, let’s delve into the solution in the following section.
Azure Site Recovery (preview)
Below, I will detail, summarize, and restructure information from the official documentation on Azure Site Recovery (preview), highlighting key factors to consider when using this service.
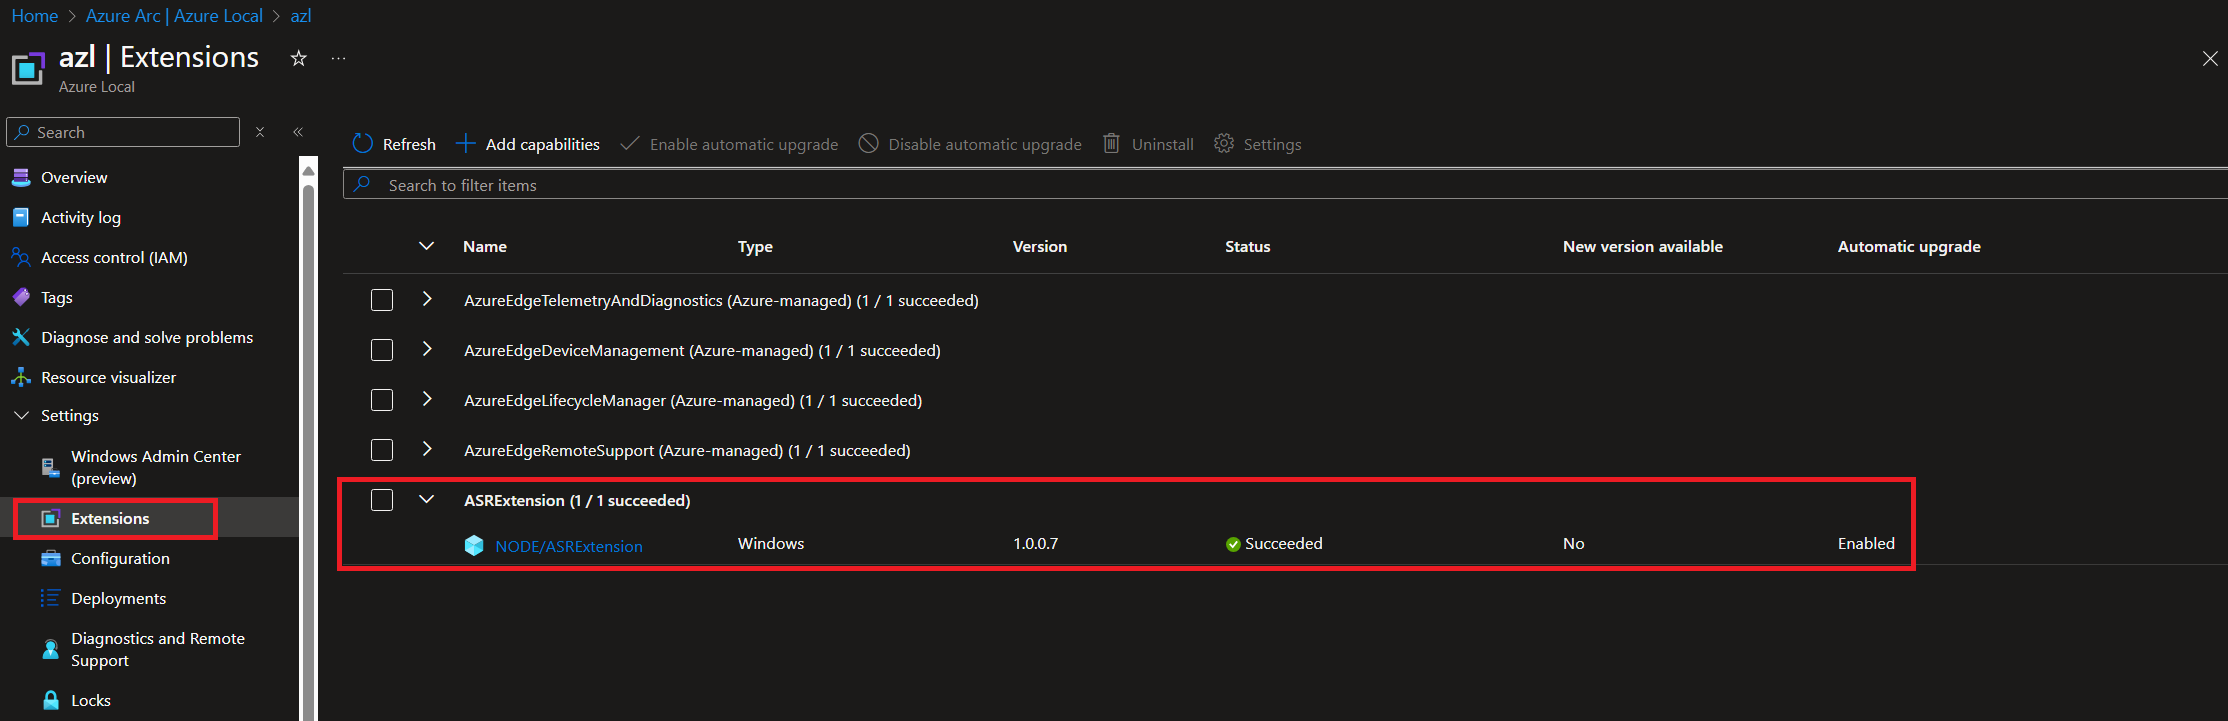
We start with the most critical aspect: when you want to use Azure Site Recovery on your cluster, it will install an agent on each node. Because this agent is not “properly signed,” WDAC will block its installation, throwing the error “Microsoft Azure Site Recovery Provider installation has failed with exit code - 1.” To overcome this, you must set WDAC to “Audit” mode. For example, you can run the following command on any node in the cluster:
Enable-AsWdacPolicy -Mode Audit
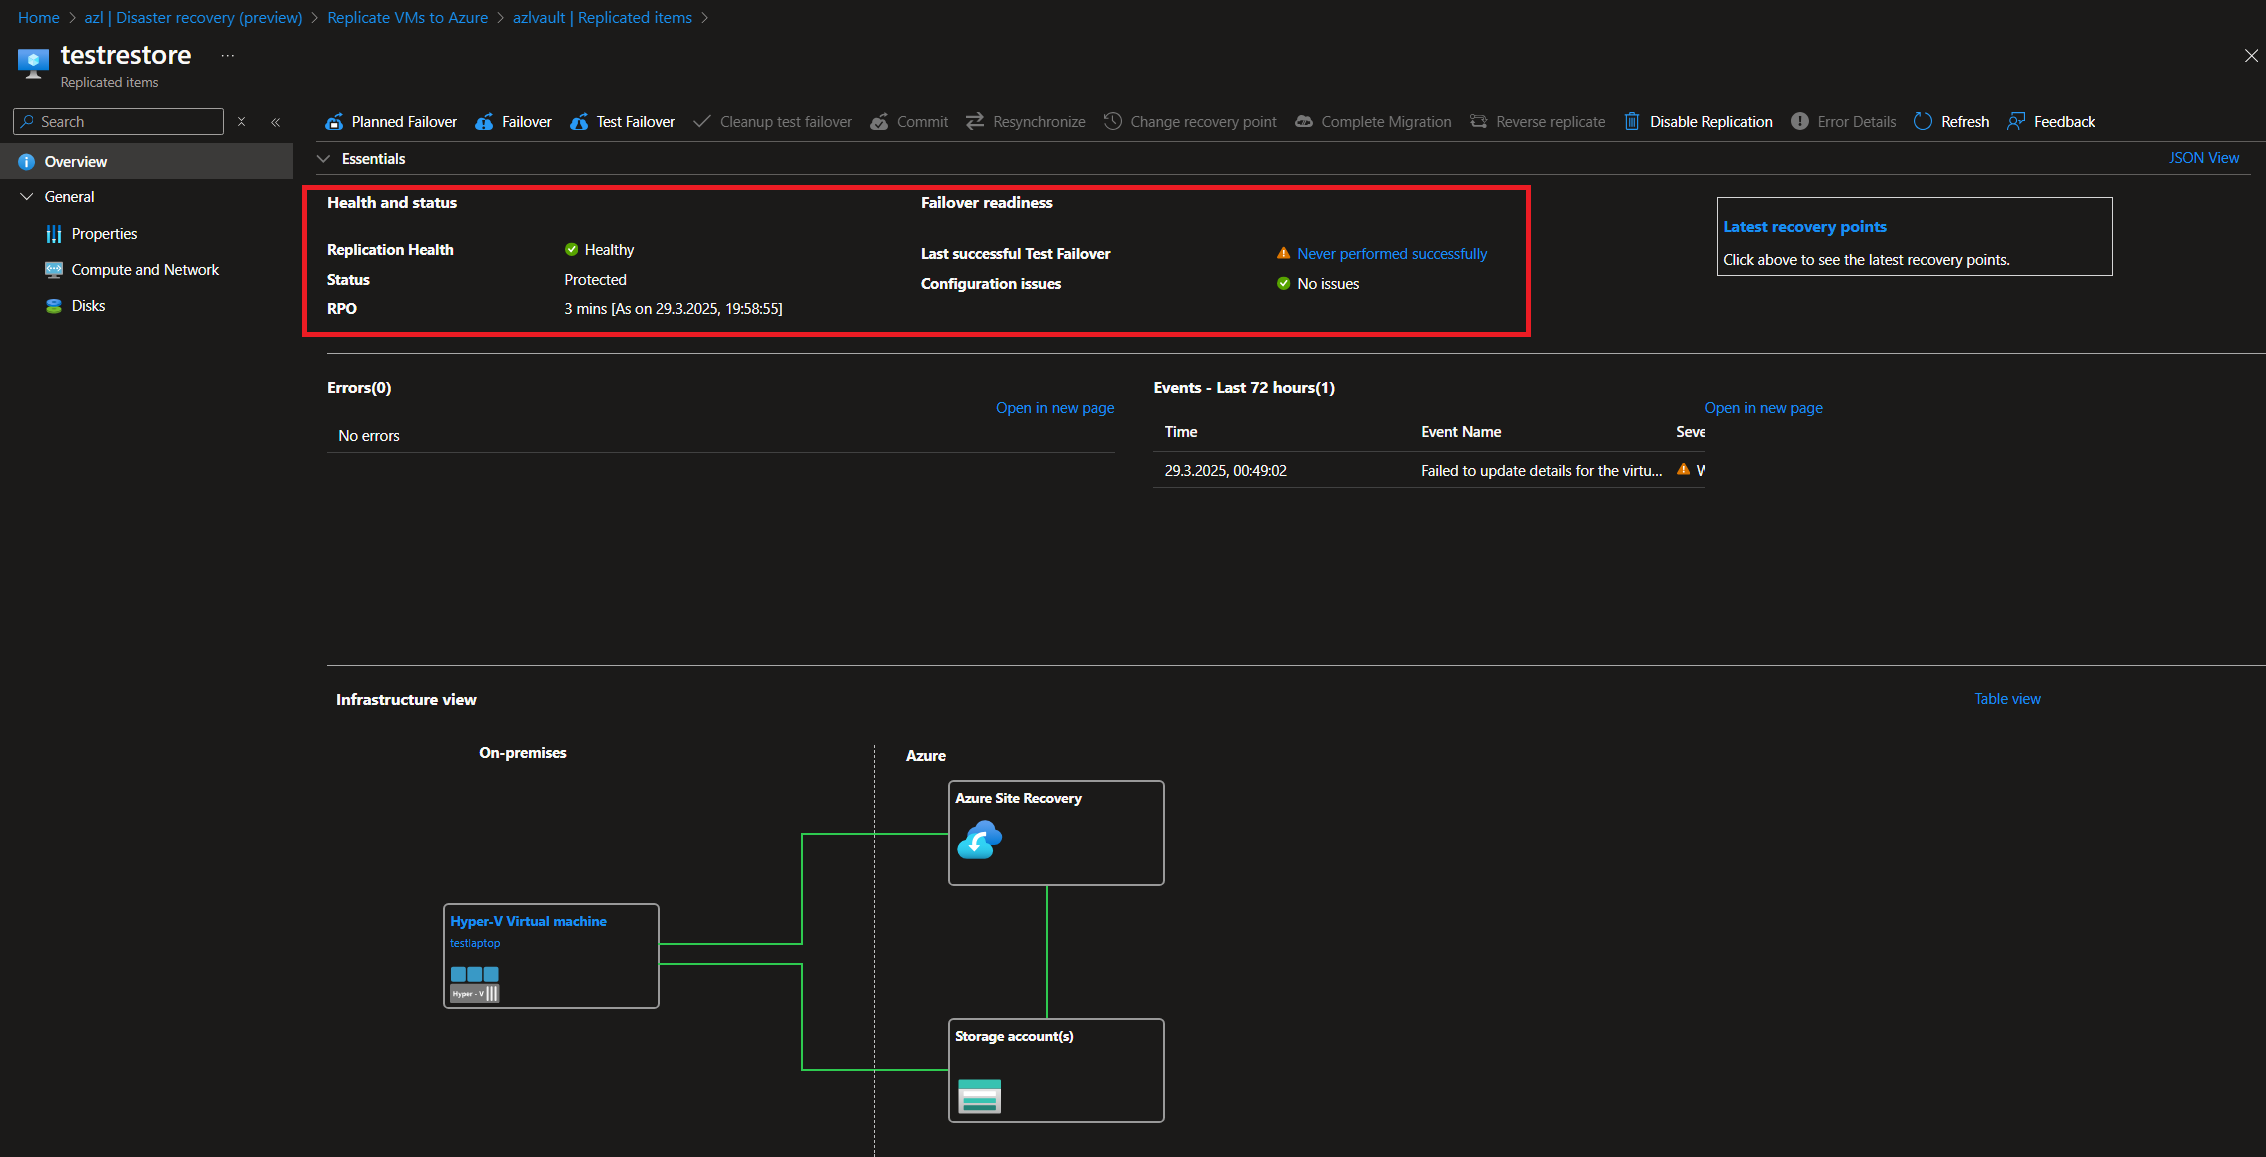
Next, we analyze the disaster recovery strategy. The Azure Site Recovery process for Azure Local involves four key stages:
- Replication: The VM’s virtual hard disk (VHD) is copied to an Azure Storage account.
- Failover: In the event of a disaster, the replicated VM is started in Azure. A test failover can also be run without impacting production.
- Re-protect: After failover, VMs can be re-replicated back from Azure to your on-premises system.
- Failback: Finally, you can fail back to your original on-premises environment.
Important: The current integration does not support replication, failover, or failback for Arc resource bridges or Arc VMs (although the latter point is nuanced – they might not officially support it, but it works).
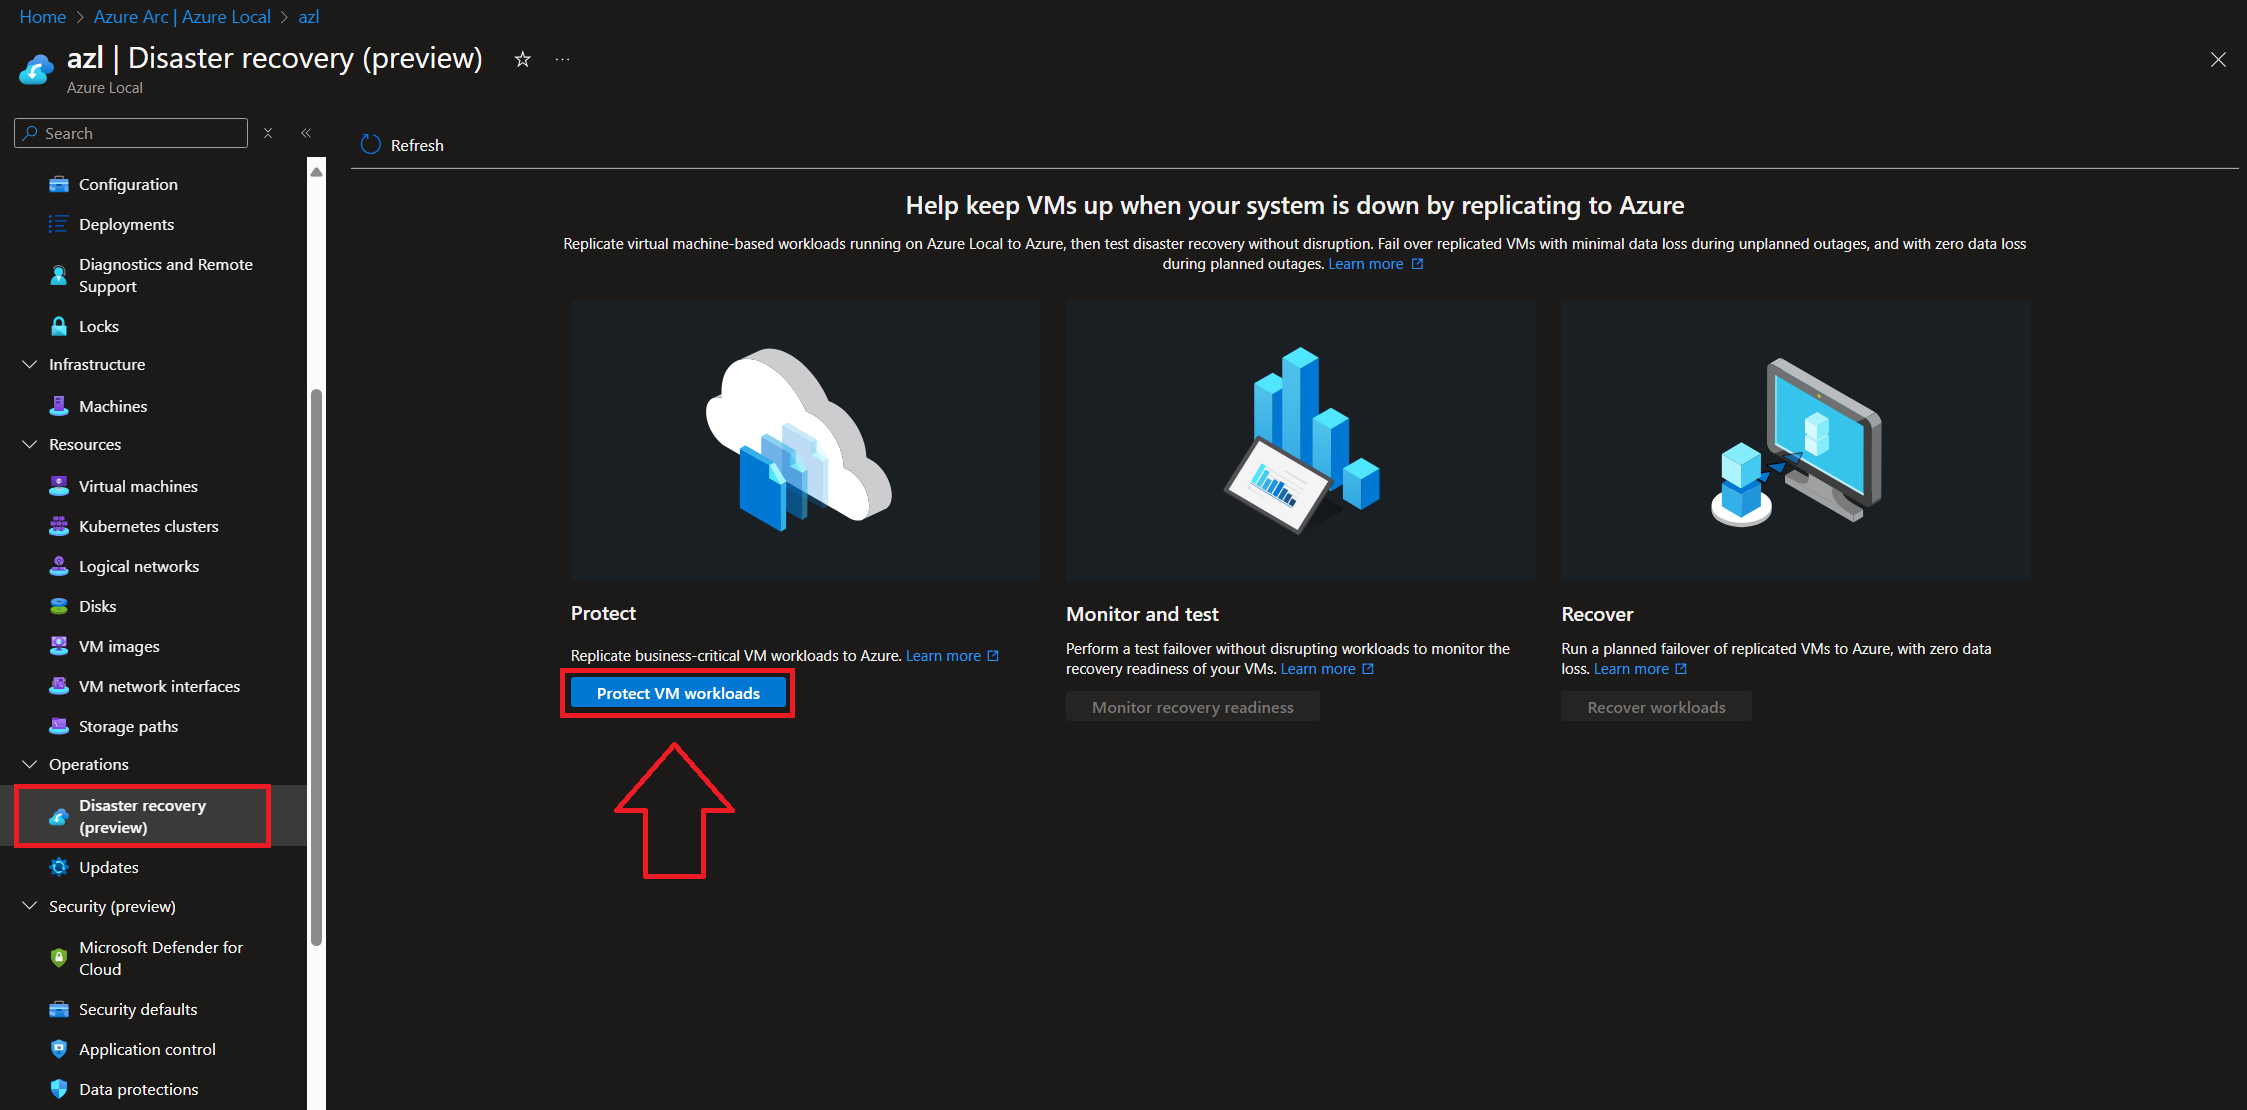
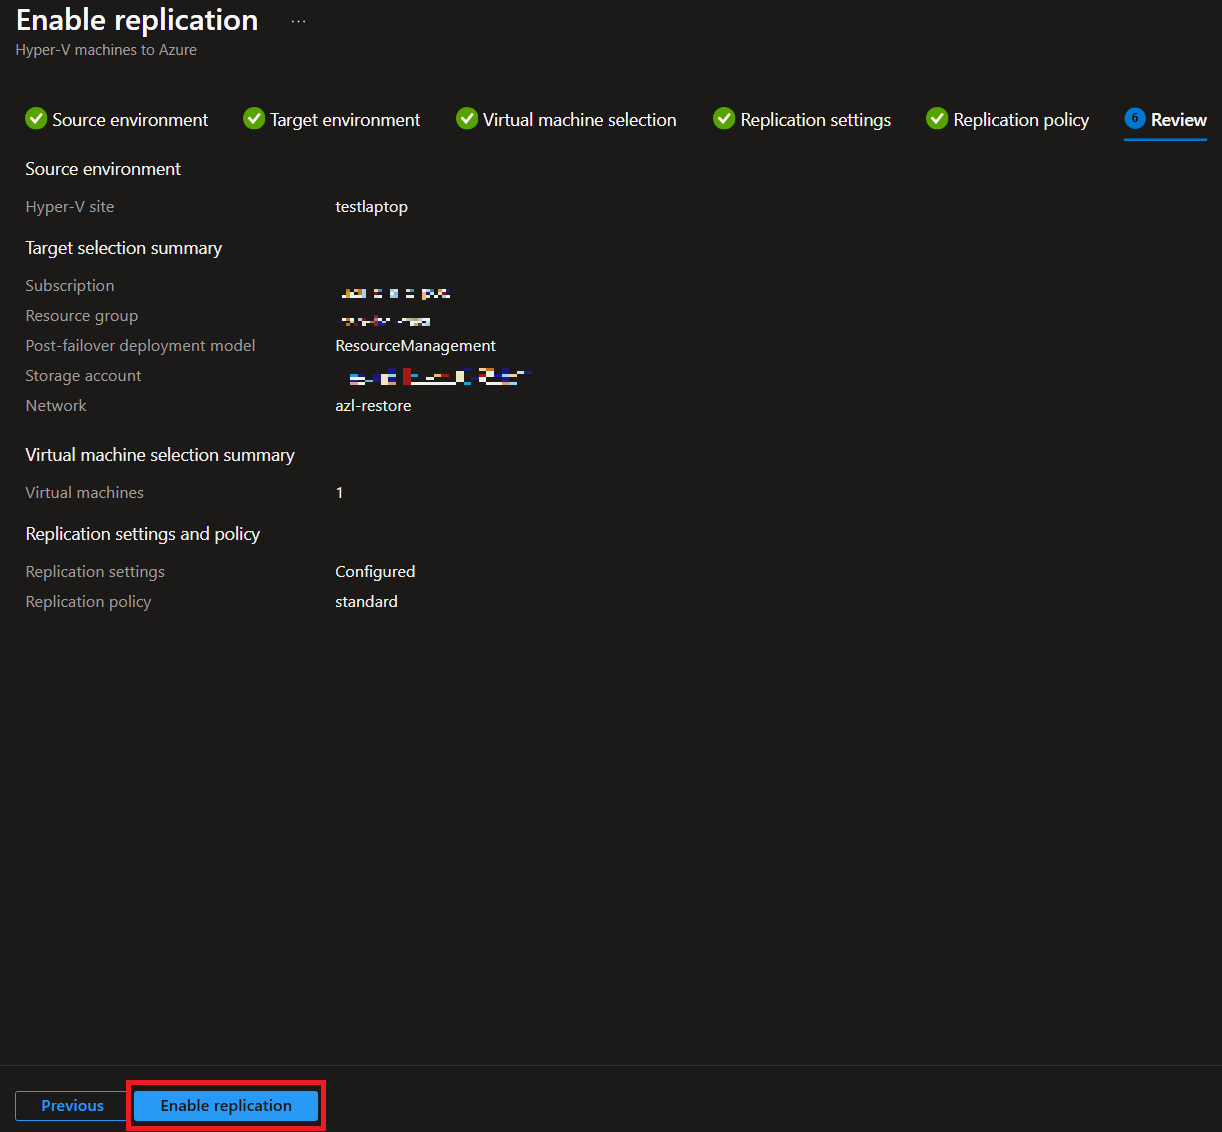
The documentation details the installation process and available options, so I won’t go into extensive detail for each step. Instead, here’s a simple guide for configuration:
-
Change WDAC to Audit Mode:
Set WDAC to Audit mode as shown above.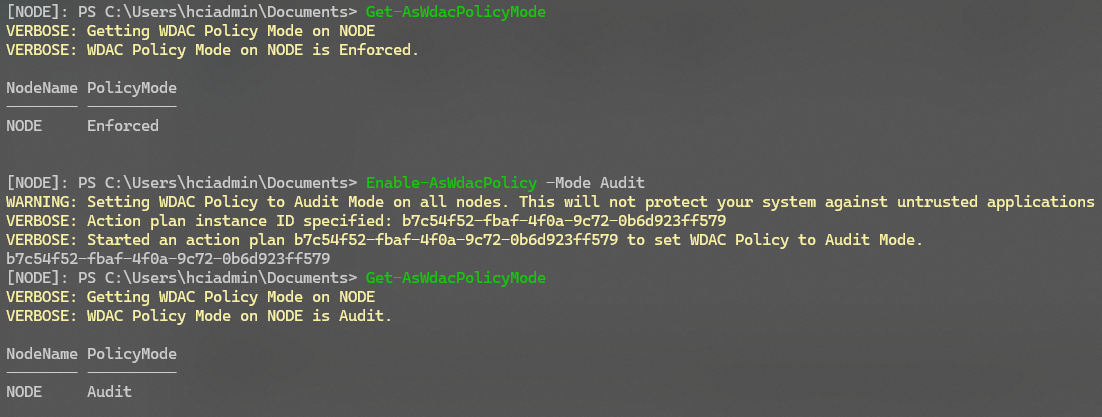
-
Create a Storage Account and VNet:
Create a Storage Account (using LRS and without SoftDelete for cache purposes) and a virtual network for testing ASR failover, where the workloads will be restored. -
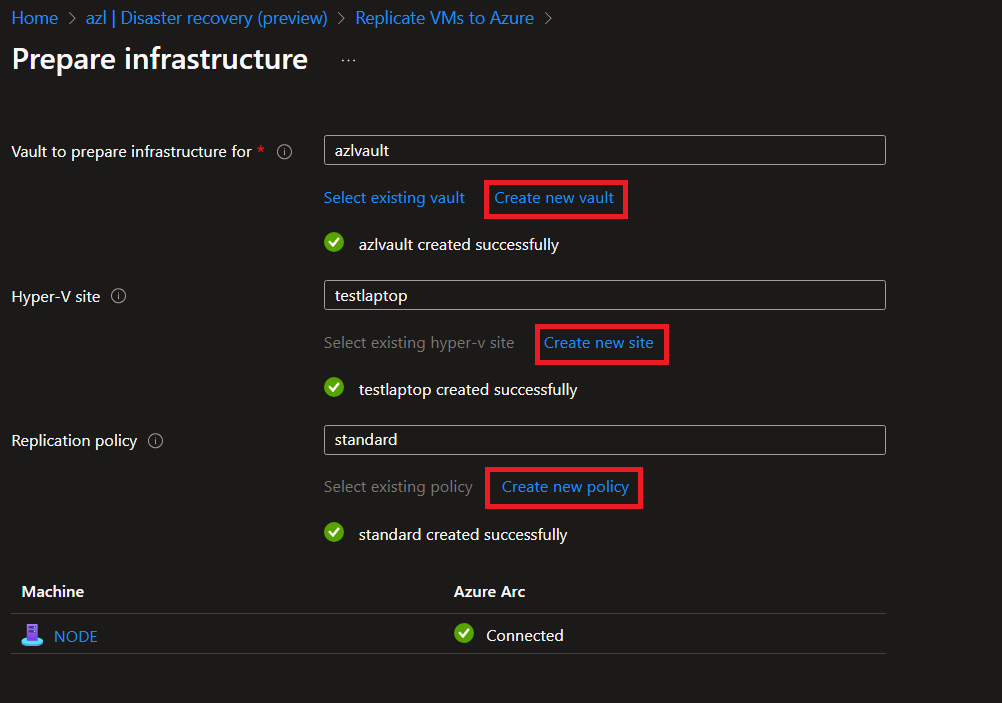
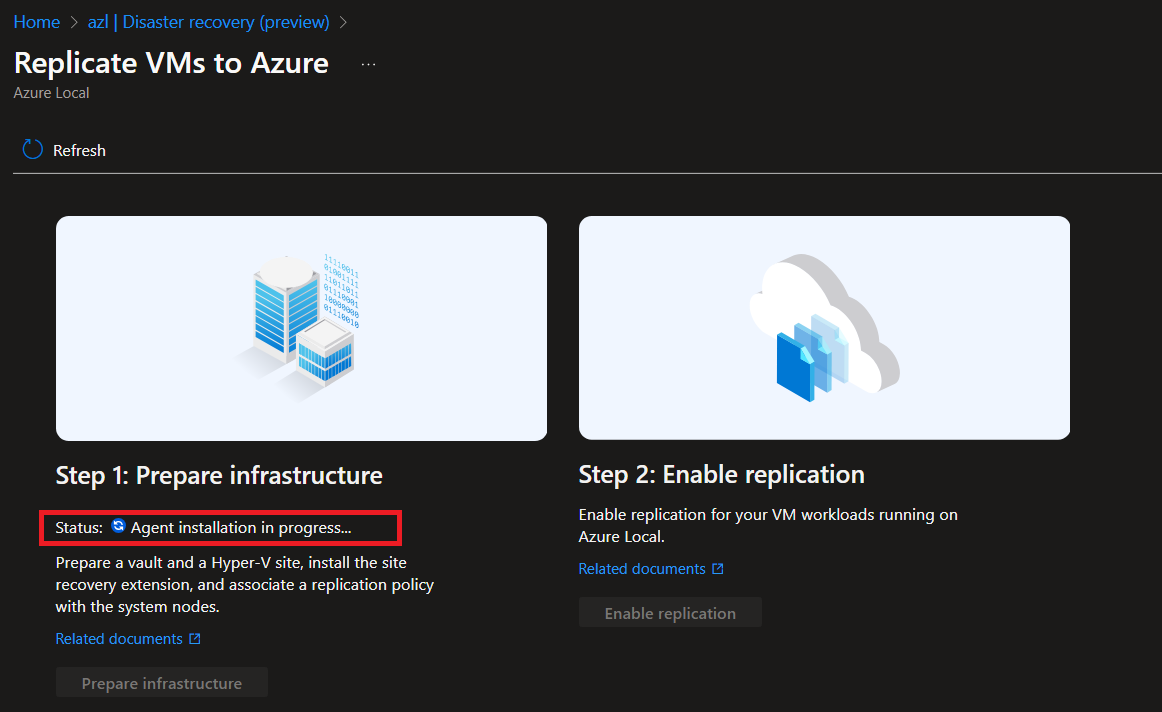
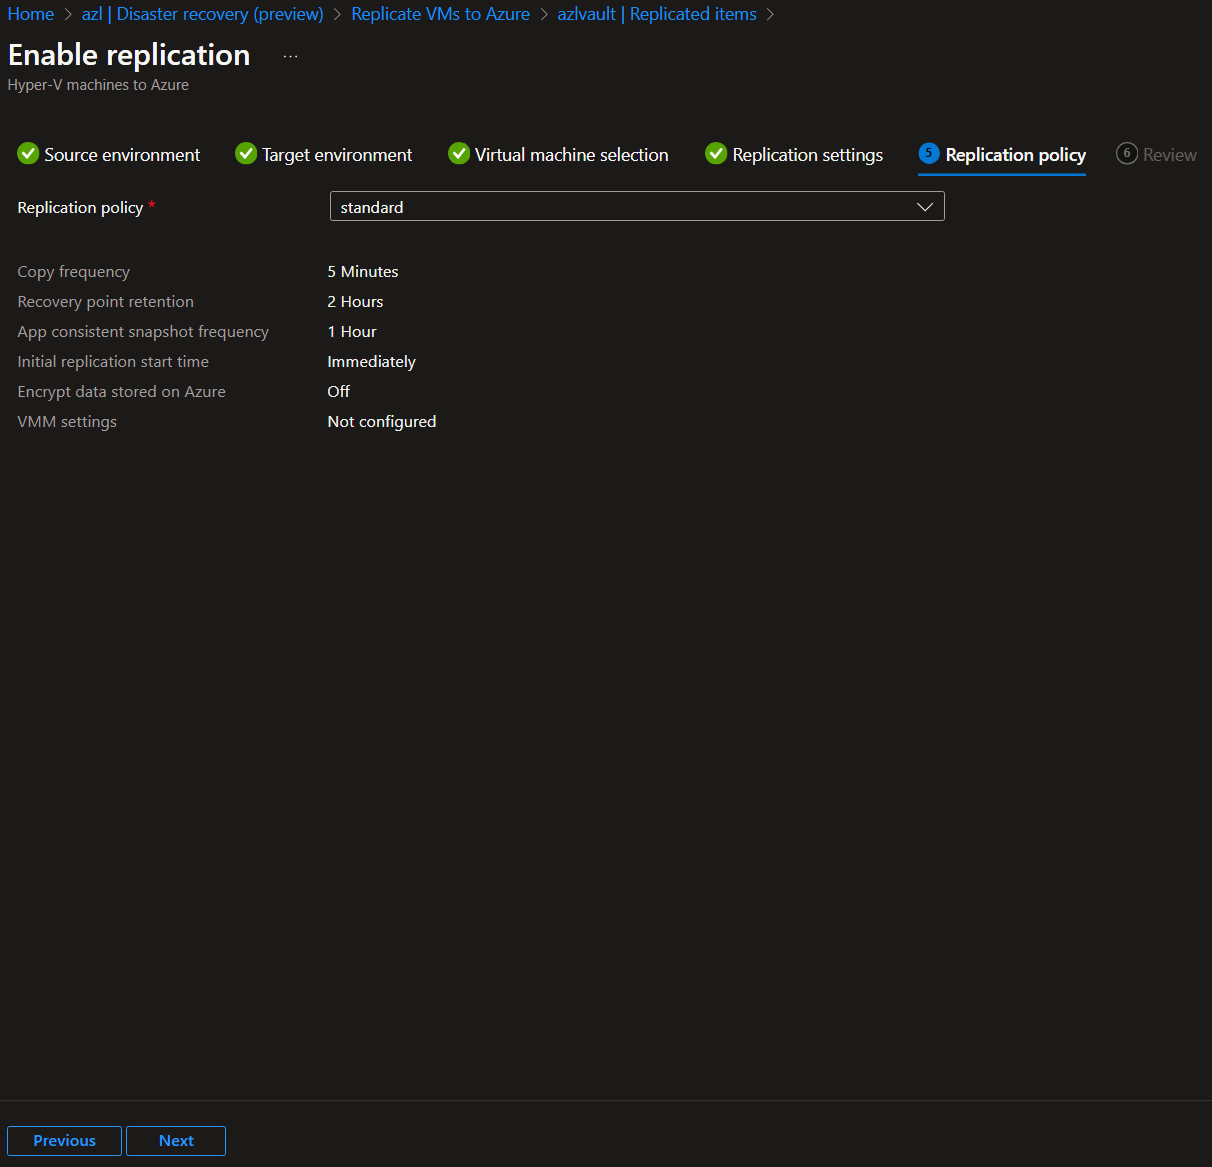
Prepare the Infrastructure:
Create a Vault, a Hyper-V site, and a replication policy (using the default settings in our case). This step installs the ASR extension on the cluster nodes.
-
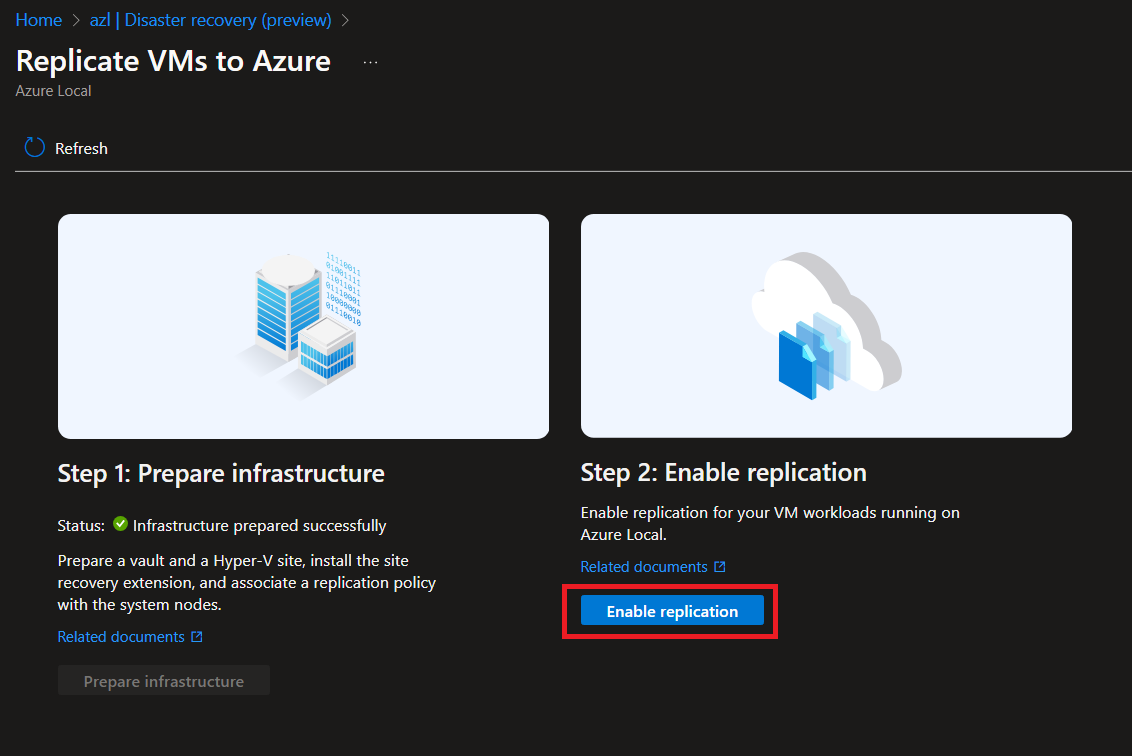
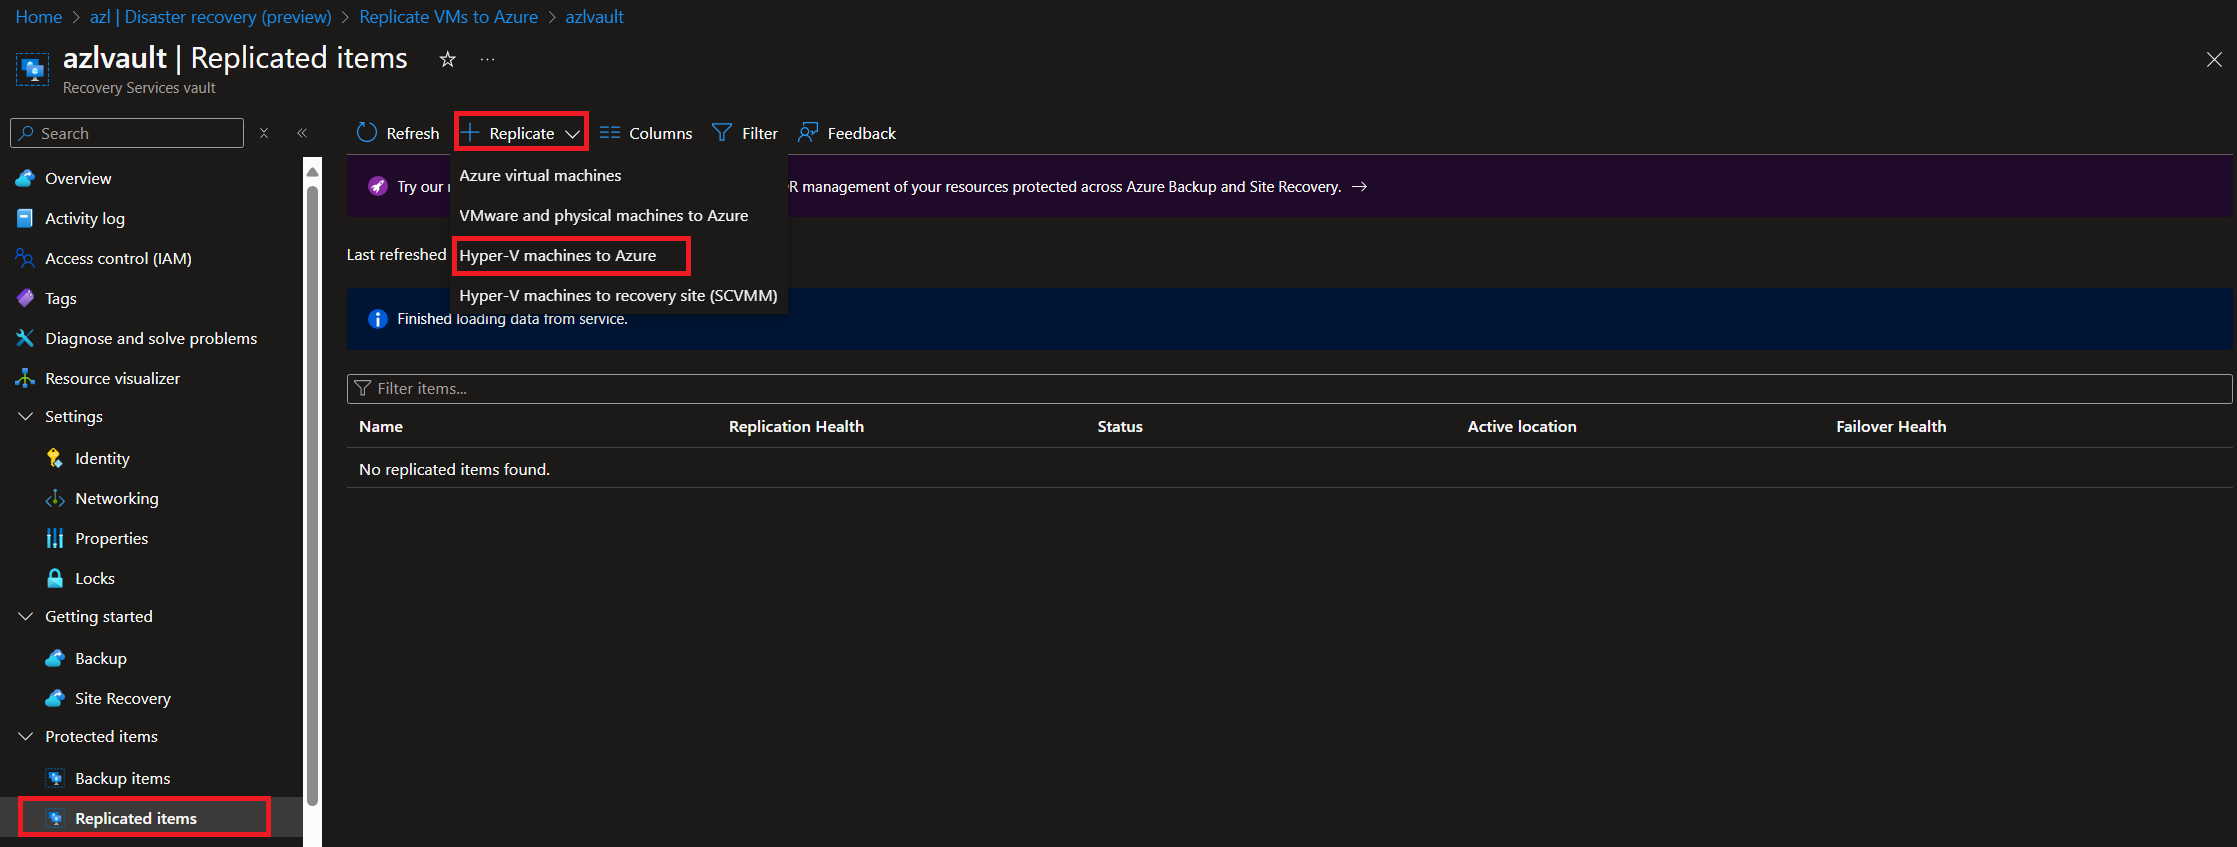
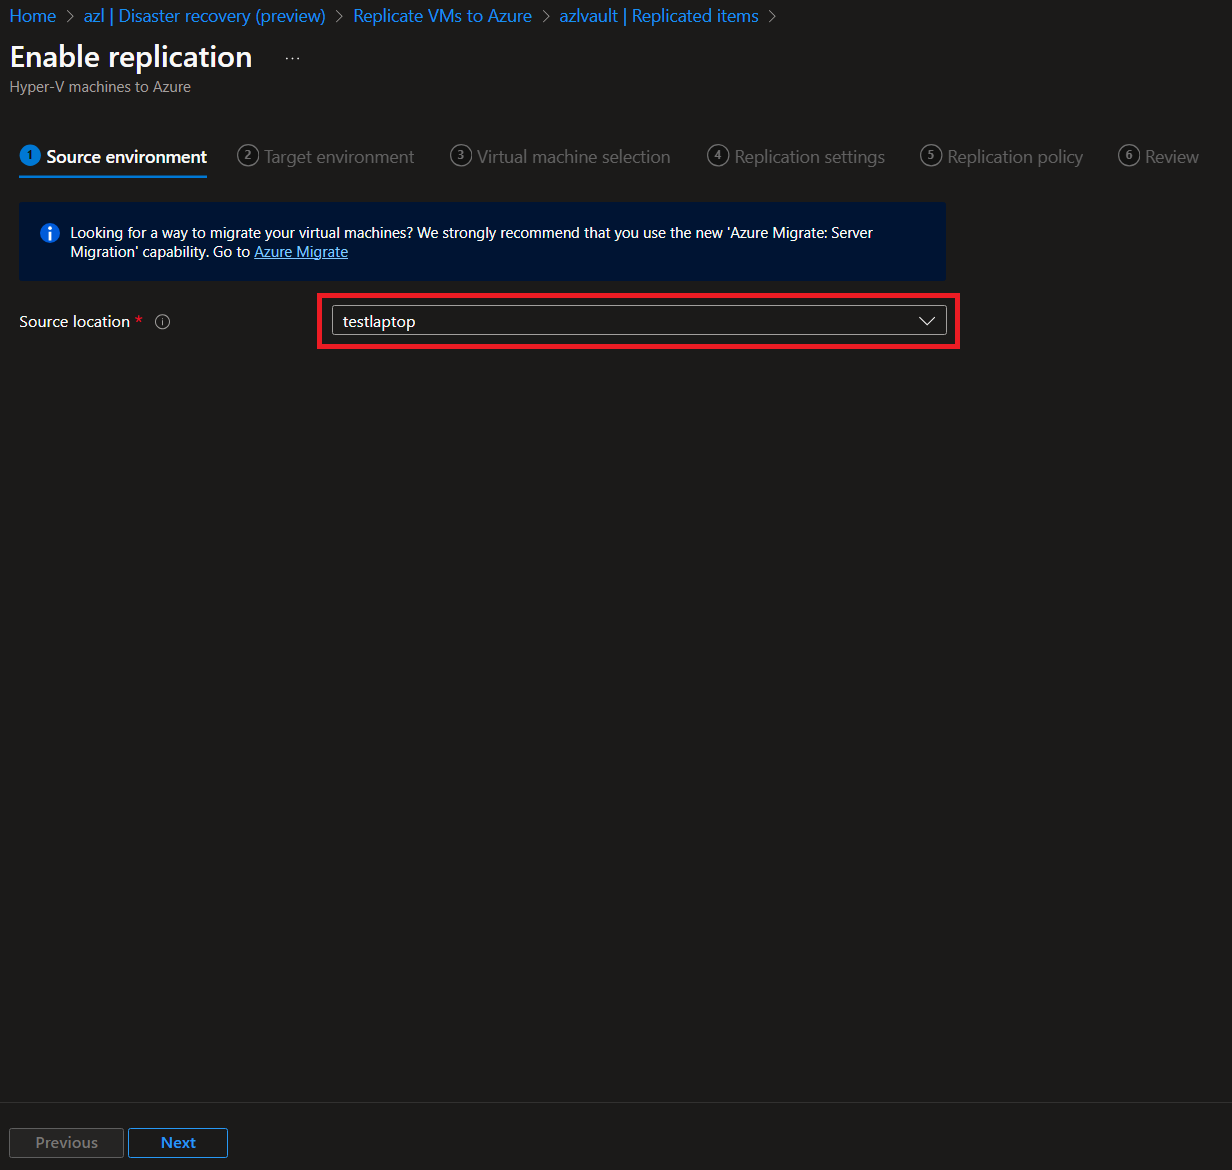
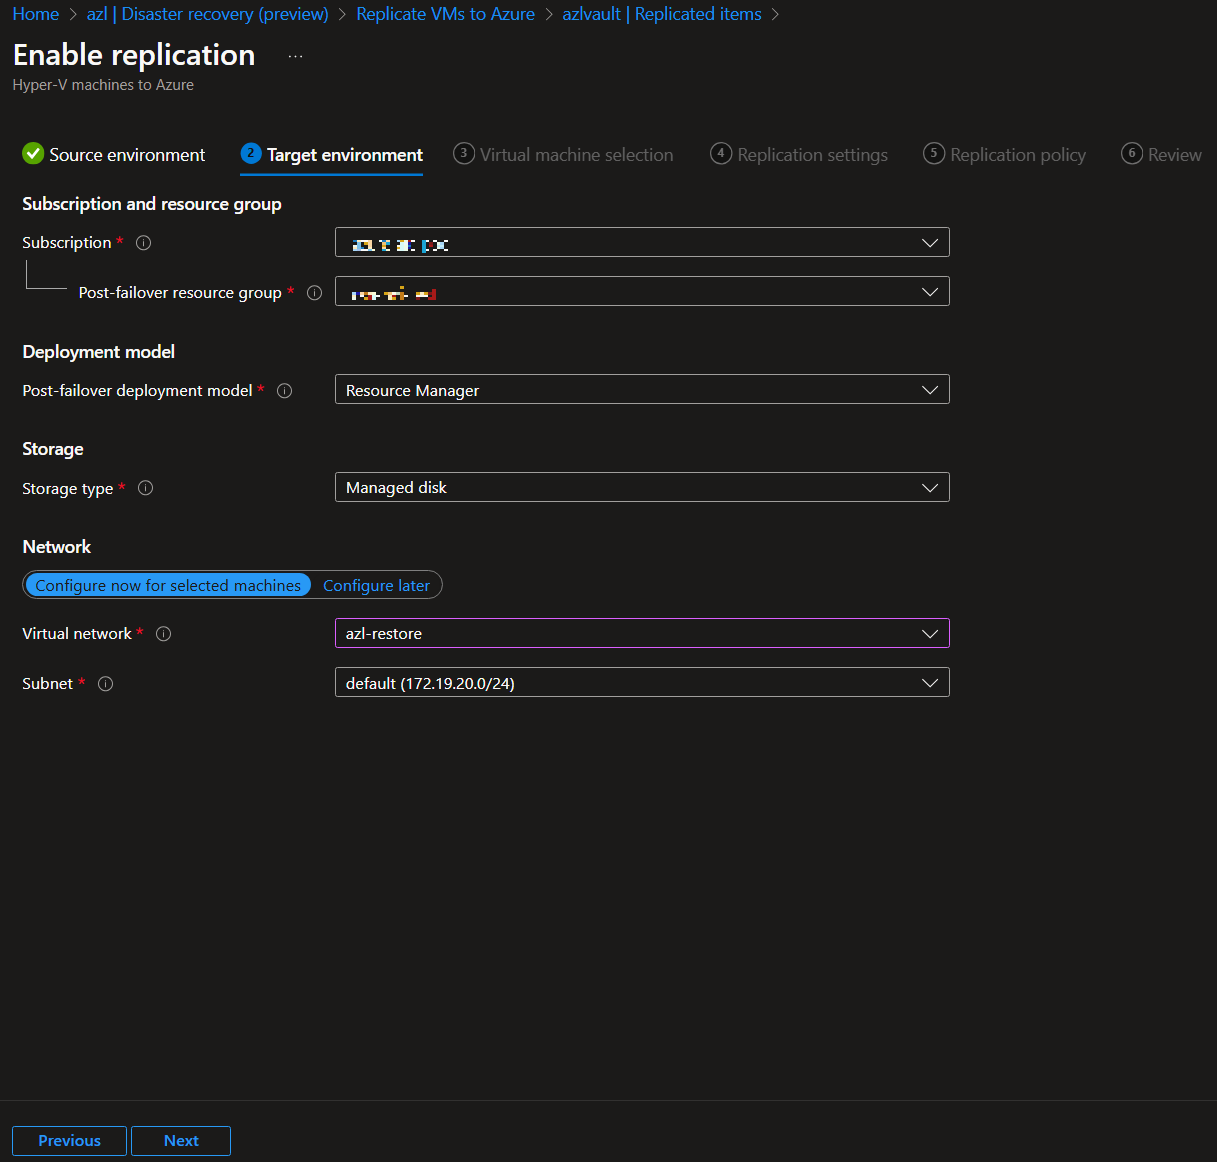
Configure Replication:
Once the extension is installed and the site is configured, proceed to set up replication for your workloads.
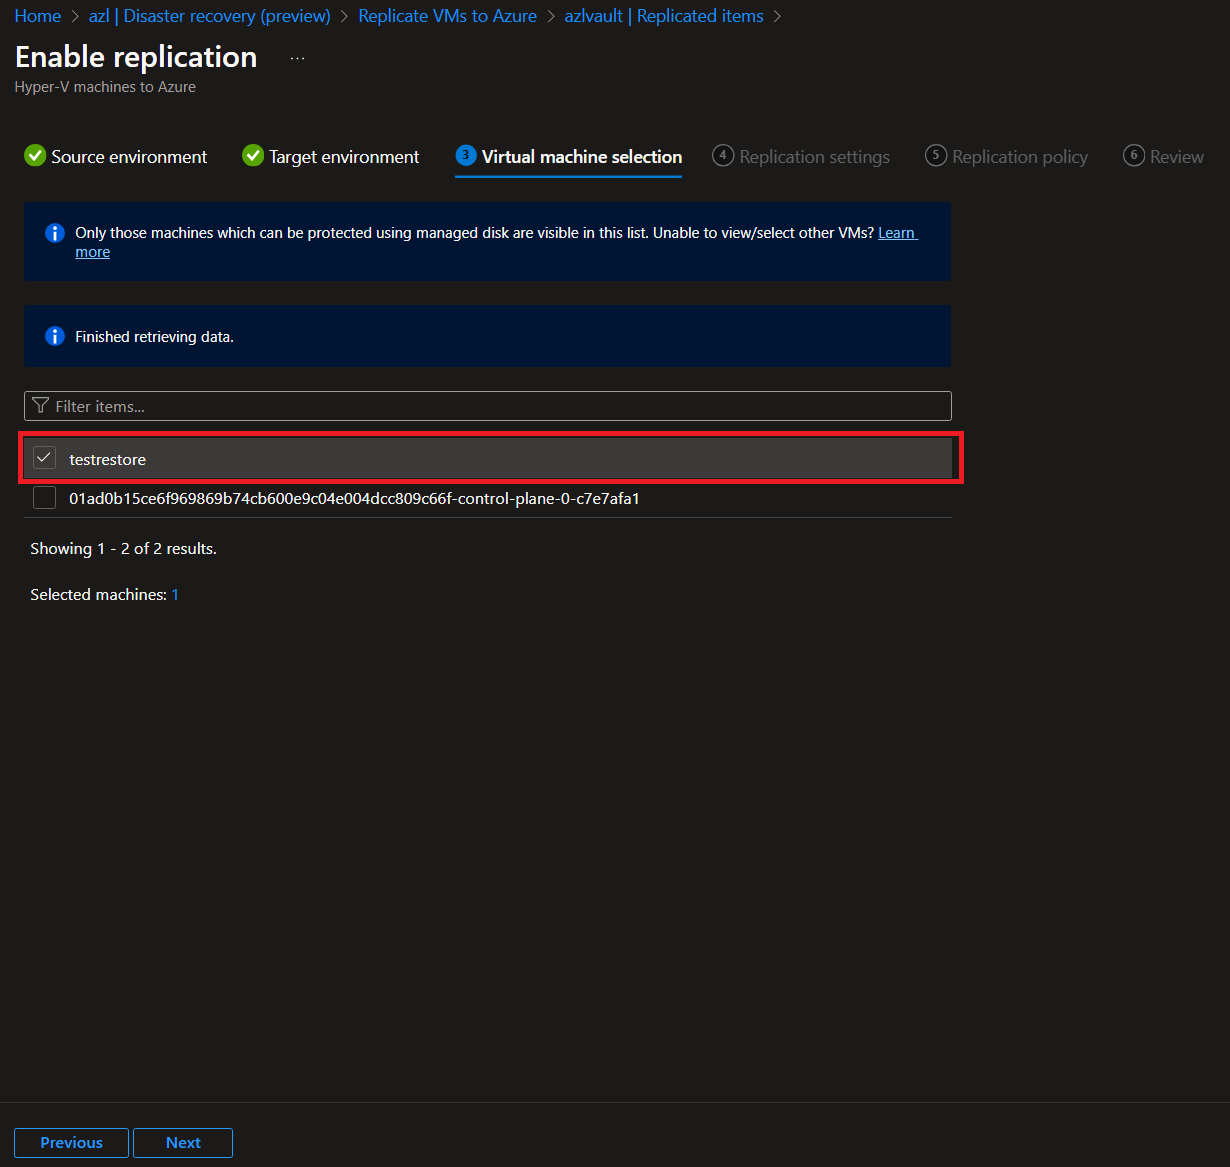
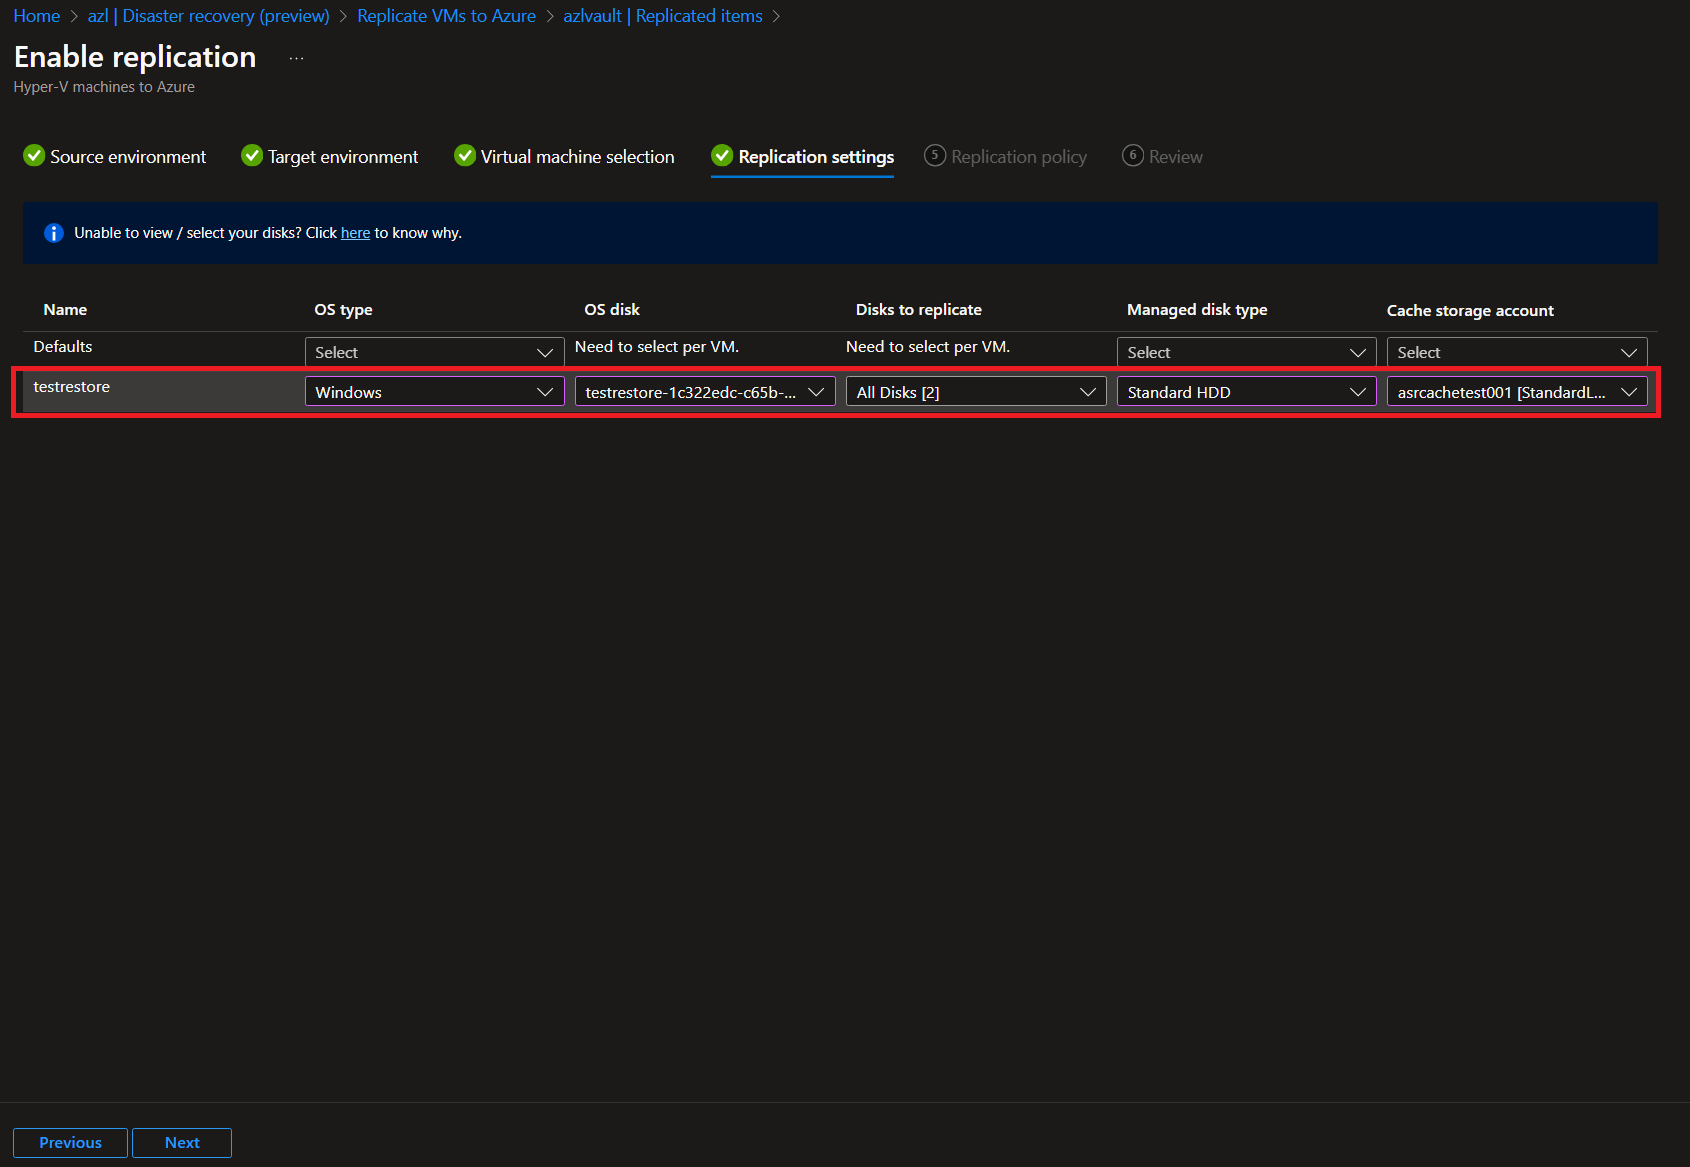
-
Synchronize the Workloads:
The workload will begin to synchronize. In my test lab (set up on a laptop), this took nearly one hour.

-
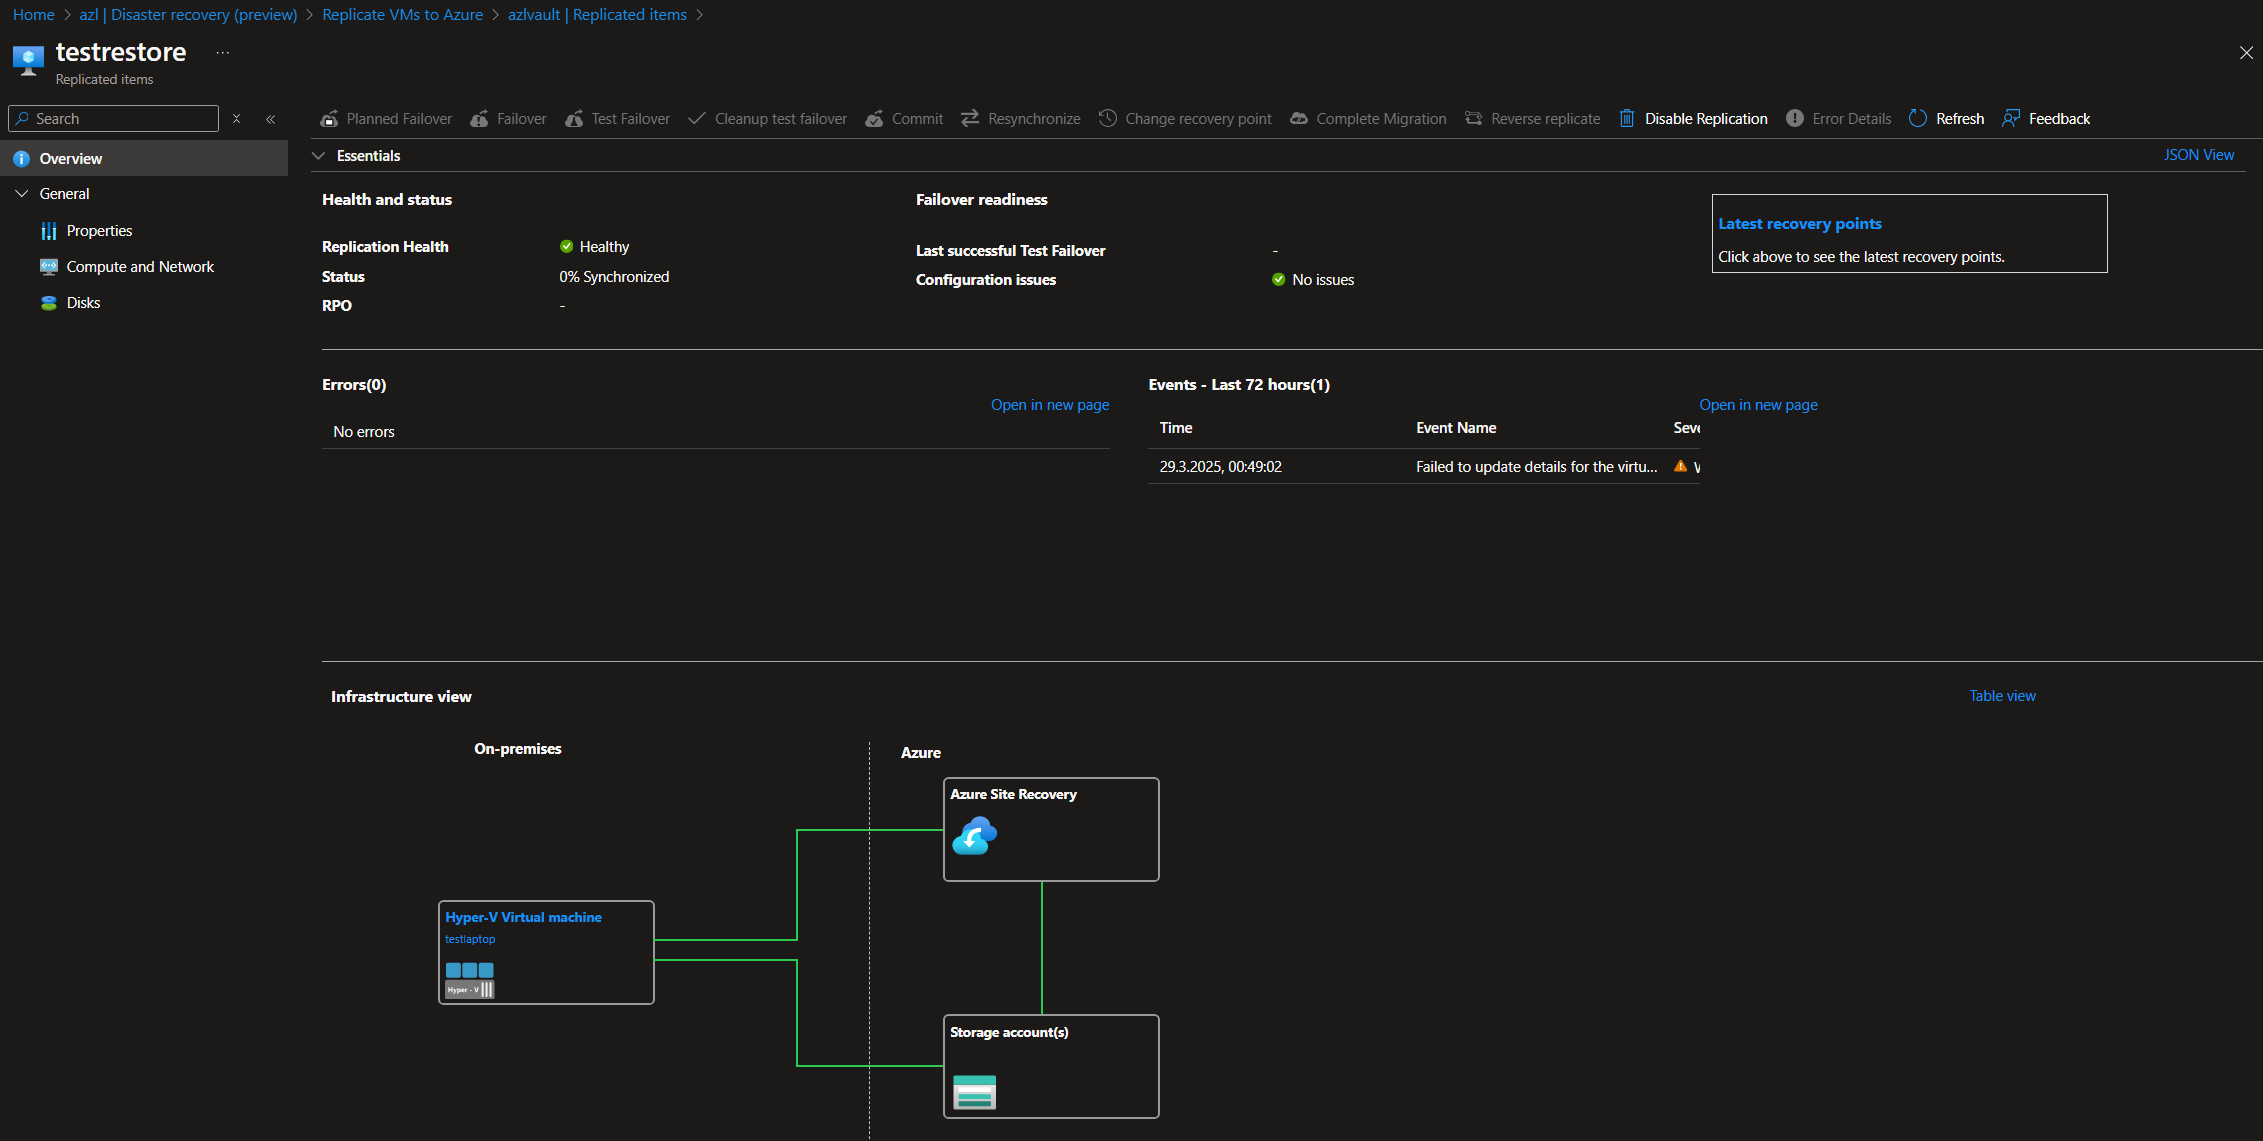
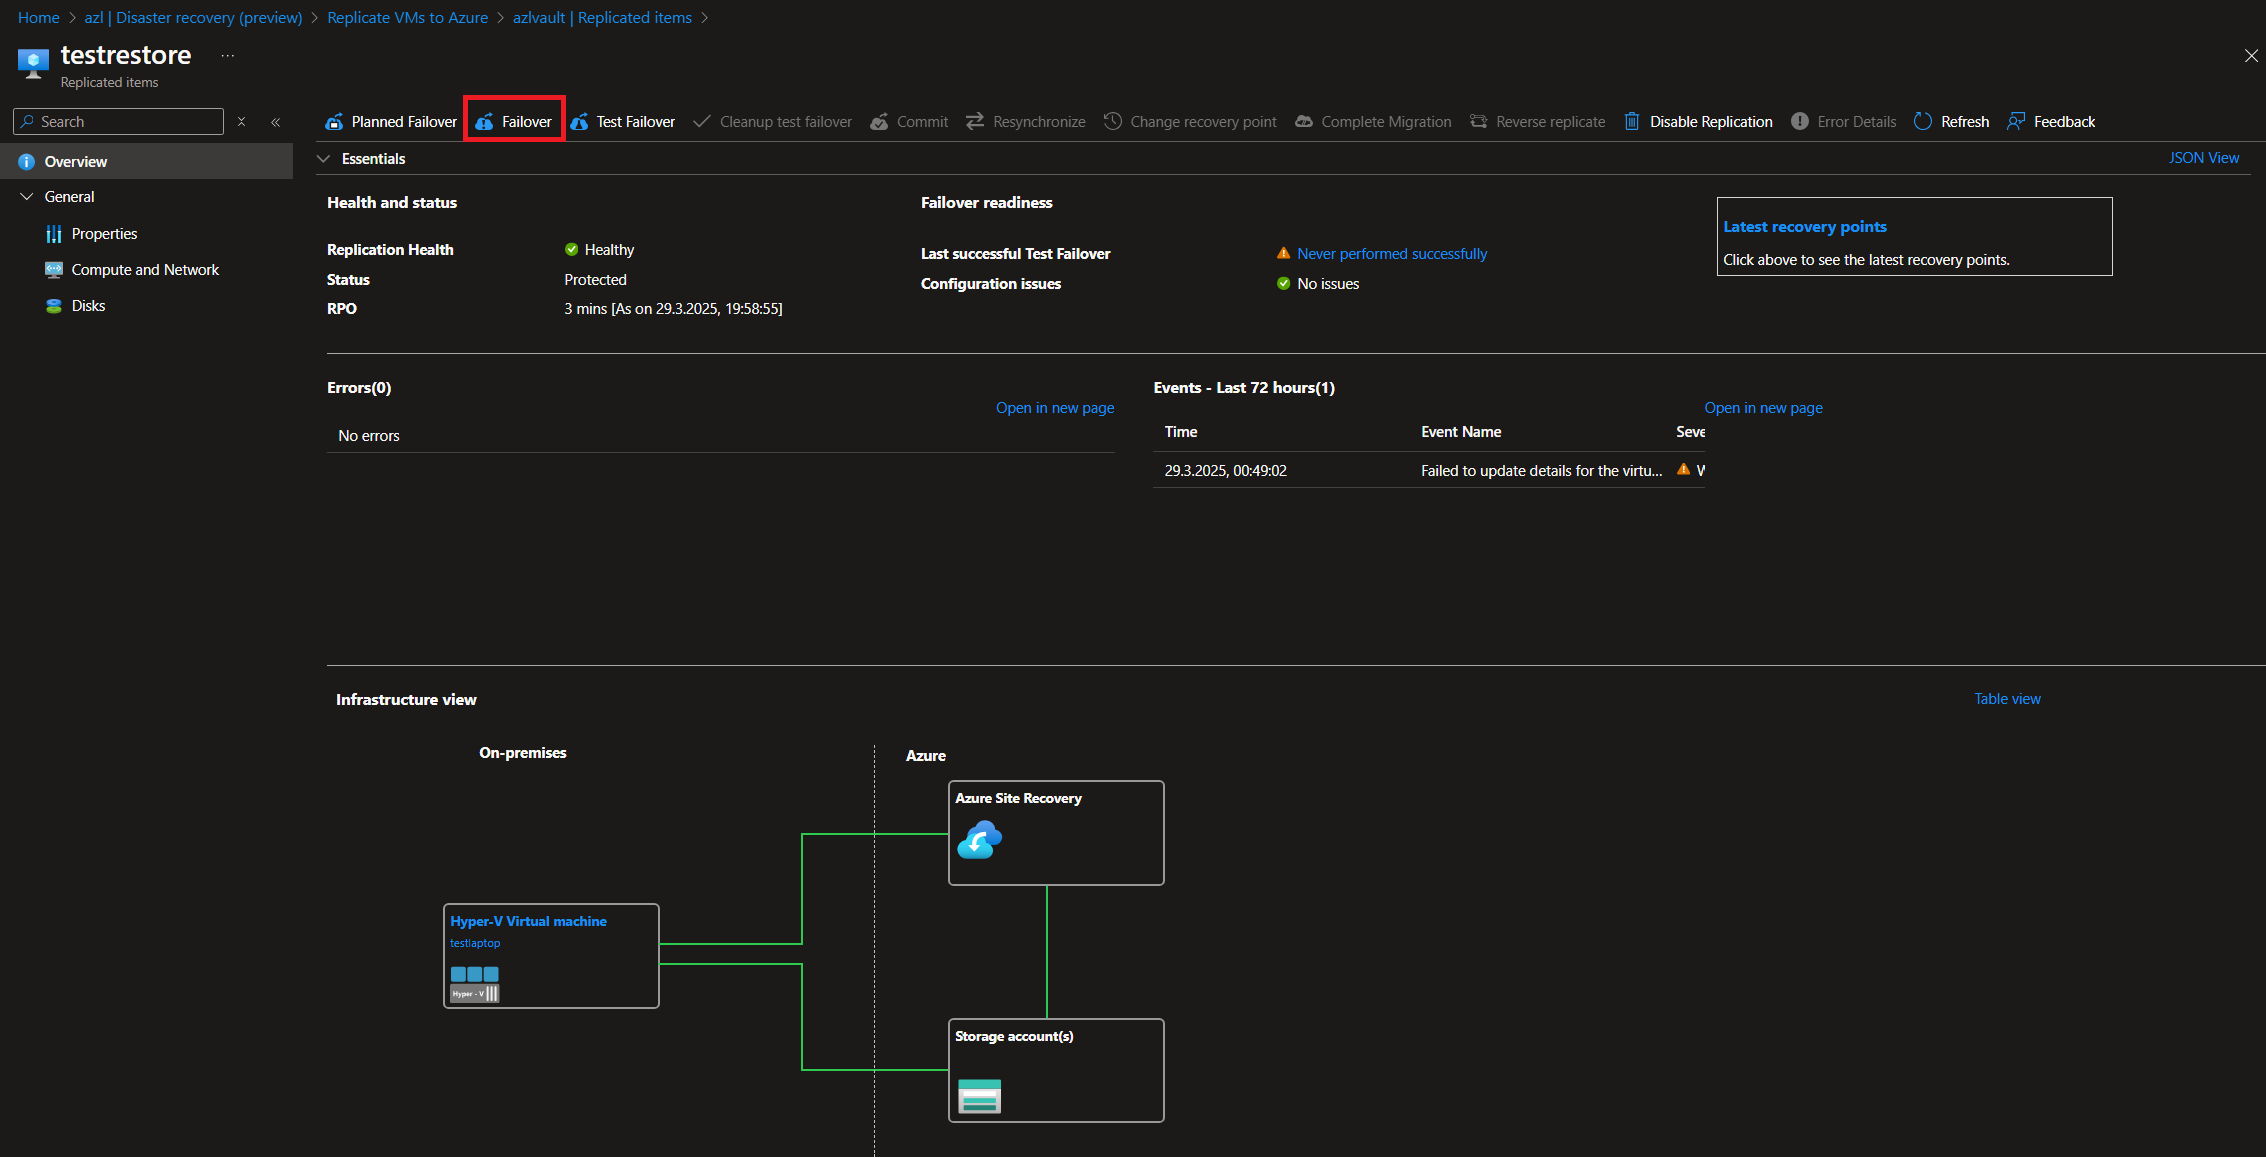
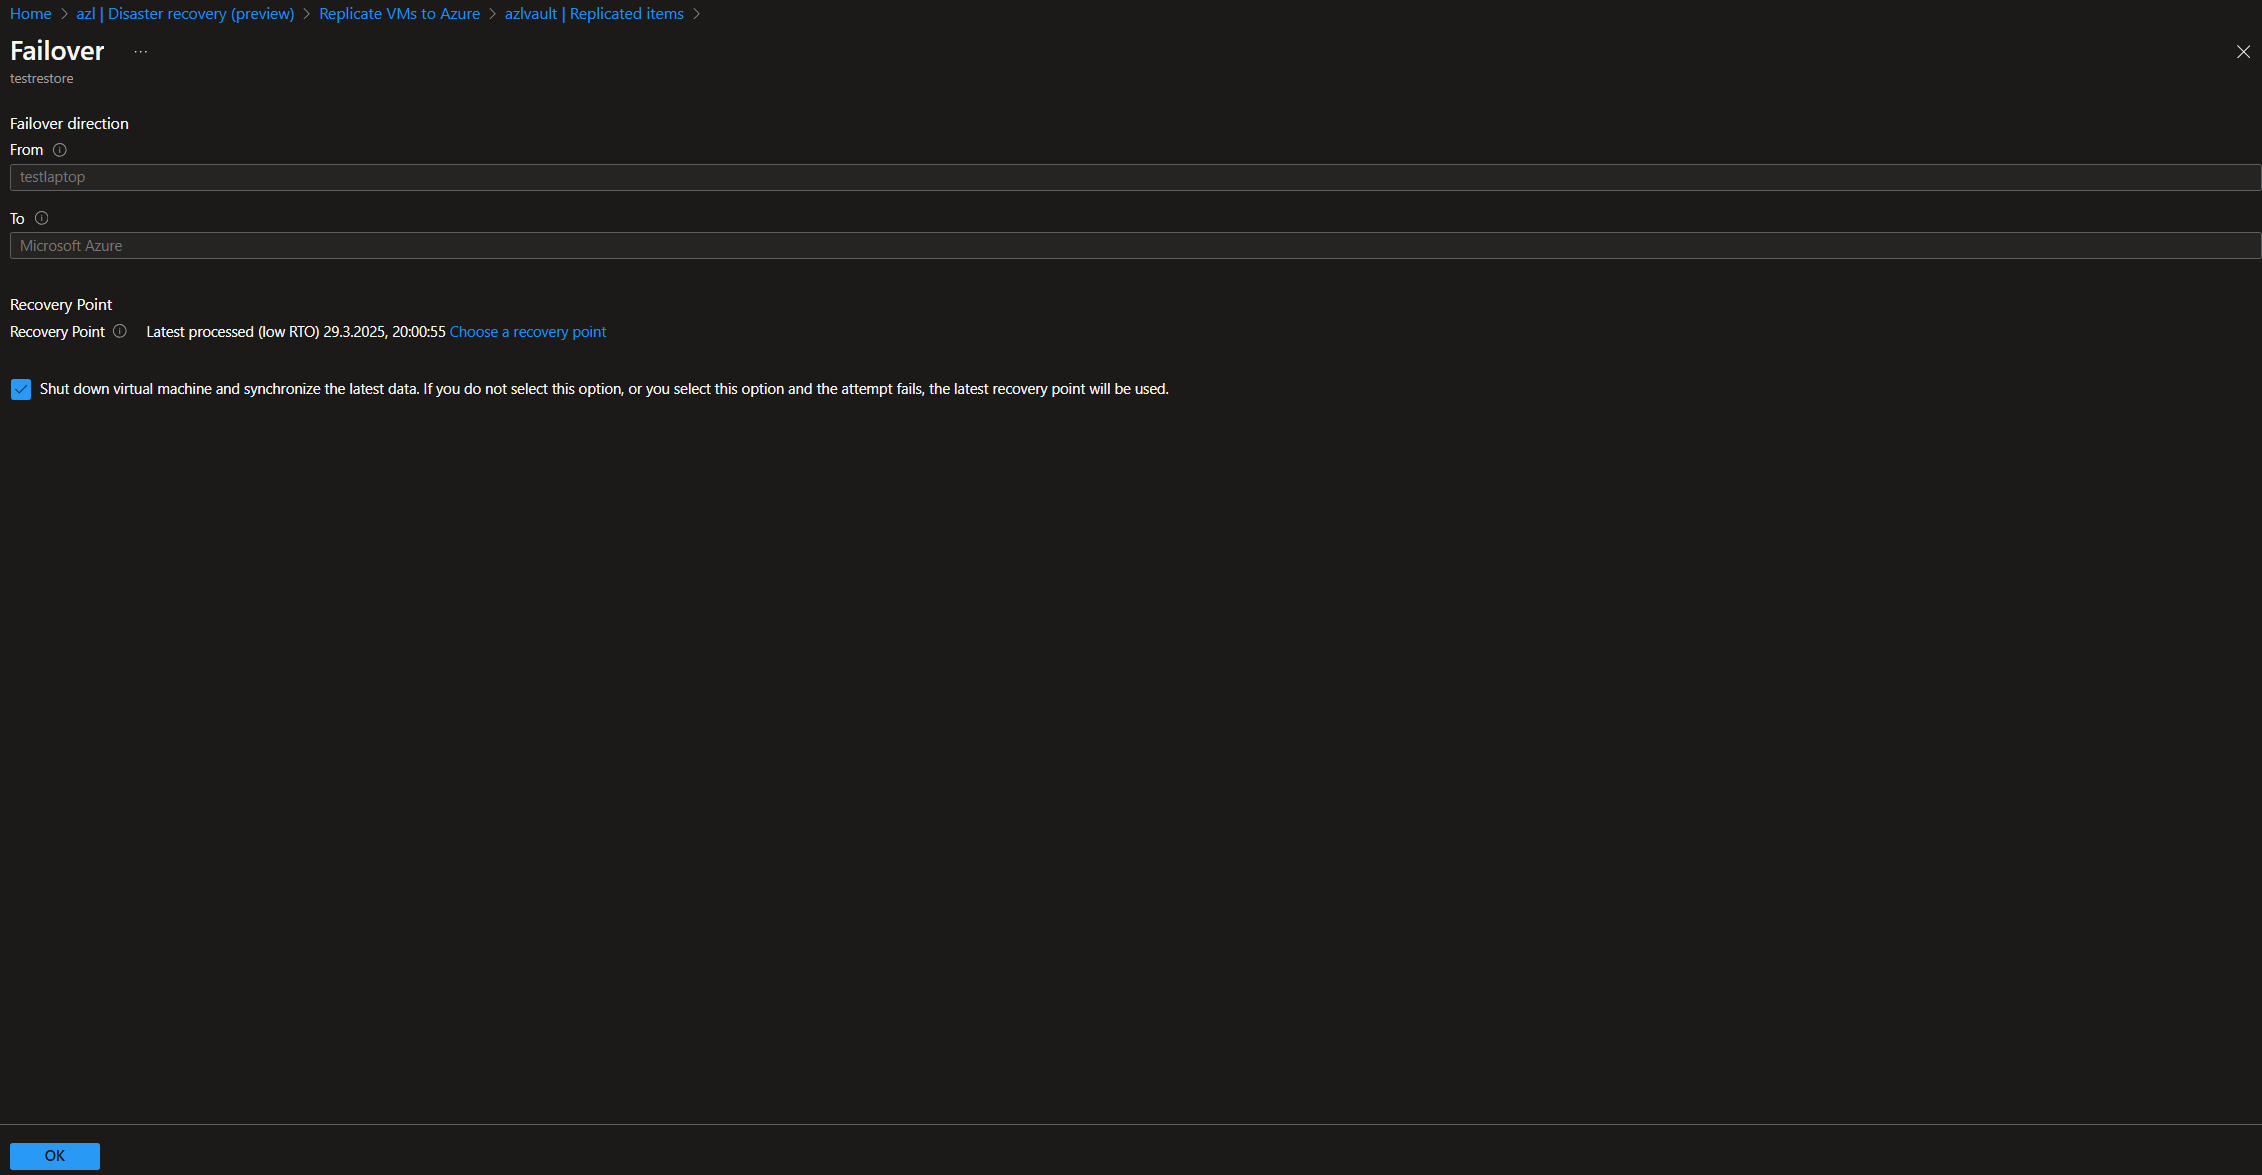
Perform Failover Operations:
Once synchronization is complete, you can execute both test failovers and regular failovers, moving the workloads from Azure Local to Azure directly.
As you can see, this solution is a viable option if you use Azure Local solely as an edge infrastructure with a few critical workloads that you want to secure and keep operational in case of an incident. It is also suitable for single-node infrastructures, as it allows continued operation if connectivity and resource access requirements are met post-failover. A notable strength is the re-synchronization of workloads after failover and the possibility to fail back to the cluster once it is restored. Personally, I would love to see an automatic failover mechanism triggered by incidents, though I understand that not every disaster recovery scenario needs to operate automatically. I also miss a mechanism that would allow syncing different Azure Local clusters using Azure Site Recovery, but maybe this will be possible in the future.
Since this solution is in Preview, it isn’t supported in production by Microsoft and may present certain challenges (such as the need to set WDAC to Audit mode). Nevertheless, in my view, it can be an alternative for environments where no backup is available or where high workload availability is critical. Keep in mind that for the workloads to function correctly afterward, additional considerations such as connectivity and access (via load balancers, DNS, VPNs, etc.) must be addressed.
With this, I conclude the section on Disaster Recovery using ASR. There are additional points in the documentation worth reviewing, such as more granular synchronization groups and prioritizing certain workloads.
Conclusion
Much to my regret, this has been an extremely lengthy and somewhat impractical article (at least in terms of lab integration), but I hope you have gained some insights (or at least compared notes) about my experience in this field. If you’d like to add anything or have me correct any points, feel free to contact me directly via LinkedIn.
I hope your experience goes beyond merely configuring a backup, you must test the restores as well. If you don’t test restorations, you can’t be sure your backups work. Given that Azure Local via Arc Bridge is a somewhat complex solution in this regard, I hope you can plan and define the limitations of your backup strategy.
I wish you a very good weekend, and I’m off to work on the next article: Planning, Sizing, and Migration, which will be the final installment of the Chronicloud saga on Azure Local 😊
Comments